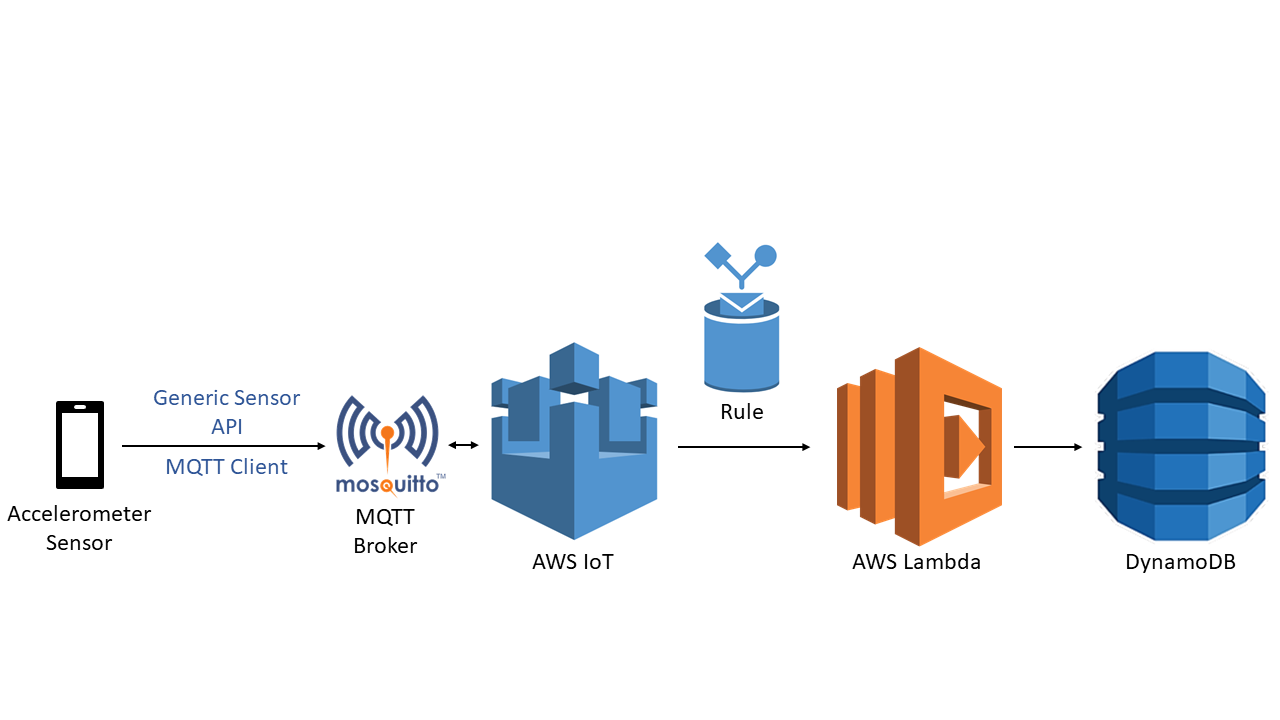
This project builds upon the cloud infrastructure that is developed in these projects:
Application1- Inside Monitor-fe, you must install the Generic Sensor API library by running the following command:
> npm i motion-sensors-polyfill2- And, the library for the MQTT Client. To do that, run this command:
> npm i ngx-mqtt --save3- Create two distinct components, one for each activity recognition type (one component for the activity recognition edge-based, one for the activity recognition cloud-based) using these commands:
> ng g c component-edge-name
> ng g c component-cloud.name
Note: I call the components for the edge-based and for the cloud-based respectively activity-recognition and accelerometer-sensor.
4- Inside the model directory, create these files: activityCloud.model.ts, activityEdge.model.ts, activityEdge.model.ts, activityEdge.response.ts, rootDynamoObj.model.ts.
5- Update all the classes like these. (Remember to update all the informations with your own as is written on the code comments).
Mosquitto MQTT brokerIn the previous project you have just installed Mosquitto, now you just have to edit the config file in this way:
# =================================================================
# Bridges to AWS IOT
# =================================================================

# AWS IoT endpoint
connection awsiot
address a6as4ru7uhh5u-ats.iot.us-east-1.amazonaws.com:8883

# Specifying which topics are bridged
# topic awsiot_to_localgateway in 1
# topic localgateway_to_awsiot out 1
# topic both_directions both 1
topic accelerometer/values both 1

# Setting protocol version explicitly
bridge_protocol_version mqttv311
bridge_insecure false

# Connection to Angular MQTT Client
listener 9001
protocol websockets

# Bridge connection name and MQTT client Id,
# enabling the connection automatically when the broker starts.
cleansession true
clientid bridgeawsiot
start_type automatic
notifications false
log_type all

# =================================================================
# Certificate based SSL/TLS support
# -----------------------------------------------------------------
#Path to the rootCA
bridge_cafile ./AWS-certs/rootCA.pem

# Path to the PEM encoded client certificate
bridge_certfile ./AWS-certs/fc278d0e63-certificate.pem.crt

# Path to the PEM encoded client private key
bridge_keyfile ./AWS-certs/fc278d0e63-private.pem.key
In particolar, this is the new part:
That is according to what we have written inside the app.module.ts:
CreateaDynamoDB Table
Create a DynamoDB table with activityRecognition as partition key and activityTimestamp as sort key. See here if you don’t remember how to do it.
Create a Lambda function.
1- Navigate to AWS Lambda Console.
2- Click on Create function.
3- Enter a name for the function (in my case is my-lambda), then click on Choose or create an execution role, select Create a new role from AWS policy templates, and finally add a role name (in my case dynamodb_lambda_function).
4- Click on Create function.
5- Navigate to IAM Console.
6- From the side menu, navigate to Access management > Roles.
7- Then, click the link of your lambda role (in my case dynamodb_lambda_function).
8- Click ok Add inline policy.
9- Click on Choose a service and select DynamoDB, then, select All DynamoDB actions.
10- Click on Resources.
11- Now, click on Add ARN on the table row, to specify table resource ARN.
12- Fill in the form with Region and Table name, then, click on Add.
13- At the bottom of the page click on Review policy.
14- Insert a policy name (in my case policy-dynamodb_lambda).
15- Finally, click the Create policy button.
16- Going back to the Lambda Console, you can now click on your lambda function and copy the following code inside the Function code:
const AWS = require('aws-sdk');
const docClient = new AWS.DynamoDB.DocumentClient({region: 'us-east-1'});

exports.handle = function (e, ctx, callback) {
    var item;
    if(e.activityRecognition == 'edge'){
        item = e;
    } else {
        var timestamp = e.activityTimestamp;
        var latestX = e.historicMotion.x[e.historicMotion.x.length -1];
        var latestY = e.historicMotion.y[e.historicMotion.y.length -1];
        var latestZ = e.historicMotion.z[e.historicMotion.z.length -1];
        var motionOverall = ((getMotionOverall(e.historicMotion.x) + getMotionOverall(e.historicMotion.y) + getMotionOverall(e.historicMotion.z)) / 3.0);
        var activity = getStatus(motionOverall);

        item = {"activityRecognition": e.activityRecognition, "activityTimestamp": timestamp, "latestX": latestX, "latestY": latestY, "latestZ": latestZ, "motionOverall" : motionOverall.toFixed(2), "activity": activity };
    }
    var params = {
        Item: item,
        TableName: 'UserActivity'
    };
    docClient.put(params, function(err, data){
        if(err){
            callback(err, null);
        }else{
            callback(null, data);
        }
    });
};

var getMotionOverall = function (axis) {
    var sum = 0;
    axis.forEach(element => {
        if(element < 0){
            element = element * -1;
        }
        sum += element;
    });
    return (sum / 60.0);
};

var getStatus = function (movement) {
    if (movement > 90) {
        return 'running';
    } else if (movement > 20) {
        return 'walking';
    } else {
        return 'standing still';
    }
};
Create a Rule
1- Navigate to AWS IoT Console.
2-From the side menu, navigate to Act > Rules, and click on Create.
3- Insert a rule name (in my case accelerometerLambdaRule), and a query (in my case SELECT * FROM accelerometer/values, because my topic name is accelerometer/values)
4-Then, click on Add action and select Send a message to a Lambda function.
5- Click on Configure action.
6- Now, click on Select, and Select your function.
7- Finally, click on Add action and then on Create rule.
DynamoDB queriesOpen Monitor-be and update the index.js like this.
1- Open the Terminal from the directory in which is saved the Mosquitto.config file and run the following command to start the Mosquitto broker (replace mosquitto_bridge.conf with the name of your file):
> sudo mosquito -c mosquitto_bridge.conf -p 18842- Start the frontend app by running this command from the Monitor-fe directory:
> ng serve --host 0.0.0.0 --port 4200 --disable-host-check3- Start the backend app executing the following command from the Monitor-be directory:
> node index.js4- From the browser of your mobile-phone, navigate to http://IP:4200 (where IP is the IP of your pc) to open the web app.
Note: you must have the firewalls disabled on your pc.
AboutThis project has been developed as part of my MSc degree at Sapienza University of Rome for the 2019/2020 Internet of Things course.
Related video on YouTube.


Comments
Please log in or sign up to comment.