

Hardware components | ||||||
 |
| × | 1 | |||
 |
| × | 1 | |||
 |
| × | 1 | |||
 |
| × | 1 | |||
Software apps and online services | ||||||
| ||||||
| ||||||
Hello everyone,
Welcome back to another interesting and easy tutorial after a long time. Sorry guys I was busy in writing very fantastic book regarding Arduino IoT Cloud and I will share the details at the end of this tutorial. so this book writing approx took 1 year and 2 months.
Well back to the point, many years ago I have created a tutorial on temperature and humidity monitoring using Arduino Uno and DHT22. I got approx half million hits on my that article. this is the love from community which is pushing me to work beyond my commitment.
So in this tutorial I am going to demonstrate how to monitor temperature and humidity using SeeedStudio tiny development MKRWiFi 1010 and how to integrate it with Arduino IoT Cloud so you guys can take the benefit of IoT Platforms and keep yourself updated with your room/outdoor temperature and humidity anywhere in the world with the help of Arduino IoT Cloud.
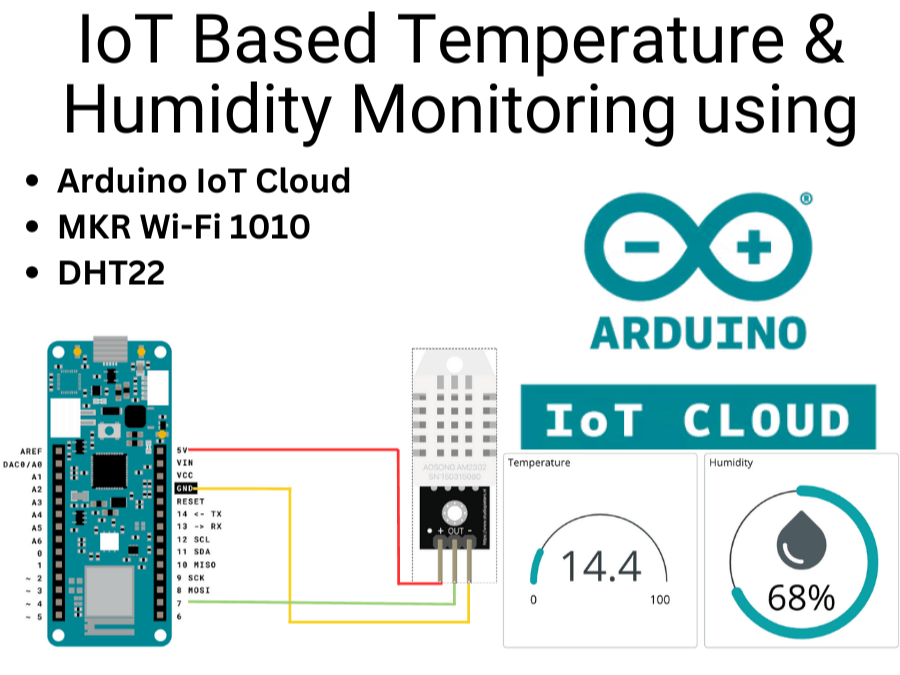
Buckle up, guys, and collect the MKR WiFi 1010 and DHT22 with male-to-male cables. Connect the DHT22 to the MKR WiFi 1010 as per the below diagram.
It's time to navigate towards Arduino IoT Cloud https://app.arduino.cc/ if you didn't have account then just create the account. Now our first step is to create Thing it's basically a container in Arduino IoT Cloud which holds the Device, Cloud variables, Code and Meta data of of IoT node. Click on Thing menu which is available in the left side bar as per below image.
Now click on + CREATETHING button which is shown in the center of the page as per below image.
After that you will see a new page where you will fin different tabs and sections as just like below diagram. this is the main page where we need to setup all the things like variables, device, network configuration, code and etc.
Above picture is marked with red boxes and I assigned the numbers to them and below is full explanation of each step which is marked by number.
1- Click on "Untitled" and select rename and assign the name to Thing.
2-In this section we will add the cloud variables and in this tutorial we required 2 cloud variables one for temperature and second for humidity.
3-Attach the device to Thing
4-Configure the Network Settings
5-Navigate to the Sketch tab and add the code for MKR Wi-Fi 1010 and upload the code.
Adding Variables to ThingIn this subsection, we will add the cloud variables to Thing. Click on the ADD button, which is available in the Cloud Variables section. and you will see the pop-up where you need to provide the name. Select the type of variable from the drop-down menu. Right now, I am not going to talk about other options due to time limitations. Finally, click on the "ADD VARIABLE" button and repeat the same procedure for the humidity variable, but select the relative humidity type from the drop-down menu as per below image.
Before adding a device you should have "Arduino Create Agent" Installed and running on your machine. Then click on Select Device button under Associated Device section. Popup will appear and list all of the devices if any device is associated in Arduino IoT Cloud else you have option to Add a new Device.
Click on "SET UP NEW DEVICE" and select the "Arduino" option. In the next step, Arduino will automatically detect the supported Arduino development board and display the name and port of the development board as shown in the below picture. Before this process, try to connect MKR Wi-Fi 1010 to your machine. Click on the "CONFIGURE" button. It will take a few seconds to configure your development board with the necessary configuration..
Congrats your Device has been added and attached successfully to Thing.
Configure Network for ThingAfter adding the device it's time to configure the Wi-Fi Settings. Click on Configure button under Network section on the Thing main page. Here you will see the popup just like below image and you need to provide Wi-Fi Name and it's Password.
After passing the first four steps, our Thing page looks like the below image. In these 4 steps, we assigned the name to the thing, created cloud variables, associated the device with the thing, and, at the end, added the Wi-Fi configuration.
Now it's time to play with the code. Just click on the Sketch tab and you will see the inline code editor. copy the code from the end of this page under code section and paste into the editor. and click on upload button which is marked by red rectangle in below image. it will take few seconds for code verification and uploading to development board.
Congrats now your devices is up and running and successfully sending the values to Arduino IoT Cloud.
Dashboard creationIn the previous tutorial, we just created and set up the thing. Now it's time to visualize the sensor readings. For this, we need to setup the dashboard. Click on the Dashboards menu, as shown in the below picture.
Now you will see the Dashboard page just like below image and click on + CREATE DASHBOARD.
You will see the new tab where you can setup the control widgets to visualize your sensor values. But here I marked down some important icons and buttons with numbers.
1- Click Untitled to rename and assign a name to your Dashboard
2-Eye icon is view mode while edit icon allows you to add/update the widgets and their settings.
3-ADD button is control drop down where you will find plenty of control widgets such as gauge, charts, buttons which will help you to visualize your sensors data and control.
4-Reize icon will be used to resize the control and lock the alignment while mobile icon is used to prepare your dashboard according to mobile device, as by default you are creating dashboard for desktop.
Adding Widgets to DashboardNow it's time to add some widgets to visualize our Temperature and Humidity values. for Temperature I will use Gauge widget and for Humidity Percentage widget. Click on the ADD button and search for Gauge widget. After that you will see the popup just like below image and Assign the Name to widget and Link the Temperature cloud variable.
After giving the Name to widget control and linking the cloud variable setup will look like below image. just click on "DONE" and you will be good to go.
Repeat the same procedure for Percentage Widget and also try to explore other display values widget controls like Values, Charts and etc widgets. Now the final Dashboard has been ready for your view just like below image which is showing both Temperature and Humidity values.
Download the Arduino IoT Cloud app on your Android/Apple via Play/App store and login with your account and see the dashboard on fingertips for latest update and alerts.
Now it's time to talk about my Arduino IoT Cloud for Developers book which is by the available at amazon as well as on PacktPub. Below are the URLS for your purchase.
The book has 14 chapters where you will learn about Internet of Things Architecture, Arduino IoT Cloud hierarchy as it's totally different from other cloud platforms such as ThingSpeak, Cayenne myDevices and etc. Next you will learn all the Cloud Platform options and dashboard widgets which is very mandatory to learn all the stuff before getting started with the Arduino IoT Cloud.
I have created 6 different projects in the book which are using different types of development boards which includes MKR Wi-Fi 1010, ESP8266, XIAO ESP32C3 and etc. You will learn Enviromental Monitoring, Smart Agriculture, Smart Health, IoT for assets tracking using GSM as well as with LoraWan, Smart Home where we integrated smart lamp with Amazon Alexa Dot Echo with in couple of minutes without any code to Arduino IoT Cloud. I Hope you will will enjoy my book just like this tutorial.
For developers and IoT engineers, I have written two special chapters that focus on how to use the Arduino IoT Cloud API and Arduino Cloud CLI to integrate their solution with other 3rd party clouds and services, and Arduino Cloud CLI helps engineers and administrators to automate and manage bulk deployments using the command-line tool.


Comments