

Hardware components | ||||||
 |
| × | 1 | |||
| × | 1 | ||||
 |
| × | 1 | |||
Software apps and online services | ||||||
 |
| |||||
| ||||||
Years ago I did my first variometer, with success and joy, so this is my second one with improved characteristics: smaller in size (around 36.5 x 54.5mm), with solar panel, changeable settings with a remote control, SMD, even more joy.
Is an instrument used by pilots during flights (sailplane, paraglider, hanglider, balloon, etc.) to help finding the core of the thermals and climb the air more and better.
Is a very sensitive barometer that emits sounds when climb (going up) and also when sink (going down). Sounds are simple bip-bip two per second or more during climb (more climb rate = higher frequency bips): it is so sensitive that it starts beeping just after a few centimeters (!) per second; you may try slowly lifting your arm holding in the hand the vario to obtain the sound. In case of sink it emits long beeps at -2 m/sec or more.
- Arduino Pro Mini 3.3V board
- BMP280 barometric sensor board
- 5V Solar panel
- DO214AC schottky diod SMD
- Mini USB-B PCB connector SMD
- 4.7uF electrolytic capacitor SMD
- 4.7uF capacitor SMD
- 2 x 470n capacitor SMD
- Resistors: 2k, 47k, 5 x 10k SMD
- Blue mini 3mm LED
- MCP73831 charger chip SMD
- On/Off switch
- LIR1654 3.6V 120mAh LiPo battery
- Passive 12x12x3mm piezoelectric buzzer (Murata PKLCS1212E4001-R1) SMD
- SN74LVC1G00 dual NAND logic port chip SMD
- VS18388 infrared LED sensor
- 2 x small insulating sheets (i.e. Kapton tape)
- Enclosure box and cover (2 screws, 2 spacers, 2 nuts, velcro, cord)
- (Remote Control for Vario settings programming)
- (FTDI232 3.3V USB to serial board for Arduino programming)
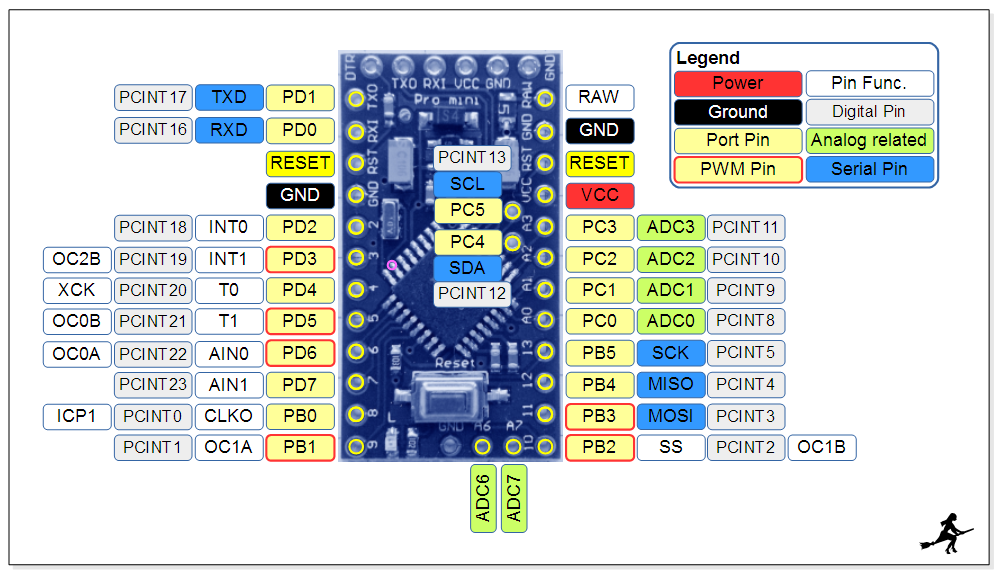
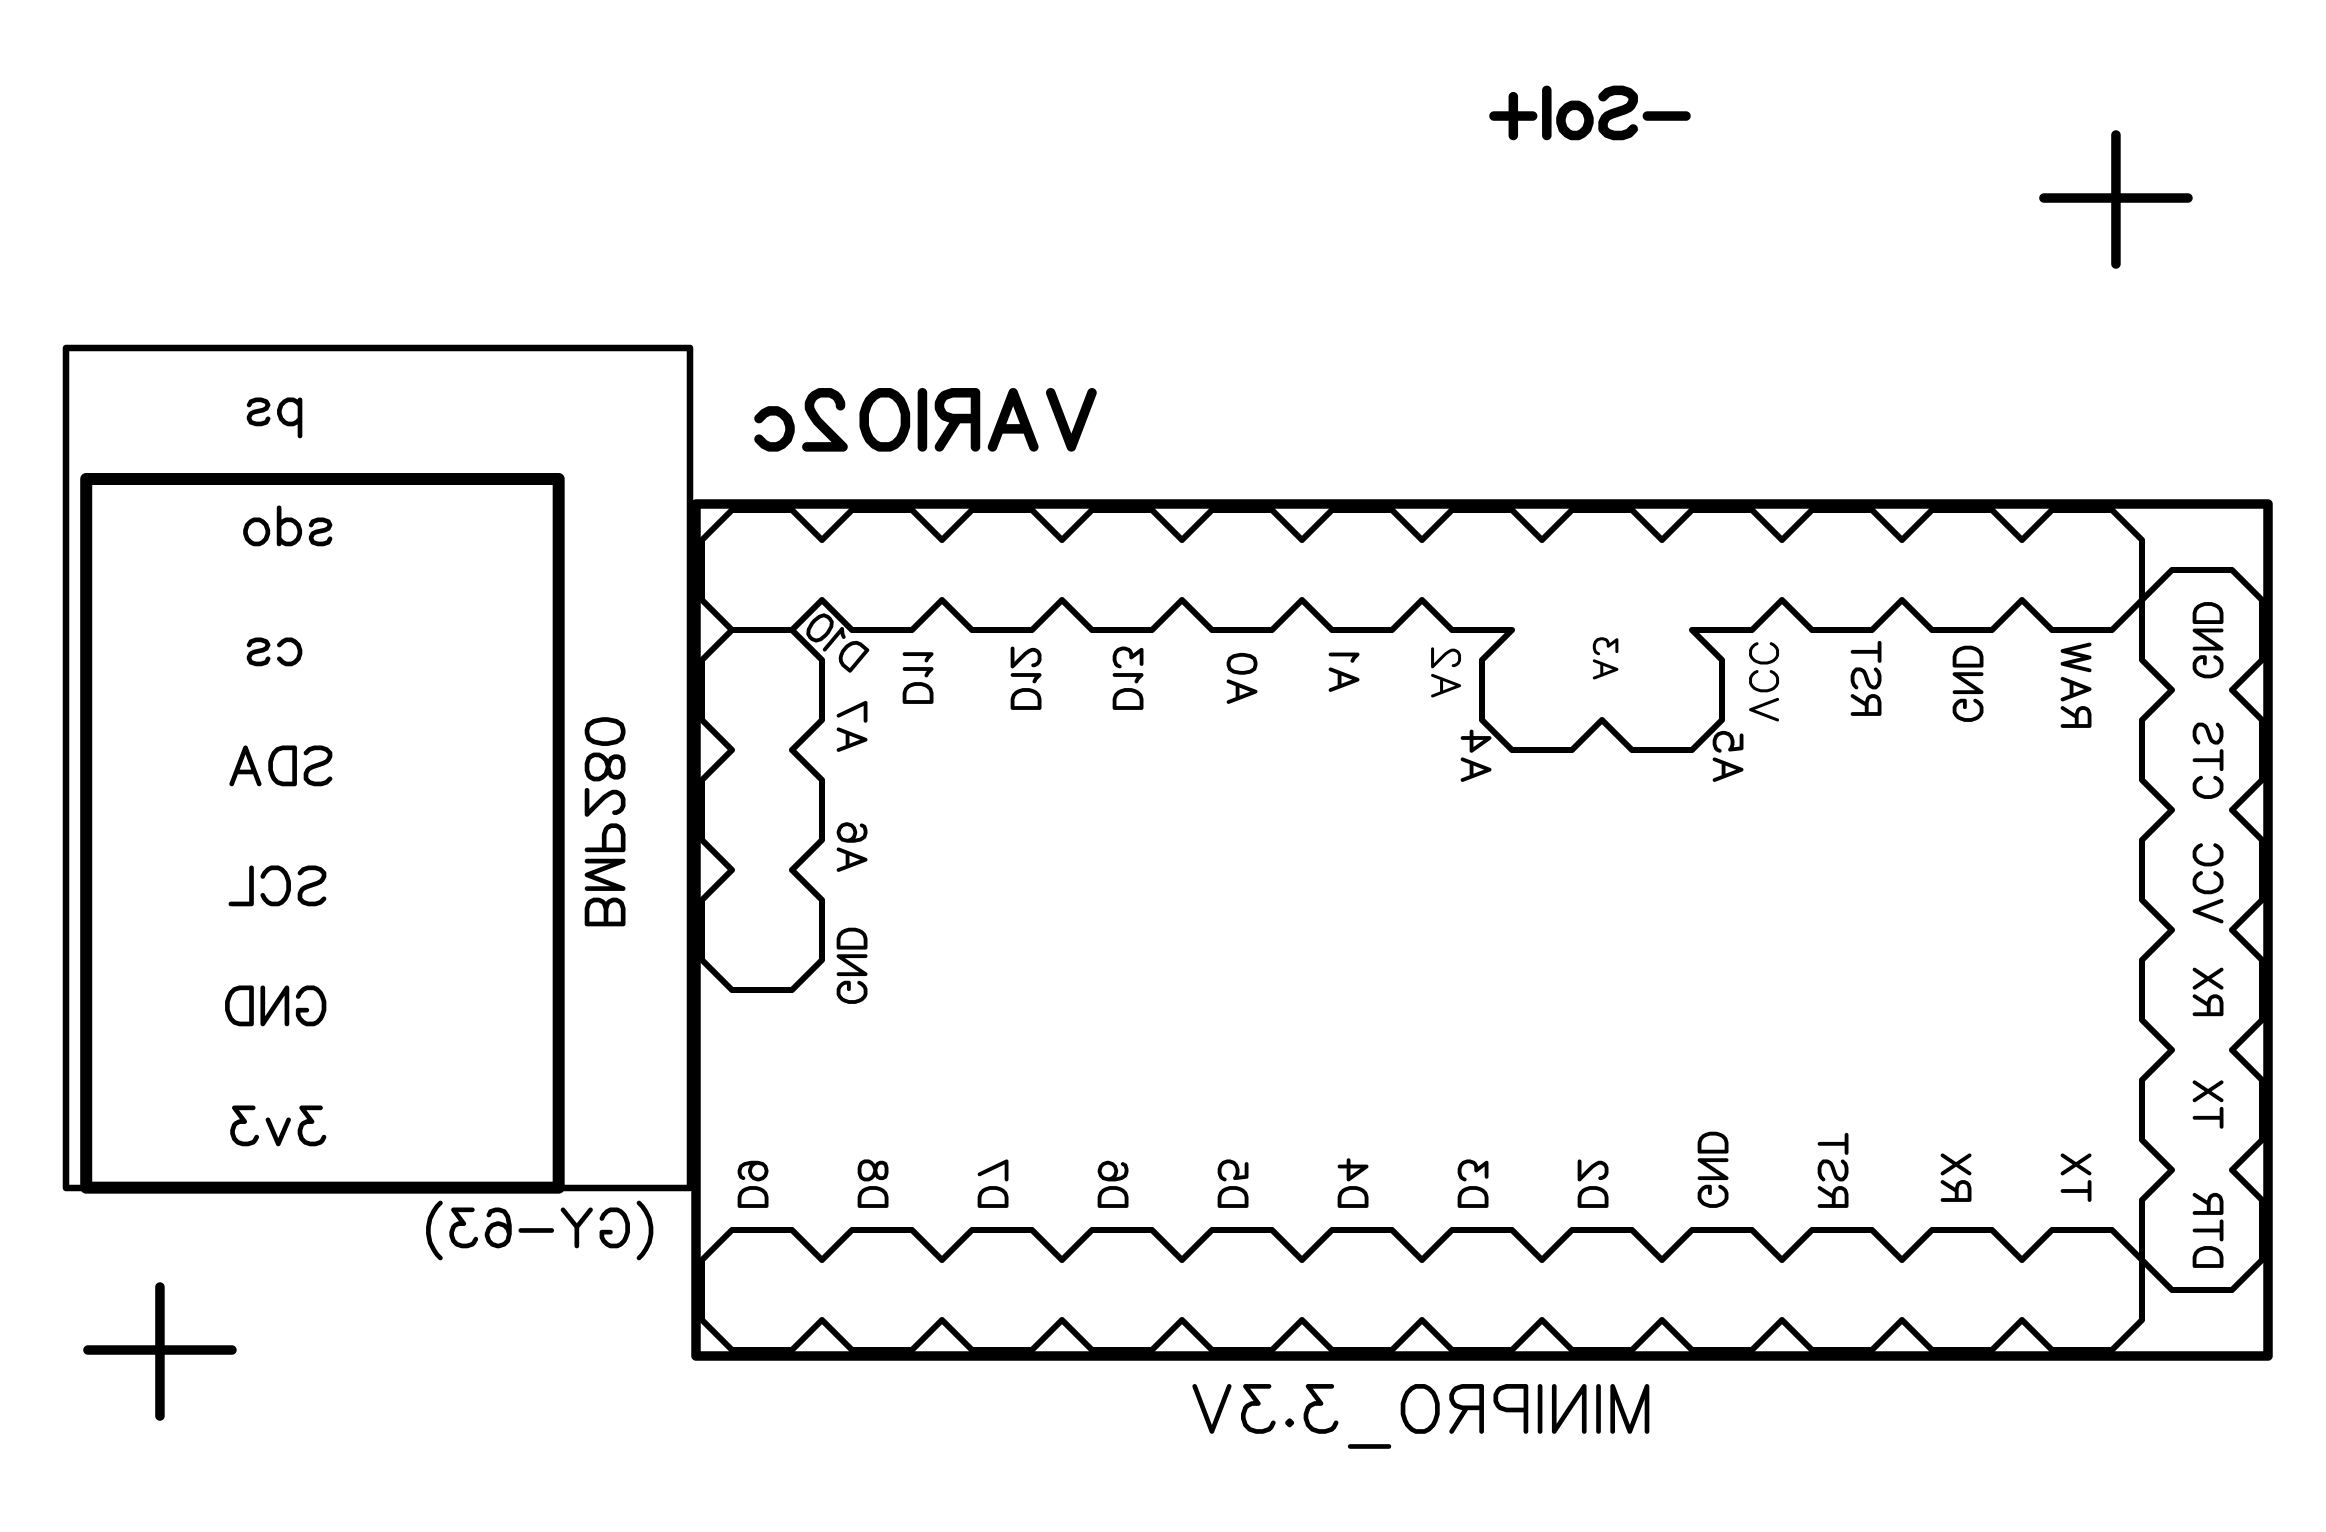
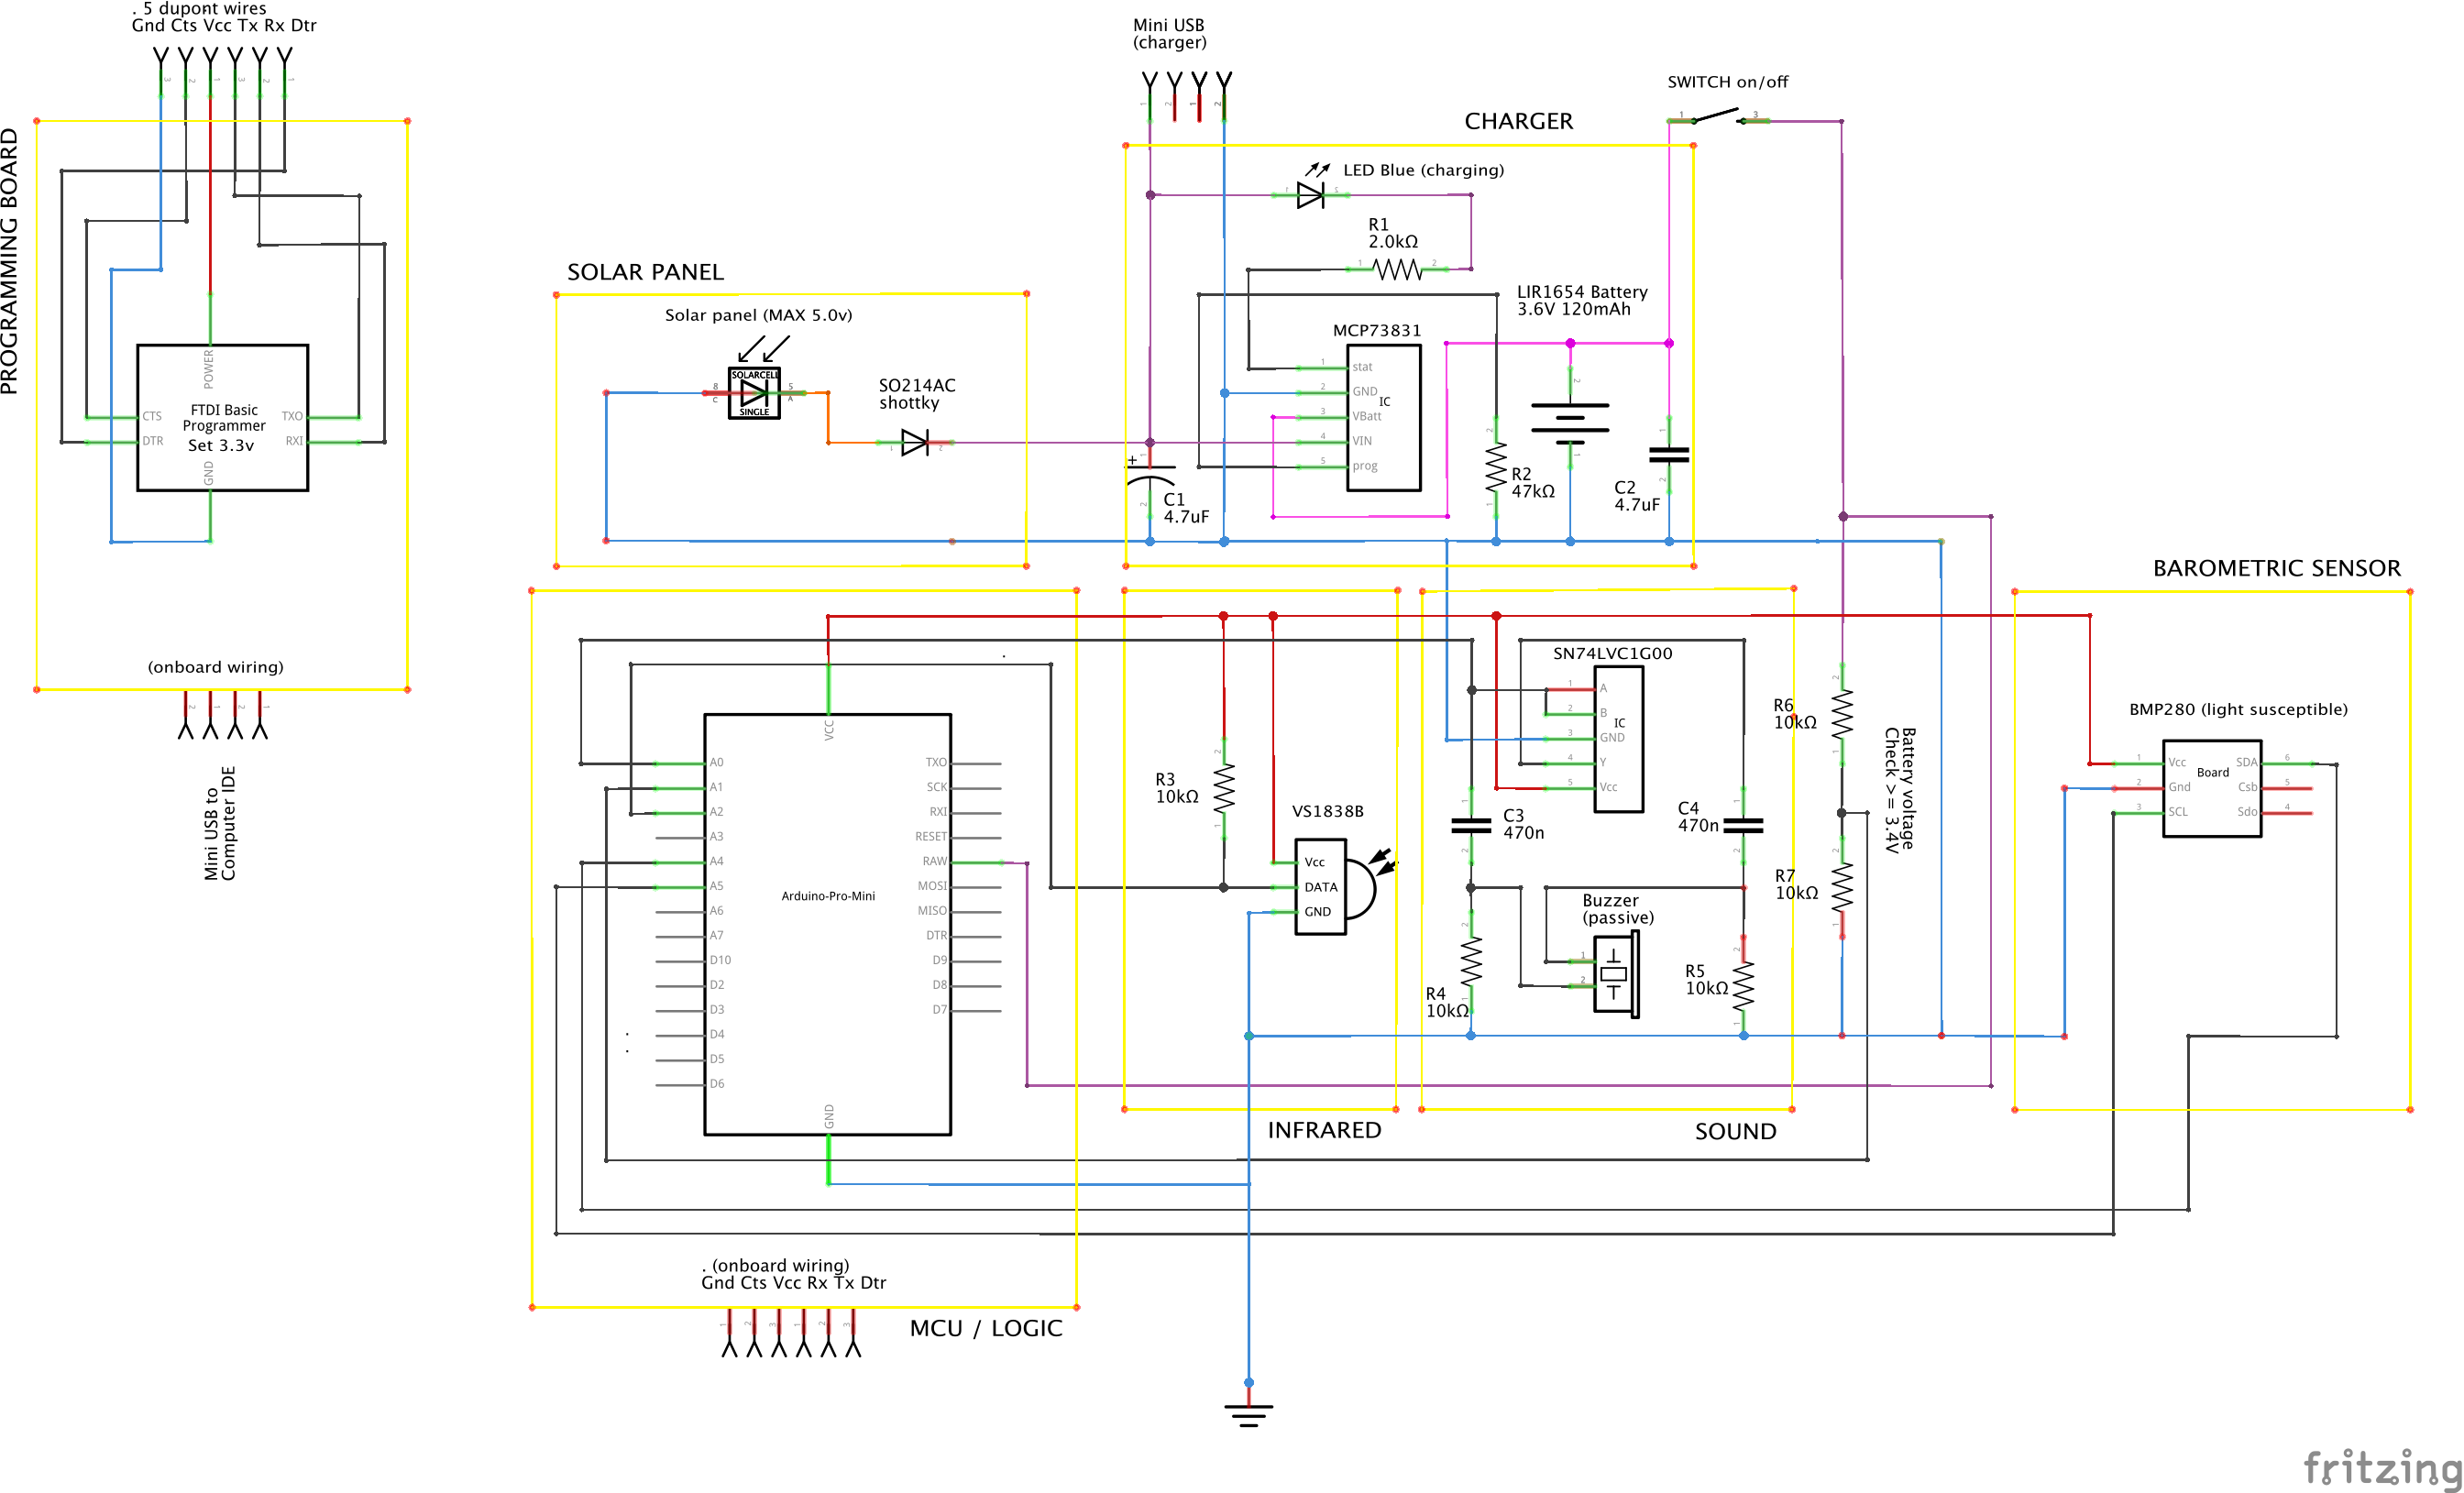
The core of the circuit is the Arduino Pro Mini microcontroller, it works at 3.3V so whole circuit work at the same voltage. To pass the sketch from Arduino IDE to the micro you need a FTDI232 board (USB->serial communicator) set the jumper at 3.3V of course. You could place and solder the Arduino board by the way of small pieces of wire like bridges or grind both edges to have castellated edges: it needs some practice and precision for this delicate operation. Remember to put a piece of insulating sheet between PCB board and Arduino according to Arduino size (i.e. Kapton tape).
The sensor is a BMP280 board but you could change it with a GY-63 (MS5611 sensor) because I provided room for its board too, the pinout is the same, but you need to modify the code in this case. Barometric sensor is light susceptible, so to have stable/accurate readings and avoid unwanted/unexpected bips do not use the circuit in transparent enclosure and avoid direct strong light; I suggest to put a black hat over it internally (a piece of foam or neoprene); you could place and solder the sensor board by the way of small pieces of wire like bridges or grind the edge to have a castellated edge: it needs some practice and precision for this delicate operation. Remember to put a piece of insulating sheet between PCB board and the sensor board according to BMP280 board size (i.e. Kapton tape). Do not forget to solder A4 and A5 pins to Arduino board with two wires, and the 7 pass-though vias of the PCB too; the solar panel wires, black and red, need to be connected to the two spots (-) Sol (+) present on the top face of the PCB.
An infrared LED receiver VS1838b with a simple and popular remote control is used for changing vario settings (see the codes below).
For the solar panel I used an old one from a broken Renschler Solario, it provides the necessary 5V at its best. I want to spend some words about this: the german Uwe Renschler has been a popular variometer producer, a meticulous technician, an "artisan" of electronics. All free flying pilots, me first, would to thanks to him for his contribute to our world. I have been a reseller in Italy of his product an inspiration for this my variometer project. Since many many years he used for his Solario circuit a super-capacitor instead of a battery, inimitable!
The MCP73831 chip provides to recharge the LIR1654 3.6V 120mAh LiPo battery both USB or solar panel. The blue LED is on when charging. A schottky diod is used after the panel due to its low drop voltage characteristics.
To produce the sounds it is an SMD passive buzzer. To almost double the signal level I did a "trick" with a NOT port (SN7400 NAND) and two high-pass filters, so the signal has no reference to ground but half wave is passed to the first buzzer pin, and half wave to the second pin... It should give more last life to the buzzer as well, they say.
Because I reused a solar panel I already had, I built the enclosure around it. You may find the 3D files below to produce the box by yourself, bottom cover included. Two screws, spacers and nuts will hold the circuit in place. To keep in place the solar panel you may use a little amount of glue or two little pieces of transparent adhesive tape (my choice). There are some holes in the box for LED, USB port, the cord, the I/R receiver, the on/off switch, for the barometric sensor and for the sound.
What we need is the relative change of altitude: the loop() reads many times per second the altitude and collects its value in TotAlt, the number of values in TotNr; every half a second or less (SampleInterval) it calculates the average change of altitude and proceeds to emit bip-bip or long beep considering settings. This simple way for filtering/calculating data is good enough; years ago, with my first vario project, I tried the interesting Kalman filtering way, and also the complicate Madgwick and Mahony filtering algorithms without significant benefits for this project purposes.
Notes: install IRremote.h library version 2.6.1 (internally is written 2.0.1); before compiling adjust flags in IRemote.h (lines 43...98) according to your remote control: for the one I used here (see picture below) I set line 49 as "#define DECODE_NEC 1" setting the others to 0 value (not line 99, leave it at 1). Avoid to use remote control under direct sun light and during sounds, it could be less responsive; with other remote control you have to adj button IR codes in function readIRRemote() too;
Libraries: NewTone Library - v1.0 01/20/2013, IRremote - Version 2.0.1 June 2015, Adafruit BMP280 Library 2.6.8 files 30.05.2023 20:00
At line number 73 "isDebug = false;" you may change from "false" to "true" to have on the serial monitor debug data out at 115200 speed.
- Up... (lift minimum rate, cm/sec, 20=0.2m/sec) -> minlift (5-199)
- UpUp... (increment of frequency bip during lift, 200=200Hz per m/sec) -> incremUU (1-250)
- Down... (sink rate alarm, cm/sec, 200=-2m/sec) -> sinkrate (5-999)
- #... (lift sound base frequency, 2900 Hz, going up) -> LiftHz (600-4000)
- *... (sink sound base frequency, 200 Hz going down) -> SinkHz (160-600)
- Right... (bip frequency added to lift rate, i.e. 20=2Hz) -> bipFreqAdd (1-50)
- Left... (% dutycycle of silence after beep, 50=50%) -> dutycycle (10-100)
- LeftLeft... (sample interval in millisec, 400, submultiple of 1000) -> SampleInterval (50-500)
For my personal use I choose the first settings below as basic standard setup; for more responsiveness try the second, for more peaceful sounds try the third. So here there are I/R buttons suggested codes sequences you may adapt to your preferences:
- 1) - Basic standard settings: Up 20 ok, Down 200 ok, # 2900 ok, * 200 ok, right 20 ok, left 50 ok, UpUp 200 ok, LeftLeft 400 ok
- 2) - if you like more sound changes, more sensitivity, in frequency bips and sound frequency (i.e. in very low air conditions with stability), I suggest these changes against the first list: Up 10 Ok, UpUp 300 Ok, Right 40 Ok, Left 20 Ok, LeftLeft 250 Ok
- 3) - if you like a more peaceful instrument with less stressing sounds, (i.e. in a turbulent air conditions with instability), I suggest these changes against the first list: Up 50 Ok, UpUp 150 Ok, Right 10 Ok, Left 75 Ok, LeftLeft 500 Ok
By the way of the remote control you could choose any values but take in account, for the bips, the buzzer "best & loud" sound is around 1000Hz and 2900Hz due to its construction characteristics; the sound level should be fine, but if it is too high for you, you could change the frequency to have better feeling (i.e. around 800Hz).
Setting are saved to the internal EEPROM so they are permanent even after power off till you change something with the remote control. During settings change you will have sound confirmation if correct in the allowed parameters range.
The two 10k resistors R6 and R7 work as voltage divider to test battery voltage. LiPo are known to be critical when discharged below 3.2v for this reason every 30 seconds the function "checkVIn()" is called and in case of low voltage the buzzer will inform you with some short bips in a second. Do not wait too long to switch off or recharge soon with cable or solar power!
I never had low battery during a flight. Someone suggested to unsolder the Arduino onboard LED, that is "useless", and spare energy in this way...
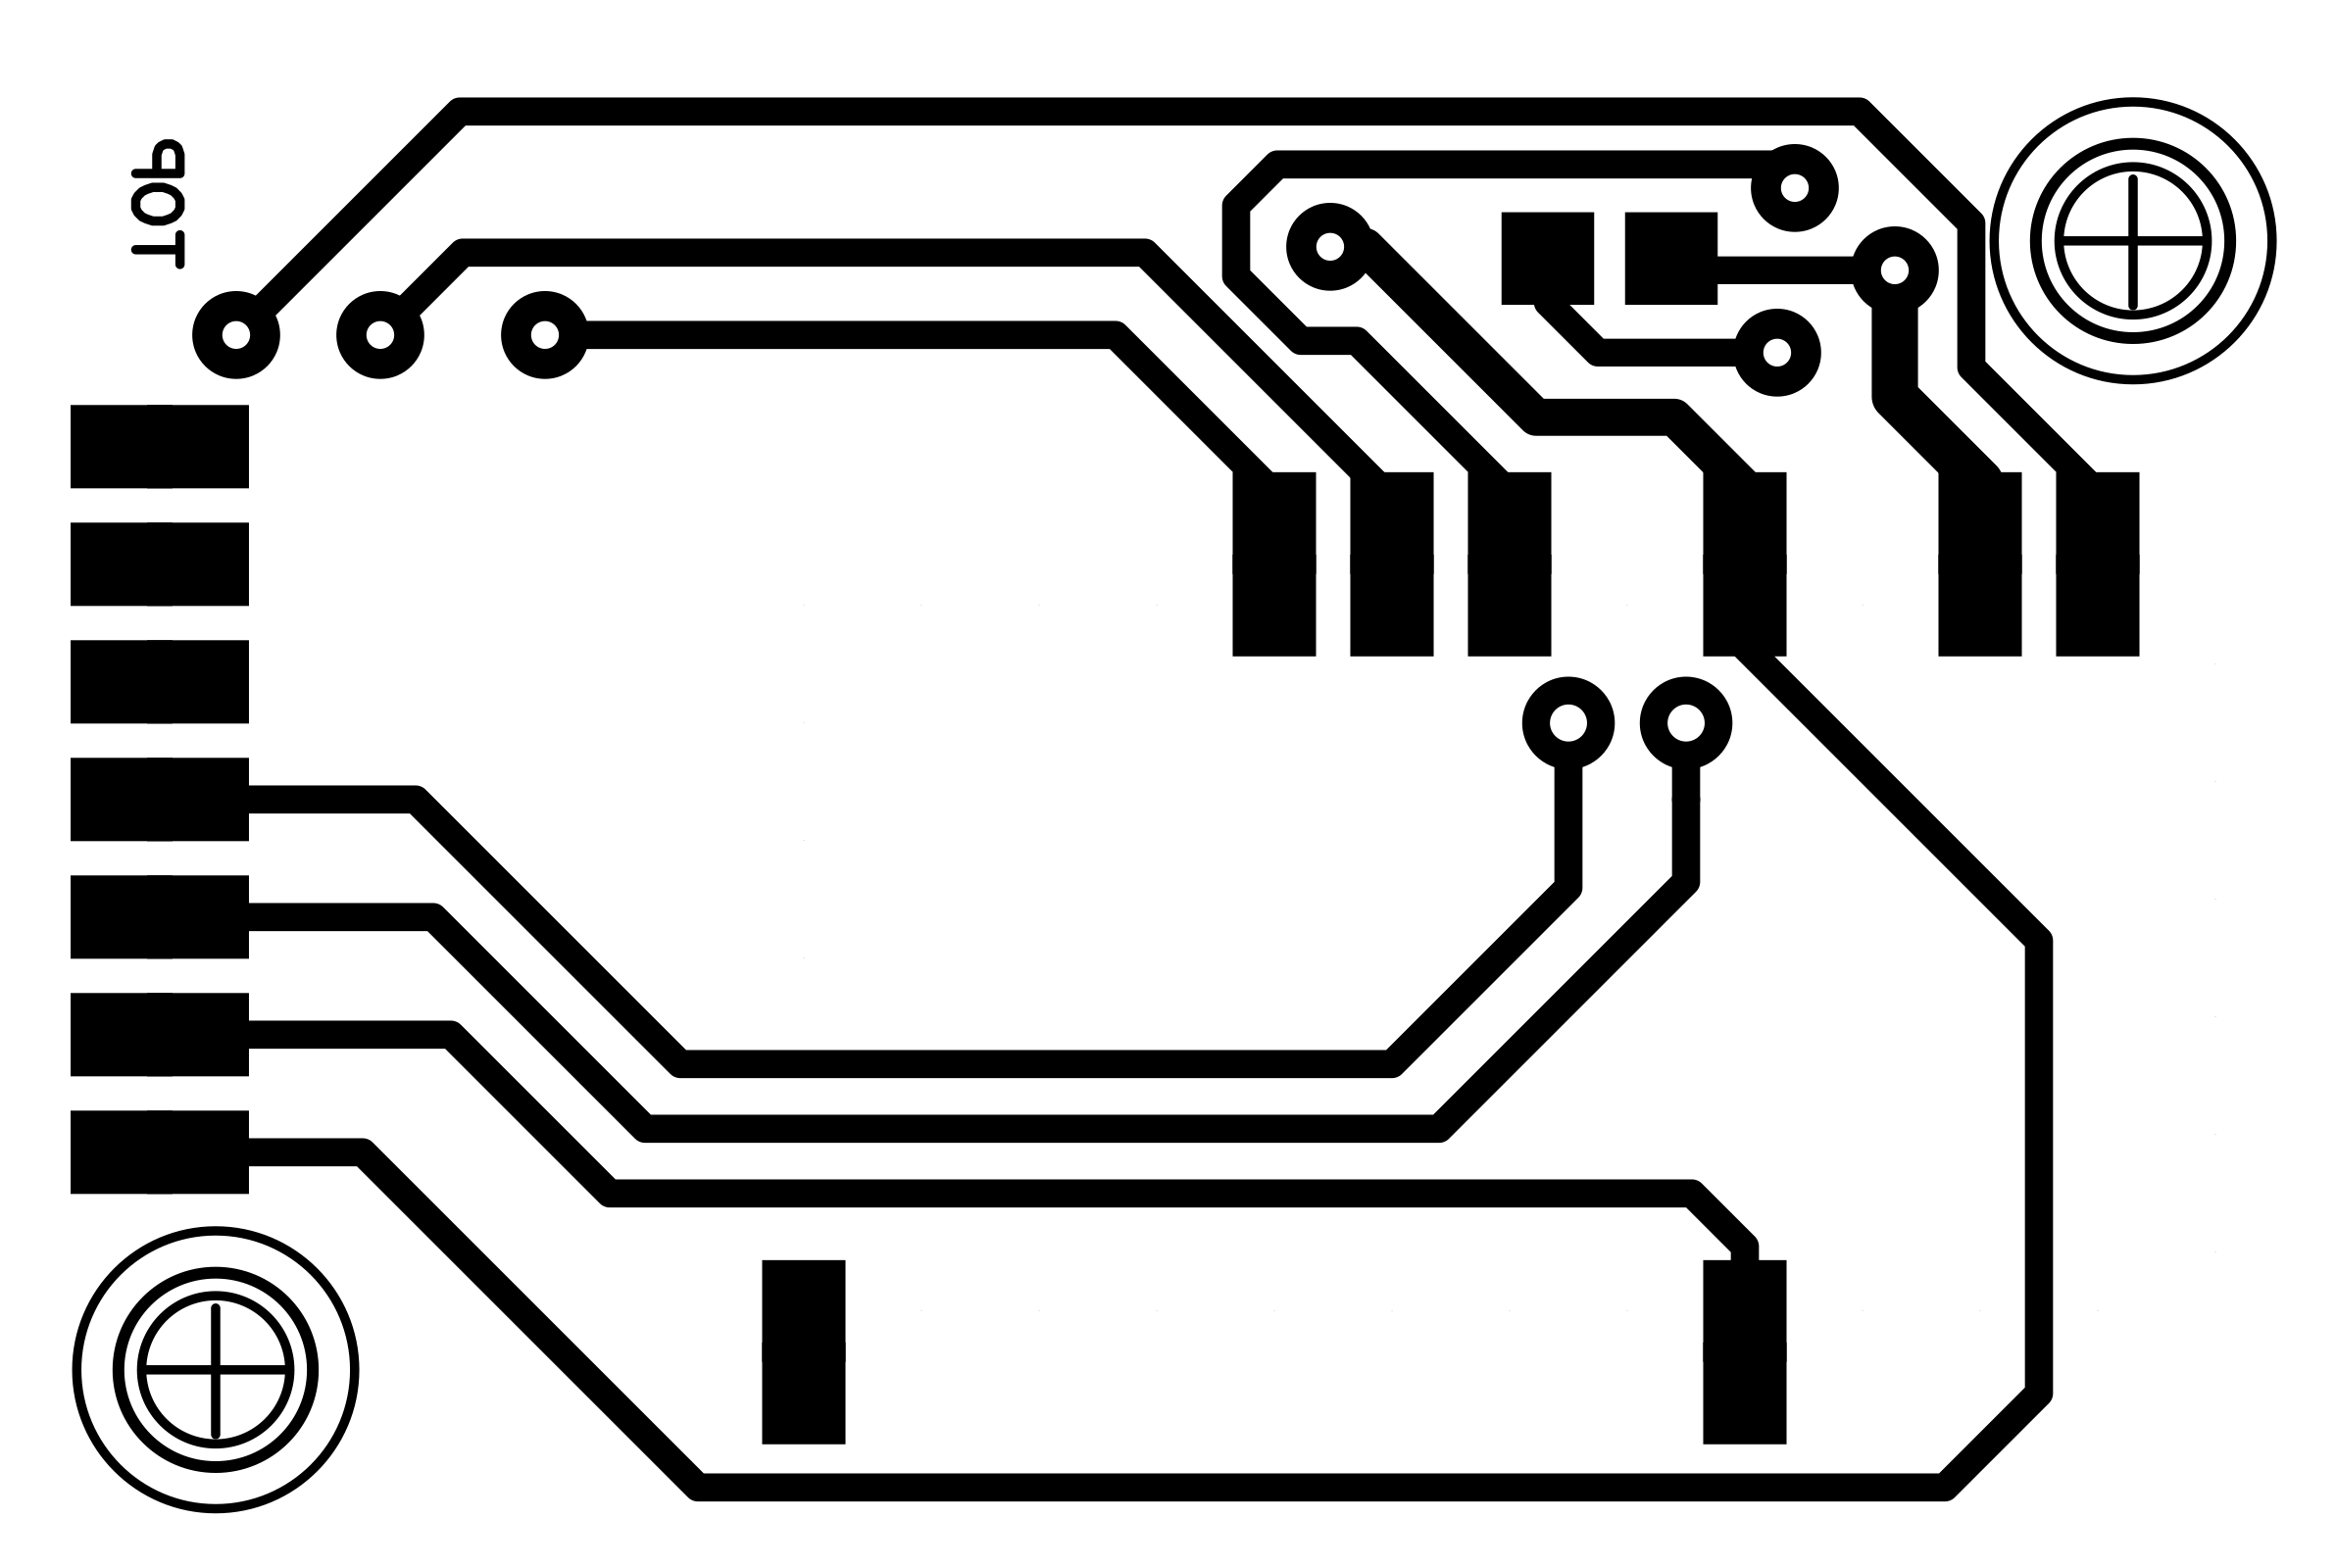
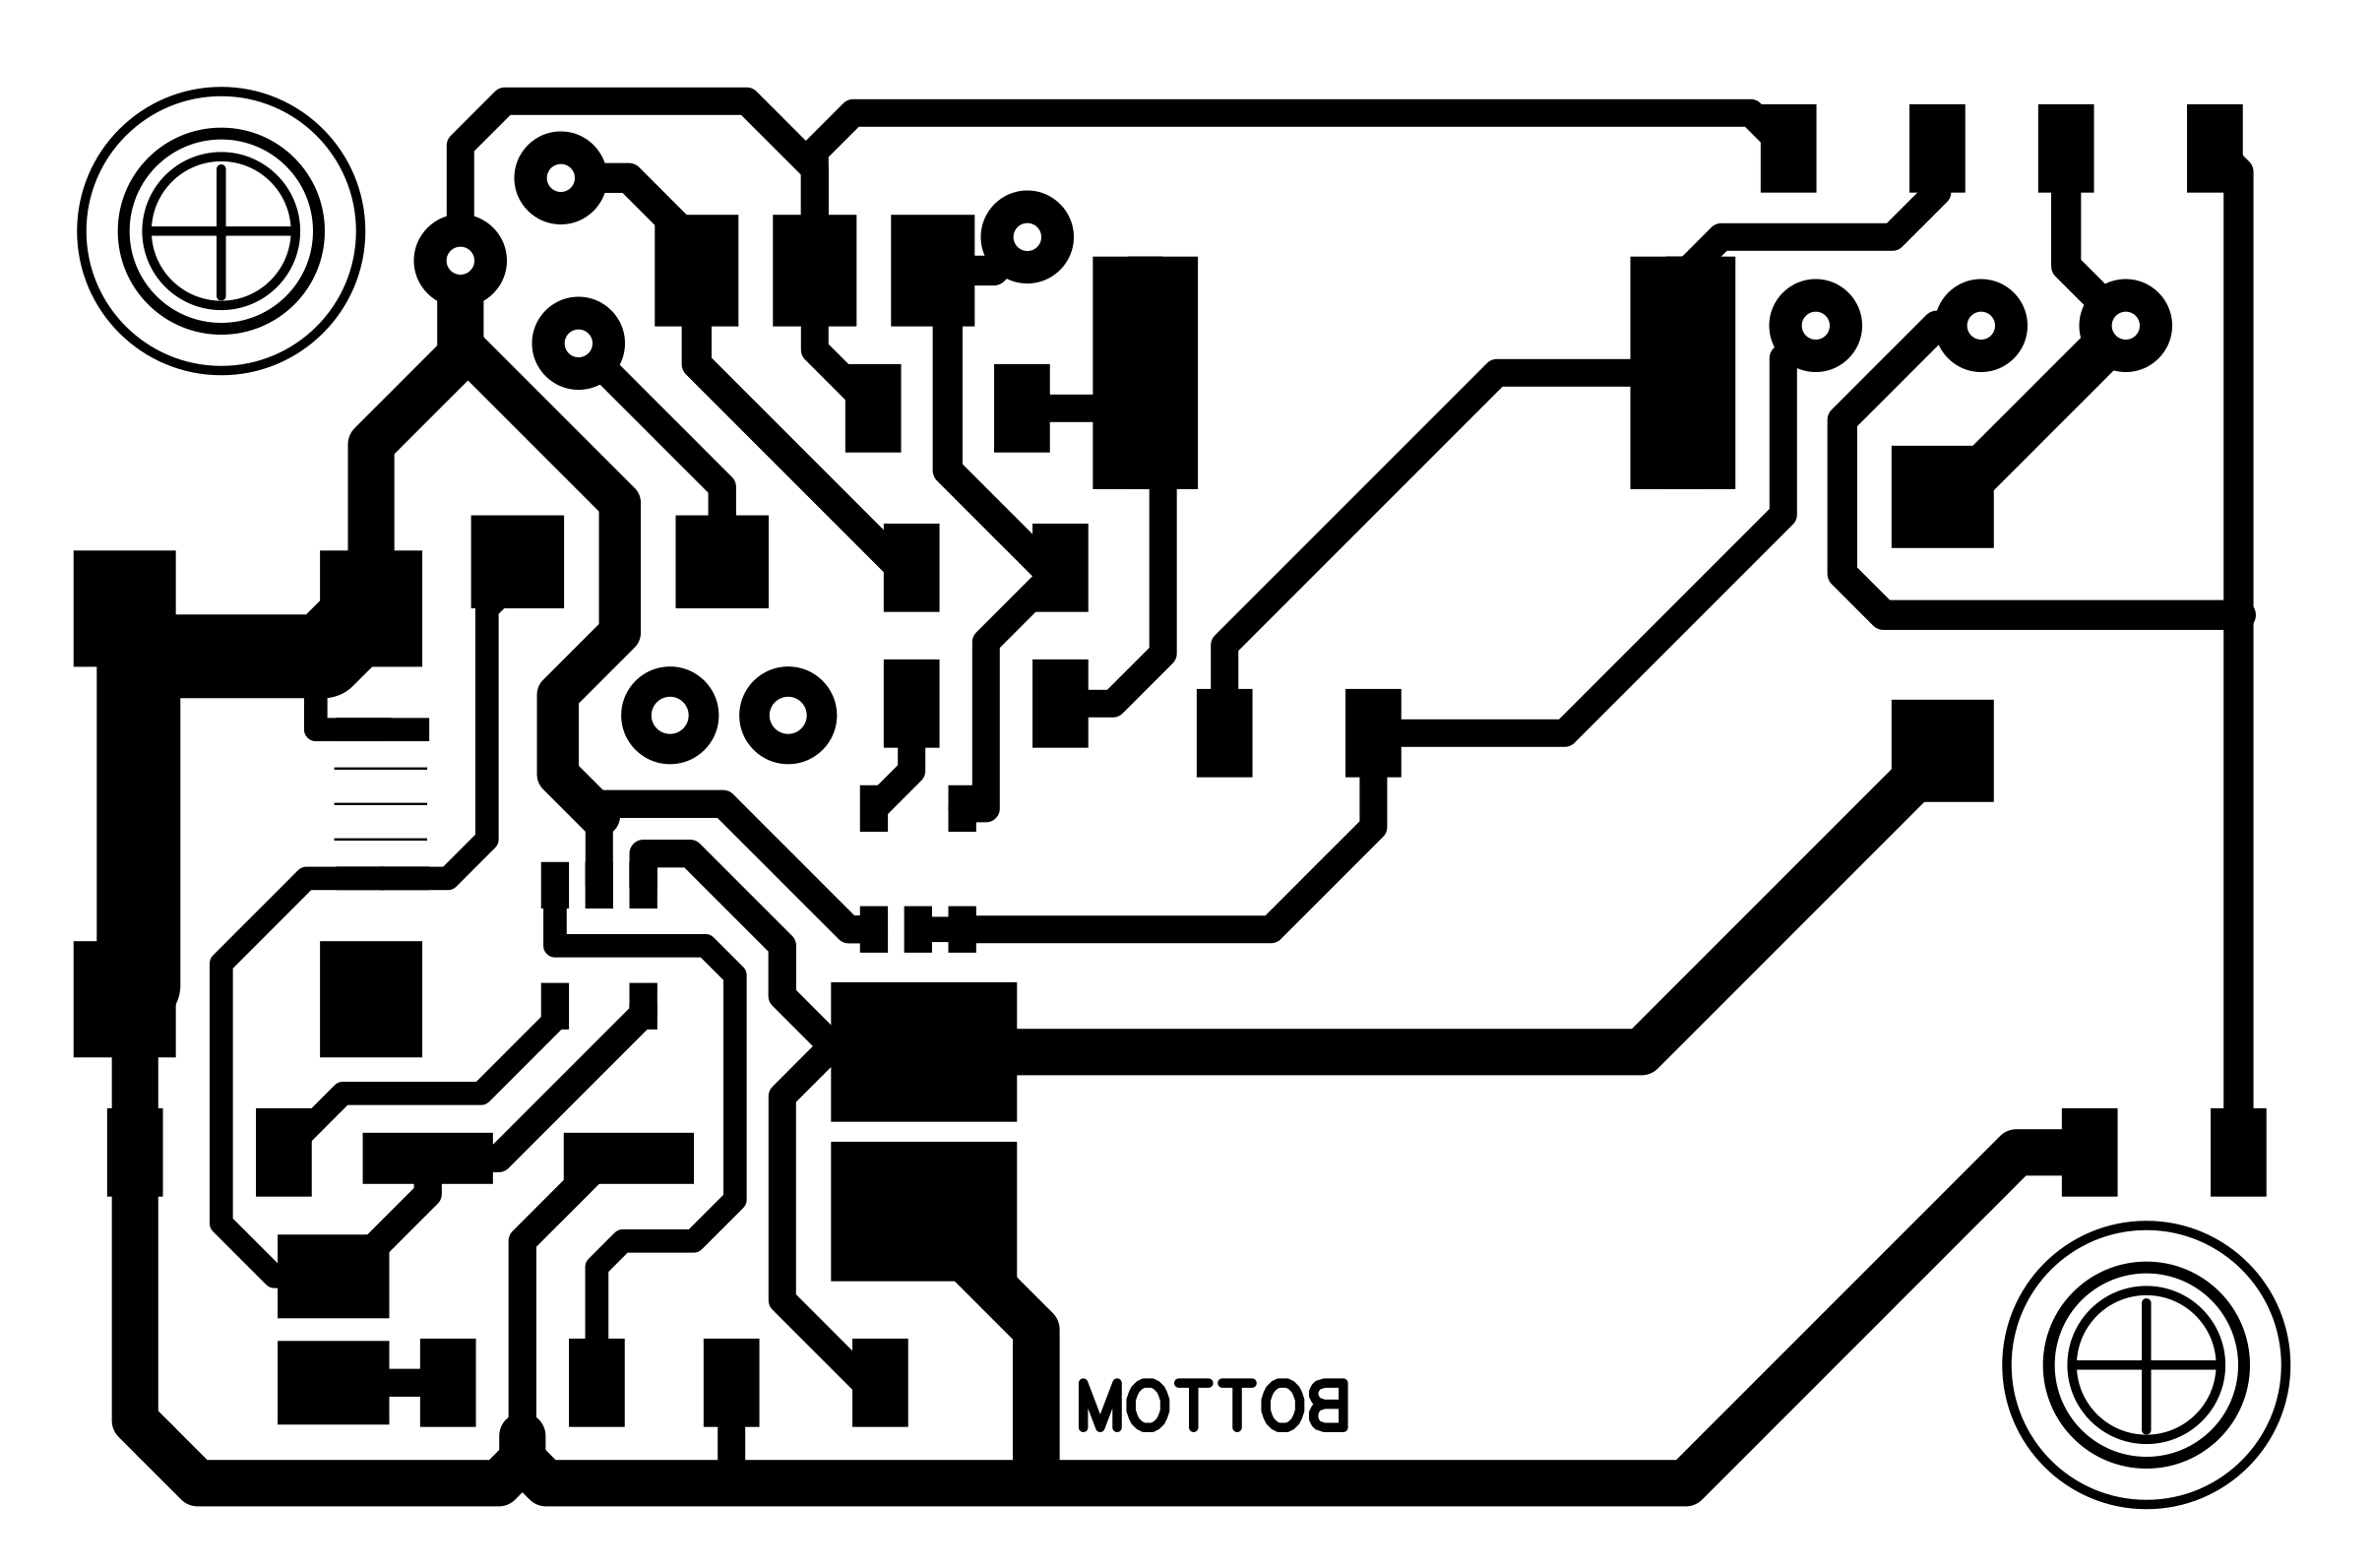
PCBWay Services:Even this time I decided to try the famous and popular PCBWay services. Some our beautiful project deserve a real professional service giving to them precise and superb items like PCB and 3D enclosure/component. I visited for the first time PCBWay website some months ago (http://www.pcbway.com) and after a few minutes I had been able to obtain the final price of the PCB just uploading the.ZIP Gerber file and setting some preferences of the board like colour: I choosen the black but is still available the most popular green, or a shining white or red or others. They shown to me a preview of the board: impressive.
The same for the 3D printings (just uploading the.STEP or .STLfile/s) and you cannot image how many materials are available: PLA, ABS, PETG, Resin, Polycarbonate but as well as Aluminium or Steel or... Titanium! What, Titanium?! It is incredible.
They offer other services actually I have not tried them yet but with these two I can say I am very satisfied. Shipping time were quick. The price was adequate. The customer care office and technician production office demonstrated to me to be ready and "sharp" for details.
23.02.2025 - the 3D printing files are available on my account at grabcad.com website too;
01.04.2025 - If you wish I have a few PCB from PCBWay ready to solder the components on, I can send to you one if still available: first come first served.


_3u05Tpwasz.png?auto=compress%2Cformat&w=40&h=40&fit=fillmax&bg=fff&dpr=2)


Comments