

Hardware components | ||||||
 |
| × | 1 | |||
 |
| × | 1 | |||
| × | 1 | ||||
| × | 2 | ||||
| × | 2 | ||||
| × | 1 | ||||
 |
| × | 2 | |||
 |
| × | 1 | |||
Software apps and online services | ||||||
 |
| |||||
 |
| |||||
| ||||||
 |
| |||||
| ||||||
This project focuses on using numerous platforms, such as a website, mobile app, and even a modern digital assistant like "Google Assistant, " to drive a robotic car in various ways. The robot begins moving in the directions you specify when you issue the commands. It serves as a basic illustration of the intelligent IoT, AI, and ML-enabled vehicles of the future. These vehicles can effectively employ sensor data to identify various objects and traffic in the surroundings.
2. Demonstration:3. Steps for creating this Robotic Car Projects3.1 Configure the product on Bolt Cloud:3.1.1 Go to the Bolt Cloud site and log in to your account. Then go to the product page to make a new product give any name for this product.
Set Device Type INPUT, Device Pin Communication select UART. Then in the Hardware section select 6 CSV Values, Baud Rate 9600.
Give variable names for Pins from CSV0 to CSV5 as automatic, forward, backward, right, left, and stop respectively.
3.1.2 You must now enter HTML code in the Code section to create an interface webpage with a control button for robot movement. In this case, the necessary data is sent to the Bolt Wi-Fi module TX Pin using Javascript and the Bolt Cloud UART Serial Data Transmitter API, which is subsequently received by the Arduino RX Pin.
Note: You must enter YOUR generated API KEY and Device ID in the code.
We have to make 6 URLs for controlling our device for different work.
URL looks as https://cloud.boltiot.com/remote/"YourAPIKEYhere"/serialWrite?data=Hello&deviceName="YourDeviceID"
Here in the data string where String will be transmitted as ASCII characters like in our case it is AUTOMODE, STOP, LEFT, RIGHT, BACKWARD, and FORWARD.
When we click Button from Webpage, Bolt app, or giving a voice command using Google assistance an HTTP request is sent as http.open("GET", "https://cloud.boltiot.com/remote/"+apiKey+"/serialWrite?data=FORWARD&deviceName="+deviceId, true); http.send();
3.1.3 HTML Code for BOLT CLOUD
Copy the code from the link provided in code section and paste it in the cloud.
After that save the configuration. Link product to the device and deploy this configuration on the Bolt Device.
3.2 Configure IFTTT for Controlling Robot through Google Assistant3.2.1 Now go to IFTTT site
Login using your Gmail account. Make sure you use same account which you'll be using on your mobile to interact with Google Assistant.
STEP 1. Choose a Service i.e Google Assistant.
STEP 2. Choose Trigger i.e Say a simple Phrase.
STEP 3: Type the phrase you want to trigger the action. Make sure to specify the trigger command in different ways
STEP 4: After creating trigger, we can see following statement
Click on PLUS '+' Sign and proceed further and choose action service as Webhooks
STEP 5: Make a Web request
Step 6. Fill URL which is discussed above in Section 3.1.2.
STEP 7: Review and Finish
STEP 8: Repeat the above steps for all the other different functions i.e AUTOMODE, STOP, LEFT, RIGHT, BACKWARD, and FORWARD.
https://cloud.boltiot.com/remote/"+apiKey+"/serialWrite?data=FORWARD&deviceName="+deviceId
https://cloud.boltiot.com/remote/"+apiKey+"/serialWrite?data=RIGHT&deviceName="+deviceId
https://cloud.boltiot.com/remote/"+apiKey+"/serialWrite?data=LEFT&deviceName="+deviceId
https://cloud.boltiot.com/remote/"+apiKey+"/serialWrite?data=STOP&deviceName="+deviceId
https://cloud.boltiot.com/remote/"+apiKey+"/serialWrite?data=AUTOMATIC&deviceName="+deviceId
That's it.
Now wake your Android phone by saying "OK Google" and say the phrase you had set while creating the trigger to see the magic happen.
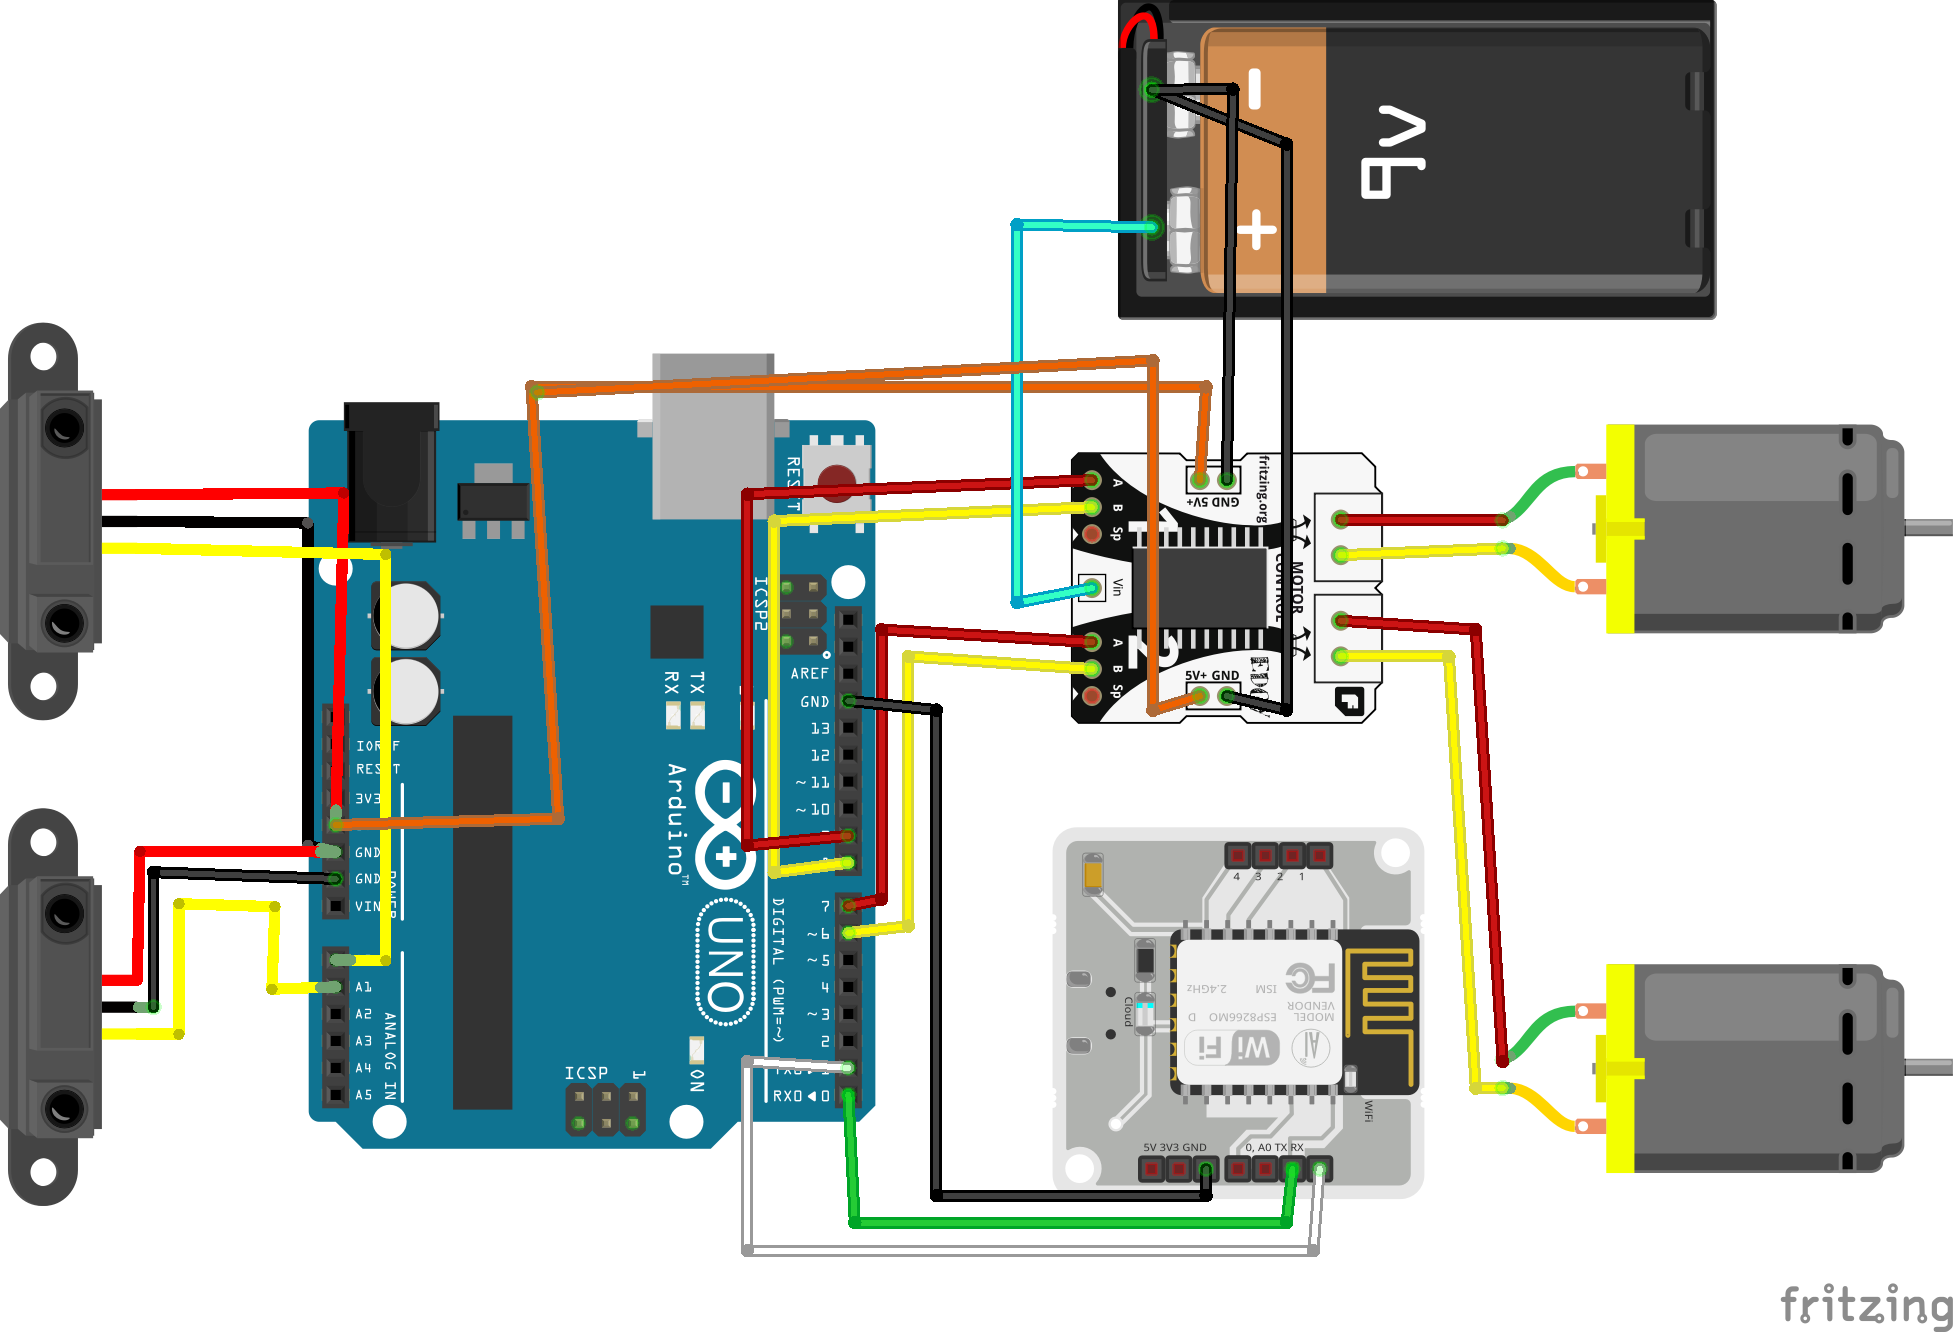
3.3 Arduino UNO Code Configuration4.3.1 PIN Initialization and Library Part
Here left_motor1, left_motor2 are two-terminal of DC motor. Similarly right_motor1 and right_motor2.
3.3.2 Setup Part
boltiot.setCommandString("FORWARD", forward);
This function has two arguments 1st is the received command from Bolt Cloud server and 2nd argument for calling the command handling function.
3.3.3 Command Handling Function
Here, the command function performs a specific motor control function whenever a defined command is received. For example, if the command "FORWARD" is received, the move forward() function is called, returning a "Success: FORWARD" message and printing this message on the serial monitor.
3.3.4 Motor Control Function
3.3.5 Loop Control - Main Program
When the command AUTOMATIC is given, a block of codes is executed that continually monitors both IR sensors and calls the necessary function for motor control if an object is detected.
Depending on the provided command, other different blocks are executed if no AUTOMATIC instruction is received.


Comments