This project is an primer on creating you own Android things LoRA node using the Raspberry Pi and RAK 811 868 Mhz lora node from RAK Wireless. I Will go through the process of setting up and some of the essentials of using the user space driver i have created for the module.
I want this project to be a starting point for a host of projects based on Android things and would like to developers to start creating user space drivers for other such boards based on the knowledge you will gain from this tutorial.
Lets dig in !!!
Hardware Setup:As stated the project aims to use the popular raspberry pi 3 board as the android things platform board and the wonderful LoRA module RAK 811 from rak wireless.
Starting from rev DP 3, Android things now supports usb UART modules. This is great news as earlier, using the UART 0 (MINIUART) for communicating with UART devices was a bit troublesome as the OS shell was also exposed on the same port and would hinder with the communication with UART devices.
Starting from DP3 you can retain this system serial port and use an external USB to uart board to interface with your boards. NEAT !!!
Note:
For those who want to still use the on board UART0, you can follow the SOF article here on how to disable UART0 from being defaulted to the system console and take full control of the UART for your devices. https://stackoverflow.com/questions/41127018/uart-peripherals-on-android-things-for-raspberry-pi-3
Before we begin: Make sure you have flashed the raspberry pi sd card with the latest Android Things build generated from your Android Things console. A full step by step instructions is provided here:
https://developer.android.com/things/hardware/raspberrypi.html
So get your favourite usb serial out and connect the RAK 811 lora node as shown below:
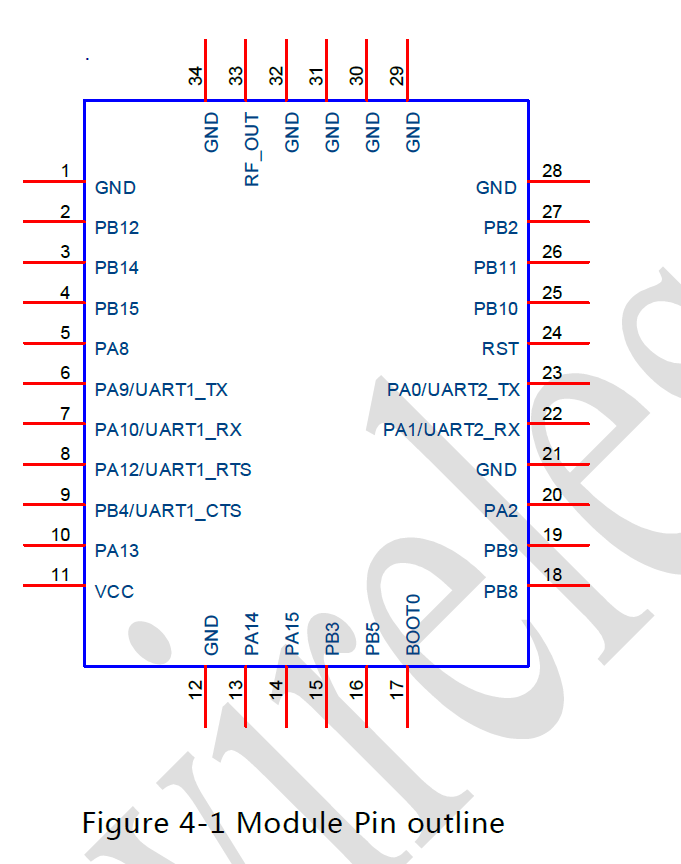
USB Module - RX <-> RAK 811 TXD pin (yellow header)
USB Module - TX <-> RAK 811 RXD pin (yellow header)
USB Module - 3v3 <-> RAK 3v3 pin (red header)
USB Module - GND <-> RAK GND pin (red header)
Now connect the USB module to any one of the USB port on the Raspberry Pi 3
Now for better debugging and getting a trace output of the logcat stream, also connect a USB serial device to the UART0 of the raspberry pi exposed by the Android Things framework as shown below:
Open a connection to the USB serial device on your development computer using a terminal program, such as PuTTY (Windows), Serial (Mac OS), orMinicom (Linux). The serial port parameters for the console are as follows:
- Baud Rate: 115200
- Data Bits: 8
- Parity: None
- top Bits: 1
Ok so now you have a raspberry pi running Android things software and are ready to interact with the LoRA node module. But before we jump in. Lets enable the wifi ADB bridge between your dekstop and RPi3
The ADB bridge is a sort of tunnel for your Raspberry Pi 3 Android platform to communicate with the PC. ADB provides lots of helper utilities for stuff like installation of APK, uninstallations, launching Intents etc. To connect you Rpi3 via ADB, open up the console in your PC where you have the android studio setup.
1) Make sure the platform-tools/ and tools/ folder in your android SDK in your system PATh variable
2) Execute the command
$ adb connect <ip address of your raspberry pi>
This will allow your device to connect successfully and will show up in the terminal as "device connected <ip>:5555". Which means the device is connected and ready to push your apps to the device.
Downloading the user space driverThe User space driver for the RAK 811 is available at:
https://github.com/narioinc/AndroidThingLoRa
Clone the repository in your local machine and open the project in Android studio.
1) Make sure that the Android SDK version 26 or aboveia available on your system
2) Make sure the latest build tools is also updated
3) in your command prompt type
$ adb devices
to check if the devices is connected to the PC via the port 5555
Now in your android studio, build the project by pressing the "Green" play button on the top panel and this will show up a prompt showing the RPI3 device as an Android IoT device on port 5555. Select the device and click "OK"
This will build the app and push the apk to the device and the examples will run. Now it is imperative to note that usual android development makes the app show up on the screen and also will provide debug logs in the Android Studio
However Android IoT is usually headless, Hence the FTDI usb serial devices you connected to the UART0 (as explained above) will help you get some logcat traces and you will also get debug logs on in the Android Studio.
API Usage:Usage is quite simple
- Create a object of type WisnodeLora
WisnodeLora mWisnodeLora = new WisnodeLora("USB1-1.4:1.0", 115200);
- The name of the UART you would like to use can be gathered from the PeripheralManagerService().getUartDeviceList()
- Create Request object using the UARTRequest Class and attach a UARTResponseListener
UARTRequest request = new UARTRequest(mWisnodeLora);

try {
        request.execute(WisnodeLora.VERSION_REQUEST, "at+version\r\n", new UARTRespons                           eListener {...});
}catch (IOException exp){
  Log.e(TAG, "Error while executing request.");
}

//and then implementing the two function of the UARTResponseListener

@Override public void onSuccess(int requestCode, byte[] response, UartDevice device)
{
   Log.i(TAG, "Response for request code :: " + requestCode +
   " is :: " + new String(response));
}

@Override public void onFailure(int requestCode, int errorCode, UartDevice device)
{
  Log.e(TAG, "Error Response for request code :: " + requestCode +
                " is :: " + errorCode);
}
Note:
1) The list of UART devices connected via USB or available on the pins is avaialble from the PeripheralManagerService().getUartDeviceList(). Once run, log the List<String> that is returned from this function. Apart from UART0 and UART1, there will be some more UART available if you have some USB uart devices attached to the RPi 3 usb ports.
2) Use the name of the UART in the WisnodeLora constructor as returned in the previous stepMore RAK 811 Commands
An Extensive list of RAK811 commands is available at:
http://wiki.rakwireless.com/lib/exe/fetch.php?media=rak811_lora_at_command_v1.2.pdf
Future of the Android User-space driver for WisNodeThe user driver will be extended in the future for all Wisnode products as and when they will be added. Hope i can get more developers support this open source initiative,
Happy Hacking !!!


_M6kErcYJ84.png?auto=compress%2Cformat&w=40&h=40&fit=fillmax&bg=fff&dpr=2)
_3u05Tpwasz.png?auto=compress%2Cformat&w=40&h=40&fit=fillmax&bg=fff&dpr=2)
Comments
Please log in or sign up to comment.