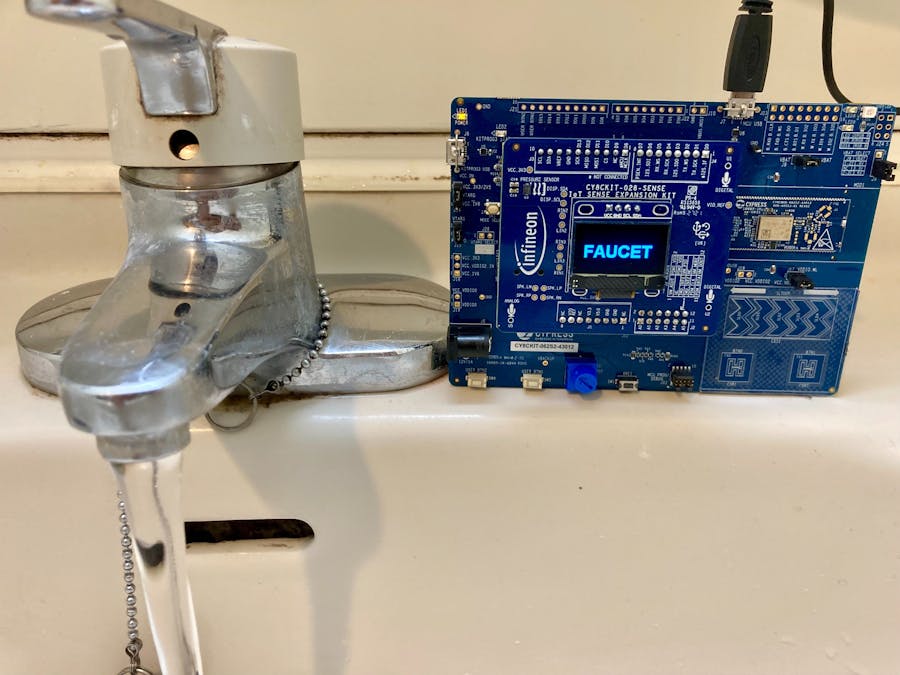
Poor memory is only a few of the many unpleasant experiences that accompany old age and these problems can have far-reaching implications on the comfort and security of seniors. Dementia is one of the most common neurological problems associated with the elderly. Imagine a case of seniors leaving the faucet on. The kind of water damage that might ensue is simply unimaginable. Not to mention lots of safety concerns such as electrocution and drowning. Also, sometimes kids or even adults forget to stop the faucet after use. It also adds up to your monthly water usage bills. According to the US EPA, leaving a faucet on for just five minutes wastes ten gallons of water. In this project, I have built a proof of concept of an AIoT (Artificial intelligence of things) device which can detect running faucets using a microphone and can send an alert notification message.
Hardware SetupI am using a PSoC 6 62S2 Wi-Fi BT Pioneer Kit and IoT Sense Expansion Kit which have many onboard sensors. I will be using the IoT Sense Expansion Kit's microphone for audio sampling and OLED display to show inferencing output. The onboard WiFi is used to send message over MQTT protocol.
We need to install ModusToolbox software which consists of various libraries and middleware, as well as an IDE and tools package for Infineon MCUs. We can download ModusToolBox from the link below. https://www.infineon.com/cms/en/design-support/tools/sdk/modustoolbox-software.
Please choose the bundle for your OS and follow the instructions given in the link above to install. We will be using the SensiML Analytics Toolkit and Data Capture Lab which automates each step of the process for creating an optimized machine learning model.
The Data capture Lab is available for Windows 10 operating system. Since I am using a macOS, I had to install an evaluation Windows virtual machine on VirtualBox. We can download the Data Capture Lab from the link below. https://sensiml.com/download/
Data CollectionWe need to collect data for detecting whether a faucet is running based on audio. Also, we would collect data for other sounds to distinguish them. The data is sampled from the IoT Sense Expansion Kit's PDM microphone at 16KHz sample rate over the following two classes:
- Faucet - faucet is running, with a variety of background activity.
- Noise - just background activities.
We will use SensiML_Template_Firmware for the data collection using the PSoC 6 62S2 Wi-Fi BT Pioneer Kit and IoT Sense Expansion Kit. Please follow the step by step instructions below to configure and flash the data collection firmware.
1. Open the ModusToolbox software and click Start > New Application from the Quick Panel.
2. Select CY8CKIT-062S2-43012 under PSoC 6 BSPs and click on Next button.
3. Select the Machine Learning > SensiML Template Firmware and click on the Create button.
4. Click on Tools > Library Manager from the Quick Panel.
5. Select the required libraries (below) from the Libraries tab which we will be using for the data collection firmware and the inferencing firmware later.
- Core > mbedtls
- Core > lwip
- Middleware > mqtt
- Middleware > wifi-connection-manager
- Peripheral > CY8CKIT-028-SENSE
6. Open SensiML_Template_Firmware > source > app_config.h header file and make sure the application mode is for data collection and audio sensor is defined as shown below.
#define APPLICATION_RUNNING_MODE DATA_CAPTURE_RUNNING_MODE
#define SENSOR_SELECT_MODE SENSOR_AUDIO
Connect the development board to the computer over USB and click on Launches > SensiML_Template_Firmware Program (KitProg3_MiniProg4) from the Quick Panel.
Now we have flashed the data collection firmware and ready to collect data from the onboard microphone. We would need a SensiML user account to use the Data Capture Lab. Open the Data Capture Lab and create a new project.
In the Sensor Configuration, select Infineon PSoC 6 WiFi BT Pioneer Kit as a device plugin.
Select Audio as the Capture Source in the Sensor Properties.
In the Edit > Project Properties, add two labels; faucet and noise as shown below.
Click on Switch Modes button and select Capture mode.
Click on the Connection Settings and scan for the connected development board port.
Select the port from the scan results list.
We will be collecting many data samples each 10 seconds duration for both classes. Now click on the Connect button for the PSoC 6 Wi-Fi BT Pioneer Kit. We can see the streaming audio data as shown below.
To auto stop recording after 10 seconds, click on the Capture Settings button and set Max Record Time to 10.
Now click on the Start Recording button to collect samples for each classes one by one.
Once recording is done we can select segments from it. In the Project Explorer, add manual Labeling Session.
Now select the recording one by one and manually assign single segment to the data from start to end and assign label accordingly. Once labeling is finished all segments are saved to SensiML cloud.
We will be using web-based SensiML Analytics Toolkit (https://app.sensiml.cloud/) for the model training. After login, go to the Prepare Data page and create a query with the following configuration. We have selected the training data only using the Query Filter field by specifying metadata value as training which were set during the data labeling.
Now go to the Build Model page and click on Create New Pipeline by providing Name and Query which we created in the previous step.
Now open the pipeline and click on Optimize button to start training and build model. We can go to the Explore Model page to see the confusion matrix and visualization. The validation accuracy is around 97% which is pretty good to try out the model.
We can see clear separation of the classes in the visualization.
In the Download Model page, we should select Infineon CYCKIT-062S2-43012 with CYC8KIT-028-SENSE as Development Platform.
Now we can download the model and all necessary configuration files and source code as a Knowledge Pack bundle.
After downloading and unzipping the Knowledge Pack, we should copy the files to the SensiML_Template_Firmware > source > lib directory in the ModusToolbox workspace.
Inferencing FirmwareOpen SensiML_Template_Firmware > source > app_config.h header file and change the application mode for inferencing as shown below.
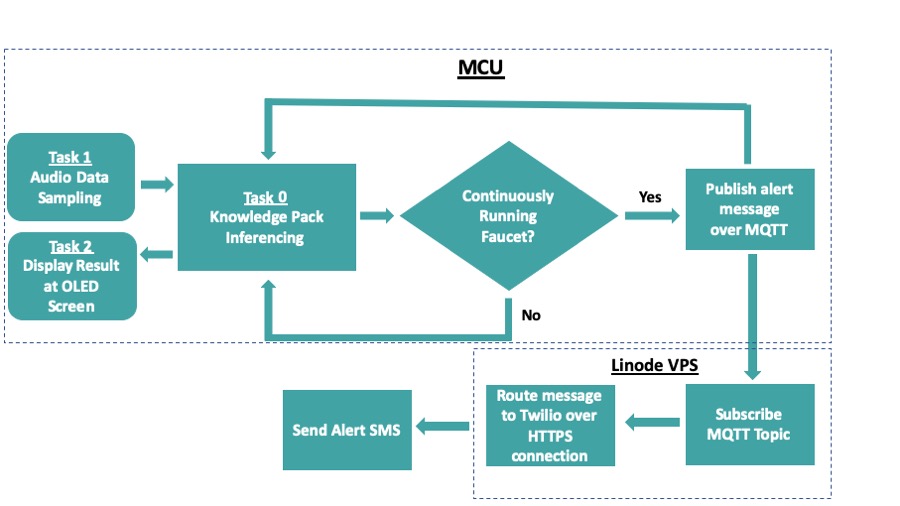
#define APPLICATION_RUNNING_MODE RECOGNITION_RUNNING_MODEThe inferencing results are displayed to the OLED display and an alert message is sent to the MQTT broker which is forwarded to Twilio SMS API for delivering SMS. For OLED and MQTT, the code has been borrowed and modified accordingly from the ModusToolbox MQTT Client and emWin OLED FreeRTOS example application template. To flash the inferencing firmware, connect the development board to the computer over USB and click on Launches > SensiML_Template_Firmware Program (KitProg3_MiniProg4) from the Quick Panel.
Application Workflow DiagramThe Eclipse Mosquitto MQTT broker and python MQTT client library is installed at Linode Virtual Private Server which is listening at port 1883. Execute the commands below to install them.
$ sudo apt install mosquitto mosquitto-clients
$ pip install paho-mqttWe would need a free trial Twilio account (https://www.twilio.com/try-twilio), with at least one Verified Caller ID established. A verified caller ID is required in order to send messages from the Twilio account. Please follow the instructions in the link below to create one.
MQTT Subscriber and Twilio SMS API script# filename: mqtt_subscriber.py
import time
import os
import paho.mqtt.client as mqttClient
from twilio.rest import Client
def on_connect(client, userdata, flags, rc):
if rc == 0:
print("Connected to broker")
global Connected #Use global variable
Connected = True #Signal connection
else:
print("Connection failed")
def on_disconnect(client, userdata, rc):
print("Disonnected.", rc)
def on_message(client, userdata, message):
data = message.payload.decode("utf-8")
print(f'{time.time()}\t{data}\n')
# Find your Account SID and Auth Token at twilio.com/console
# and set the environment variables. See http://twil.io/secure
account_sid = os.environ['TWILIO_ACCOUNT_SID']
auth_token = os.environ['TWILIO_AUTH_TOKEN']
from_phone_no = os.environ['TWILIO_FROM']
to_phone_no = os.environ['TWILIO_TO']
client = Client(account_sid, auth_token)
body = 'Alert: Faucet Running'
message = client.messages.create(body=body, from_=from_phone_no, to=to_phone_no)
print(message.sid)
if __name__ == "__main__":
Connected = False #global variable for the state of the connection
broker_address= "mqtt.tinymachinelearning.com" #Broker address
port = 1883 # Broker port
user = "naveen" # Connection username
password = os.environ['MQTT_PASSWORD'] # Connection password
topic = "running_faucet_alert"
client = mqttClient.Client("Sub-client") #create new instance
client.username_pw_set(user, password=password) #set username and password
client.on_connect = on_connect #attach function to callback
client.on_disconnect = on_disconnect #attach function to callback
client.on_message = on_message #attach function to callback
client.connect(broker_address, port, 60) #connect
client.subscribe(topic) #subscribe
client.loop_forever() #then keep listening foreverExport the environmental variable mentioned in the script for the credentials and run the command below.
$ python3 mqtt_subscriber.pyIt is an easy-to-use and convenient device which respects users privacy by running the inferencing at the low-powered resource-constrained MCU. Although the model inferencing accuracy is good enough considering it is trained on small datasets but as for future plans, I hope to create a larger training dataset to improve the classification accuracy of the device. This is a proof-of-concept project but it showcases all the features which an end product could have and it is working as intended. I would like to thank Infineon for providing me free hardware for this project.


Comments
Please log in or sign up to comment.