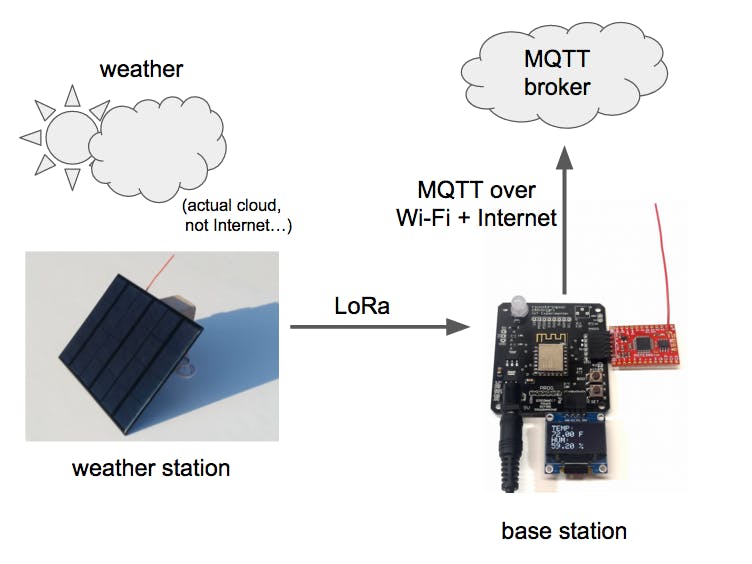
In this project I show how I built a remote, solar-powered weather station that transmits temperature and humidity readings over LoRa, and a base station that publishes the data to the Internet with MQTT (er, I guess we are supposed to say “cloud” now).
LoRa (Long Range) is a relatively new radio technology intended for reliable communication of small amounts of data over distances that are longer than achievable with bluetooth or Wi-Fi. It’s also geared toward low power applications. LoRa modules are relatively cheap (about $8 for a bare module), but the easiest way to use LoRa is to buy development boards that also have a microcontroller on them. Moteino and Anarduino MiniWireless both have LoRa enabled transceivers that work well and are essentially the same. Each is basically a small Arduino with ATmega328 and LoRa module. They cost around $20-25, and remember that you’ll need 2 of them, one for each end of the communication.
Weather StationThe remote weather monitoring station has a cheap solar panel, a LiPo battery, an Adafruit LiPo charging board, and an an Anarduino board with a TH02 I2C temperature and humidity sensor. I enclosed all of this in an small plastic box (not waterproof!).
Reading the I2C sensor is easily accomplished using this TH02 library. As for the control of the LoRa radio, there is a wonderful library called RadioHead that makes it easy to use all kinds of radio technology in embedded systems. For message format, I like to use JSON because it is easy to read and very flexible. The ArduinoJson is an excellent Arduino library for generating and parsing JSON strings. Using these 3 libraries, the Arduino sketch reads the sensor and transmits a small JSON message with the temperature and humidity readings to the base station every 10 seconds. The format of the JSON message is simple:
{
  temp: 72.1,
  hum: 54.2
}
The base station has 2 hardware modules. First, there is another LoRa module to receive the sensor reading messages. When the LoRa module receives the JSON message from the weather station, it simply writes the message over the serial UART which is connected to the second board, an IoT Experimenter development board. The IoT Experimenter has an ESP8266 WiFi microcontroller which provides a gateway to the Internet. I designed the IoT Experimenter as a simple tool for my IoT projects, and you can read more about the IoT Experimenter here. You can use any ESP8266 development board, though! You can connect an OLED display which allows us to see the data right at the base station.
The code on the IoT Experimenter receives the message over serial and publishes the data using MQTT. In the source code for the ESP8266 you will need to add your WiFi user/password, as well as the info about an MQTT broker to publish the data to. You can set up a free account on CloudMQTT. Their free plan allows you to have up to 10 connections. The source code for this project makes it clear where to set the information for your account: username, password, server, and port. This project uses an SSL connection, so use the SSL port on your CloudMQTT server.
Instead of watching the weather data on the base station’s OLED display, it is more convenient to see it on the Internet or on your phone. I have an Android phone and use a simple app called MQTT Dash. It lets you create dashboards with controls on them. My weather dashboard has gauges for the temperature and humidity.
Another way to see data from an MQTT broker is to use the Chrome app called MQTTLens. It allows you to connect to an MQTT broker, publish to topics and subscribe to topics. It works well.


Comments
Please log in or sign up to comment.