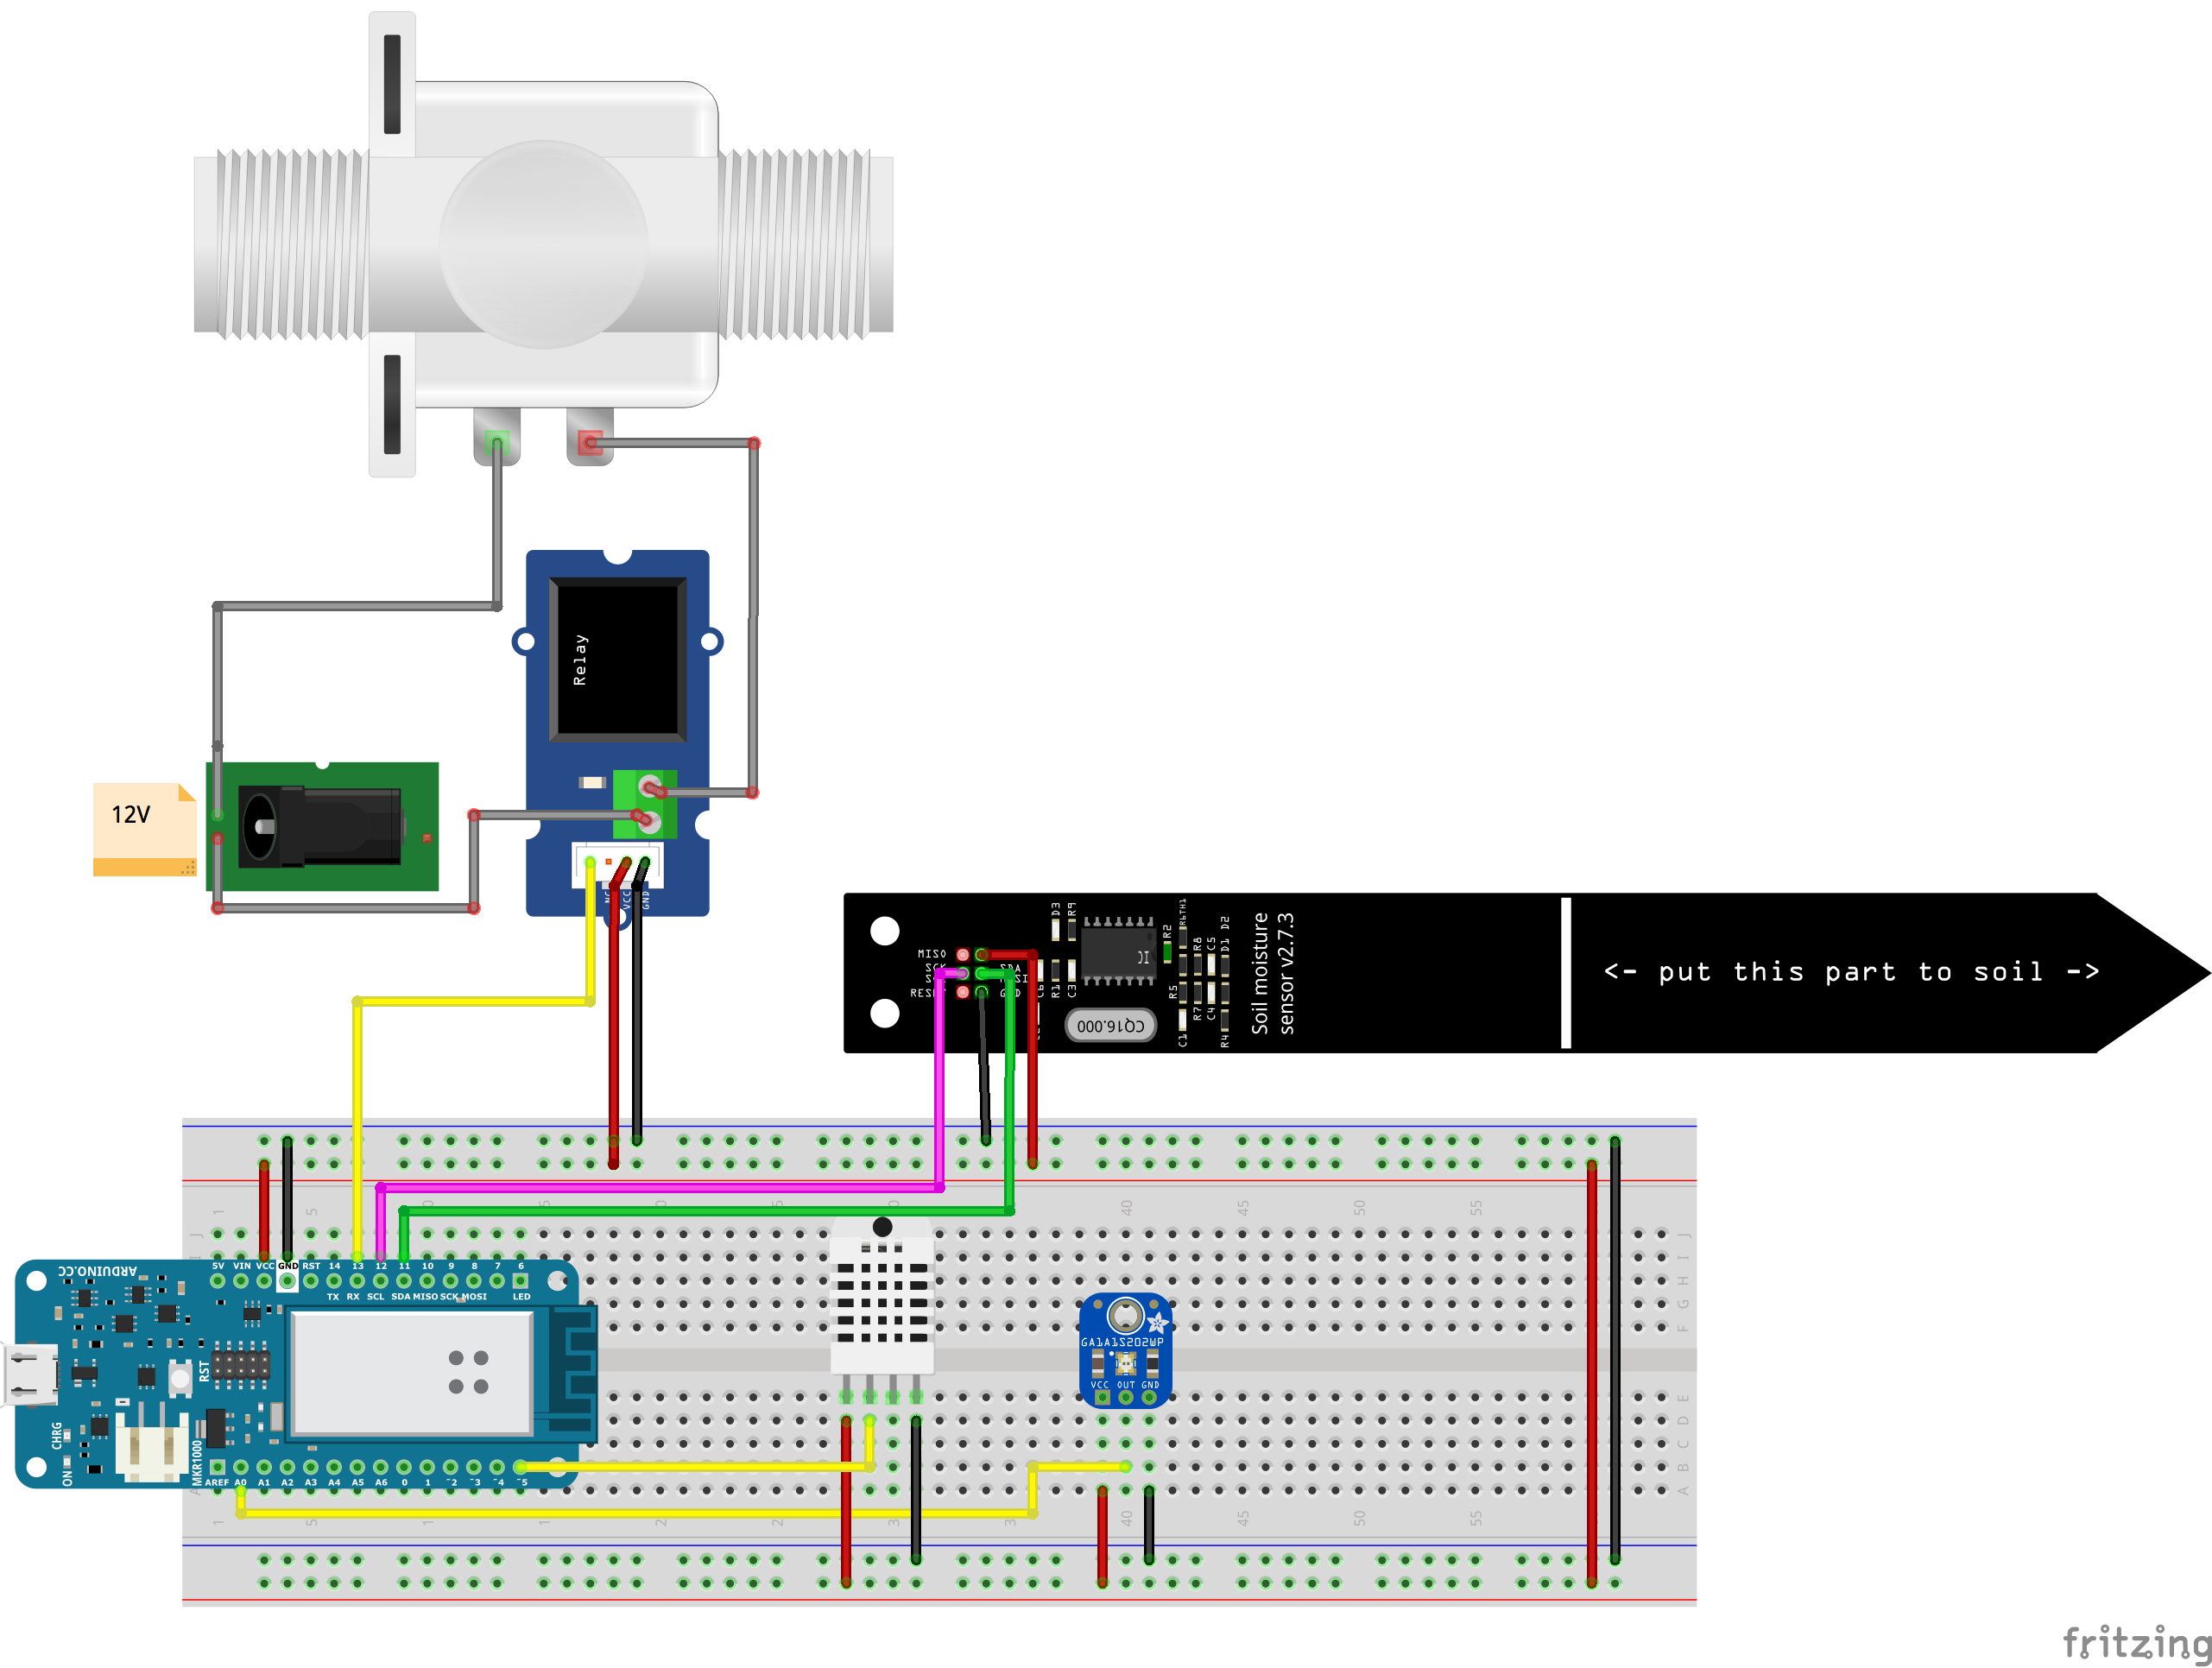
In this tutorial we would make use of the WiFiConnection of our mkr1000.
We will get weather forecast of and activate the relay, connected to the water pump, only if there is no rain at the horizon.
Connect to the openWeatherMap APIwe will use the open weather map to get the weather data.
First of all you will need to get a new api key to authenticate yourself with the service. Create an account on open weather map and go here to generate a new api key.
Now you can start testing the api and figure how to get the information you need from the Open Weather Map service. (You can find a full documentation on how to use the api here. )
To test that your api key is working correctly you can just try to get the weather forecast of your city.
Open your browser and navigate to:
http://api.openweathermap.org/data/2.5/forecast?q=torino,IT&cnt=3&appid=xxxxxxxxxxxxxxxxxxxxxxxxxx
IMPORTANT: replace xxxxxxxxxxxxxxxxxxxxxxxxxx with your api key.
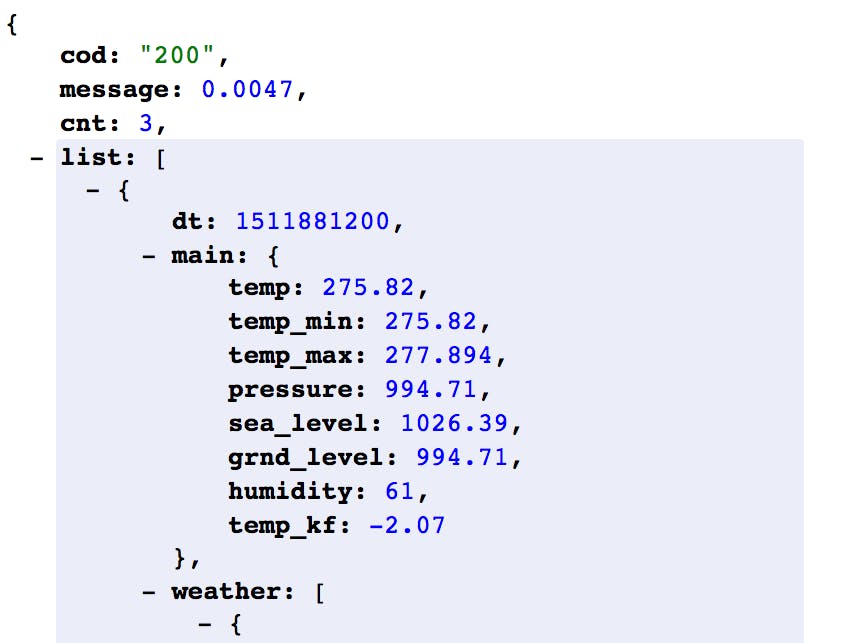
You should now see in your browser Torino's weather forecast for the next hours in Json format.
Let's analyse our query:
The first part of it is the API endpoint http://api.openweathermap.org/data/2.5/forecast
Then after a '?' the query parameter are listed: q=torino,IT&cnt=3&appid=xxxxxxxxxxxxxxxxxxxxxxxxxx
every parameter is separated by a '&' character:
The "cnt" parameter specifies how many future data do you want, this will be very important especially on board with limited amount of memory where parsing a very long Json would be problematic.
Replace "torino,IT" with your "city_name,countryCode" and you should be able to see the weather forecast for your actual city.
Get the data into ArduinoNow you can query the data from the MKR1000.
Edit the sketch below changing the city you want the data for, and make sure you inserted the correct wifi authentication credentials. Then upload it to your MKR1000 board.
Get the code here
#include <SPI.h>
#include <WiFi101.h>
char ssid[] = SECRET_SSID; //  your network SSID (name)
char pass[] = SECRET_PSW;//  your network PASSWORD ()
//open weather map api key
String apiKey= SECRET_APIKEY;
//the city you want the weather for
String location= "torino,IT";
int status = WL_IDLE_STATUS;
char server[] = "api.openweathermap.org";
WiFiClient client;
void setup() {
 //Initialize serial and wait for port to open:
 Serial.begin(9600);
 // attempt to connect to Wifi network:
 while (status != WL_CONNECTED) {
   Serial.print("Attempting to connect to SSID: ");
   Serial.println(ssid);
   status = WiFi.begin(ssid);
   //use the line below if your network is protected by wpa password
   //status = WiFi.begin(ssid, pass);
   // wait 10 seconds for connection:
   delay(1000);
 }
 Serial.println("Connected to wifi");
}
void loop() {
 getWeather();
 delay(10000);
}
void getWeather() {
 Serial.println("\nStarting connection to server...");
 // if you get a connection, report back via serial:
 if (client.connect(server, 80)) {
   Serial.println("connected to server");
   // Make a HTTP request:
   client.print("GET /data/2.5/forecast?");
   client.print("q="+location);
   client.print("&appid="+apiKey);
   client.print("&cnt=3");
   client.println("&units=metric");
   client.println("Host: api.openweathermap.org");
   client.println("Connection: close");
   client.println();
 } else {
   Serial.println("unable to connect");
 }
 delay(1000);
 String line = "";
 while (client.connected()) {
   line = client.readStringUntil('\n');
   Serial.println(line);
 }
}
If everything goes well you should be able to open the serial port and see the json data printed in the serial monitor.
Notice, inside the sketch, that most of the code needed to do the HTTP get request is inside the getWeather function. it should look very similar to the url we were using to get the data in the browser.
Parse the Json dataNow we just need to get only the information that we need from the sketch.
To parse the data we are going to use the Arduino Json library, therefore, if you don't have it already just go ahead and download it from the Arduino library manager.
What we want to get from the query result is just the weather of the next 3 forecast. To get the data we will have to go through the Json tree looking for what we need.
For instance, to get the "list" property of the json.
data["list"]
To get the first element of the list we can get
data["list"][0]
To get the weather forecast we should get
data["list"][0]["weather"]
This returns an array, therefore we need to ask for the first element of the list
data["list"][0]["weather"][0]
this will return a series of values like temperature weather description etc...
data["list"][0]["weather"][0]["main"]
getting the main value will return the actual weather forecast in plain words (sun, rain, snow etc...)
Look at the code provided below, it mast be clear at this point how you can get the necessary data from open weather map for your project.
Get the code here
#include <ArduinoJson.h>
#include <SPI.h>
#include <WiFi101.h>
char ssid[] = SECRET_SSID; //  your network SSID (name)
char pass[] = SECRET_PSW;//  your network PASSWORD ()
//open weather map api key
String apiKey= SECRET_APIKEY;
//the city you want the weather for
String location= "torino,IT";
int status = WL_IDLE_STATUS;
char server[] = "api.openweathermap.org";
WiFiClient client;
void setup() {
 //Initialize serial and wait for port to open:
 Serial.begin(9600);
 // attempt to connect to Wifi network:
 while (status != WL_CONNECTED) {
   Serial.print("Attempting to connect to SSID: ");
   Serial.println(ssid);
   status = WiFi.begin(ssid);
   //use the line below if your network is protected by wpa password
   //status = WiFi.begin(ssid, pass);
   // wait 10 seconds for connection:
   delay(1000);
 }
 Serial.println("Connected to wifi");
}
void loop() {
 getWeather();
 delay(10000);
}
void getWeather() {
 Serial.println("\nStarting connection to server...");
 // if you get a connection, report back via serial:
 if (client.connect(server, 80)) {
   Serial.println("connected to server");
   // Make a HTTP request:
   client.print("GET /data/2.5/forecast?");
   client.print("q="+location);
   client.print("&appid="+apiKey);
   client.print("&cnt=3");
   client.println("&units=metric");
   client.println("Host: api.openweathermap.org");
   client.println("Connection: close");
   client.println();
 } else {
   Serial.println("unable to connect");
 }
 delay(1000);
 String line = "";
 while (client.connected()) {
   line = client.readStringUntil('\n');
   //Serial.println(line);
   Serial.println("parsingValues");
   //create a json buffer where to store the json data
   StaticJsonBuffer<5000> jsonBuffer;
   JsonObject& root = jsonBuffer.parseObject(line);
   if (!root.success()) {
     Serial.println("parseObject() failed");
     return;
   }
 //get the data from the json tree
 String nextWeatherTime0 = root["list"][0]["dt_txt"];
 String nextWeather0 = root["list"][0]["weather"][0]["main"];
 String nextWeatherTime1 = root["list"][1]["dt_txt"];
 String nextWeather1 = root["list"][1]["weather"][0]["main"];
 String nextWeatherTime2 = root["list"][2]["dt_txt"];
 String nextWeather2 = root["list"][2]["weather"][0]["main"];
 // Print values.
 Serial.println(nextWeatherTime0);
 Serial.println(nextWeather0);
 Serial.println(nextWeatherTime1);
 Serial.println(nextWeather1);
 Serial.println(nextWeatherTime2);
 Serial.println(nextWeather2);
 }
}


Comments
Please log in or sign up to comment.