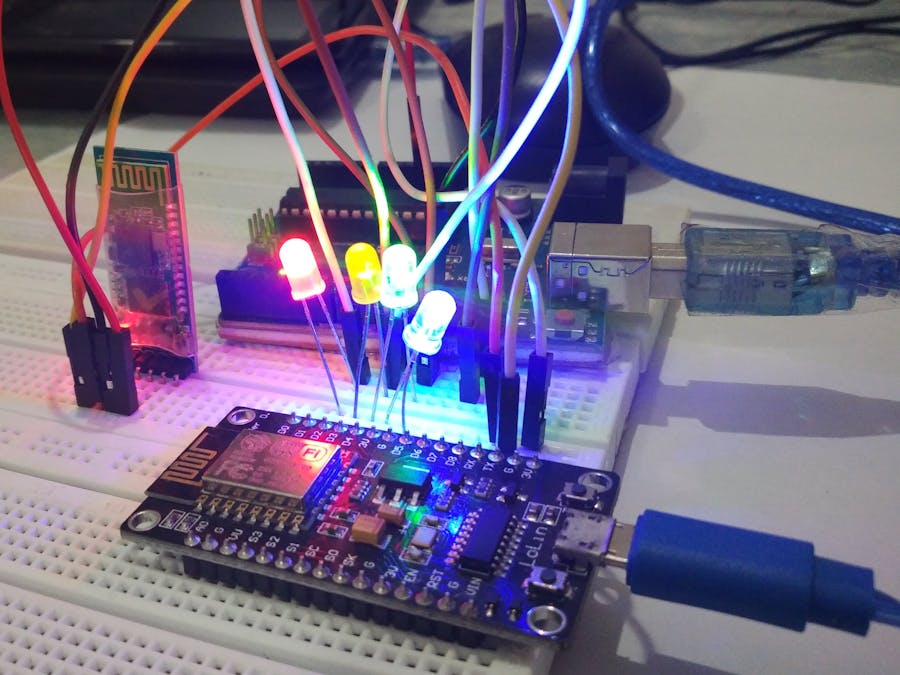
Many IoT-based Home Automation projects crash when the Internet speed goes down. So, within this project, I tried to build such an IoT prototype that can automate the Home not only when Internet speed is good but also when Internet speed goes down. In this project, I’m going to use OSH NodeMCU V1.0 ESP8266 Development Board and Bluetooth HC-05 Module for communication & control of 4 AC loads connected to NodeMCU with Blynk Android App & my custom-made Bluetooth Automation App. Blynk App can be used when Internet speed is good on both sides & Bluetooth Automation App can be used when you are near the project & not have the internet at all.
You can add a relay module to control actual electrical appliances like water pumps, geysers, LED bulbs, Fans, etc. For providing a 5V supply to a project I have connected Arduino Uno’s +5V & GND pin to the Vin & GND pin of NodeMCU board, instead of IC 7805 & Battery.
NodeMCU:
NodeMCU is a low-cost open-source IoT platform. It initially included firmware that runs on the ESP8266 Wi-Fi SoC from Espressif Systems and hardware that was based on the ESP-12 module. Later, support for the ESP32 32-bit MCU was added. NodeMCU is an open-source firmware for which open-source prototyping board designs are available. The name "NodeMCU" combines "node" and "MCU" (micro-controller unit).The term "NodeMCU" strictly speaking refers to the firmware rather than the associated development kits. Both the firmware and prototyping board designs are open source.
The firmware uses the Lua scripting language. The firmware is based on the Lua project and built on the Espressif Non-OS SDK for ESP8266. It uses many open source projects, such as lua-json and SPIFFS. Due to resource constraints, users need to select the modules relevant to their project and build firmware tailored to their needs. Support for the 32-bit ESP32 has also been implemented.
The prototyping hardware typically used is a circuit board functioning as a dual in-line package (DIP) which integrates a USB controller with a smaller surface-mounted board containing the MCU and antenna. The choice of the DIP format allows for easy prototyping on breadboards. The design was initially was based on the ESP-12 module of the ESP8266, which is a Wi-Fi SoC integrated with a Tensilica Xtensa LX106 core, widely used in IoT applications (see related projects).
- Voltage: 3.3V
- Wi-Fi Direct (P2P), soft-AP
- Current consumption: 10uA~170mA
- Flash memory attachable: 16MB max (512K normal)
- Integrated TCP/IP protocol stack
- Processor: Tensilica L106 32-bit
- Processor speed: 80~160MHz
- RAM: 32K + 80K. • GPIOs: 17 (multiplexed with other functions)
- Analog to Digital: 1 input with 1024 step resolution
- +19.5dBm output power in 802.11b mode
- 802.11 support: b/g/n
- Maximum concurrent TCP connections: 5
HC-05 Bluetooth Module:
The Bluetooth module HC-05 is a MASTER/SLAVE module. By default, the factory setting is SLAVE. The Role of the module (Master or Slave) can be configured only by AT COMMANDS. The slave modules cannot initiate a connection to another Bluetooth device but can accept connections. The master module can initiate a connection to other devices. The user can use it simply for a serial port replacement to establish a connection between MCU and GPS, PC to your embedded project, etc. The HC-05 Bluetooth module is the most economical and easiest way to go wireless (via Bluetooth).
This module makes it easy for you to wirelessly extend your serial interface, so you can control any program running on your Laptop with the serial port interface.
Hardware Features:
- Typical ‐80dBm sensitivity.
- Up to +4dBm RF transmit power.
- 3.3 to 5 V I/O.
- PIO (Programmable Input/Output) control.
- UART interface with programmable baud rate.
- With an integrated antenna.
- With edge connector.
Software Features:
- Slave default Baud rate: 9600, Data bits:8, Stop bit:1, Parity: No parity.
- Auto‐connect to the last device on power as default.
- Permit the pairing device to connect as default.
- Auto‐pairing PINCODE: ”1234” as default.
Blynk App:
Go to Google Play Store & search for Blynk.
Install the Blynk Android App & open it. Sign in to Blynk App with email address & create a project by clicking on “New Project “as “IoT Home Automation”, select board as NodeMCU, connection type as Wi-Fi, select dark or light theme & click on create.
An Auth Token is sent to the registered email address. Click on OK. Now click on the + sign at the top & add 4 buttons.
To edit each button's details open it & given the name LED1, LED2, LED3 & LED4. Click on Pin & Select Pin as Virtual along with V1, V2, V3 & V4 for 4 Buttons. Select Mode as SWITCH. Add OFF label as OFF & ON label as ON in all 4 buttons you can select 4 text colors (say Red, Yellow, Green, Blue) for 4 different buttons. Press the back button & click on the triangle button at the top of the screen to make an app in active mode.
Now you can control the electrical appliances connected to the project with Blynk App across the world.
Embedded Code:Open the Arduino Sketch in Arduino IDE, install & include the Blynk library. Add the Auth Token received on Blynk Account registered email address, Wi-Fi network SSID & Password, too. Upload the code to the NodeMCU board.
Bluetooth App:Install the Bluetooth Automation app provided in this GitHub repository. Open your phone’s Bluetooth settings, search for nearby networks. If you’ll get the HC-05 Bluetooth module then pair your phone with it (the default password is 0000 or 1234). Now open the Bluetooth Automation App & press on the blue color Bluetooth Button & select the paired HC-05 module & now you can control the electrical appliances connected to the project with Bluetooth even though the internet speed is slow or not at all.


Comments
Please log in or sign up to comment.