The possibilities of using a single Arduino!
The requirements for an Automated Honeycomb Repair System was set forth by Boeing's Defense, Space and Security division, where honeycomb panels are heavily used on satellite structures in space, government, and military communication applications. This was a joint senior project by students at Cal State Los Angeles and The Boeing Company.
The requirements were to design an automated repair system which would repair dents and damages on honeycomb panels in an automated fashion such that it would speed up the current "manual repair" of honeycomb panels which currently take an approximated 3-4 hours to repair a single dent.
The basic concept of the process is to drill out the top face-sheet of the honeycomb with a 1/4" drill, core pick an inner diameter of 1" under the drilled top face-sheet to the bottom face-sheet, vacuum debris, and finally foam fill the core-picked void / affected area.
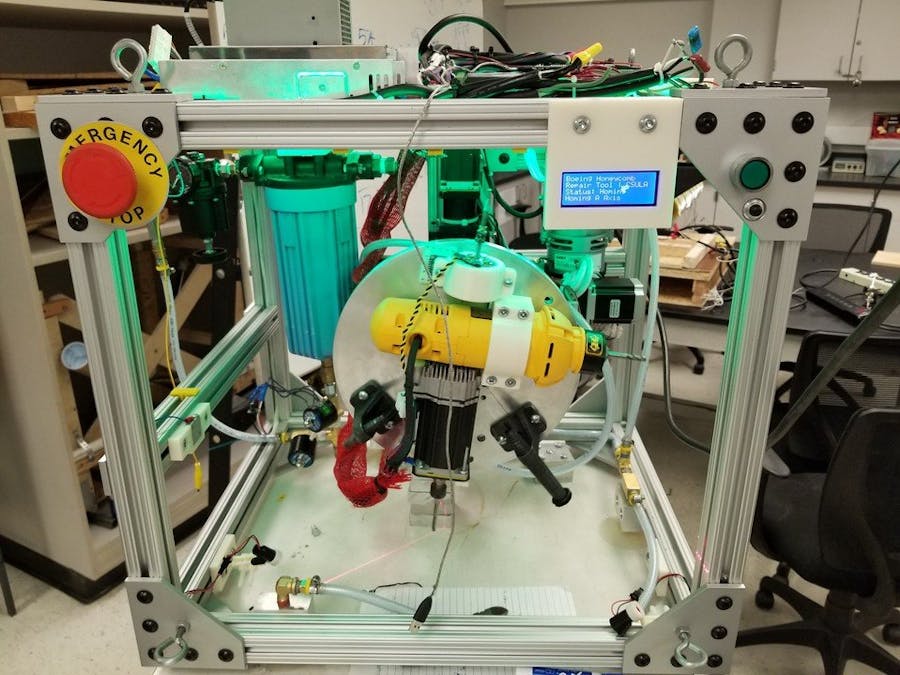
To achieve the aforementioned process, the mechanical sub-system consists of a ball-screw driven Y and Z axis and a rotary A axis for performing a tool change turret style and which also makes angled entry of a custom core-picker tool possible, which was also custom designed by our team for the actual core-picking task.
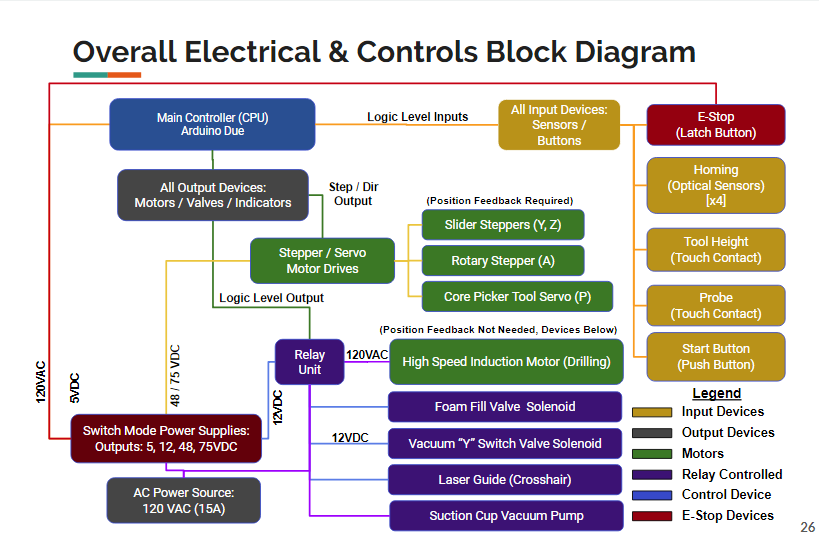
The electrical sub-system consists of a single Arduino Due for complete machine control and automation driving: 3 stepper motors and drives, a servo motor + drive, 6 solenoid valves, a full 20x4 LCD display for status updates throughout the process, a full color RGBW LED strip for visual status feedback, and 8 relays. Input devices include: 4 optical homing sensors, one for each axis, tool touch plate input, probe input, and finally start + stop inputs.
All possible electrical noise generating devices such as power supplies and motor drives were placed far away from logic level devices such as the control microprocessor / Arduino. This was initially designed with that in mind as can be seen in the Solidworks model layout.
From Solidworks model on the left to realization on the right, the figure above shows the actual machine after fabrication. The entire machine automation process brought down the manual repair time of 4-6 hours to roughly 10 minutes.
Below is a time-lapse of the entire process of the Automated Repair Machine Process.
The video begins with all the user-replaceable tools being "tool-touched" or measured for any change due to wear or replacement, as they will not be exactly placed into location via human hands, this applies to the drill bit, probe, and custom core-picking tool. Next the face of the honeycomb panel is measured via a probe, and drilling of the face sheet is performed. After drilling, the bottom face-sheet is measured to make sure the next process of core picking does not puncture the bottom face sheet when clearing the inner honeycomb core. Using those measured distances from top to bottom face-sheet, the core picking process is performed, pay attention to the fine motor movements required for the custom angled tool to make entry and exit the previously drilled hole. Next the vacuum clears all the debris in the core picked void space, and finally foam is filled into the affected area, completing the repair process, the machine waits for another dent and start button press to begin its process again.
Senior Team Members: Allen Analian (EE), Jeffrey T. Iwasaki (ME), Jonathan Sanabria (ME), Gino Kiettisak (ME), Carlos A. Sanchez (ME), Alberto M. Cortes (EE)
Acknowledgments: Special thanks to the Boeing Company & Cal State Los Angeles for the opportunity, Theodore (Ted) Nye (Senior Design Director), Teofilo El-Masri, Cameron Massey, Jose Armenta, Jonathan Fish (Boeing Liaisons).


Comments
Please log in or sign up to comment.