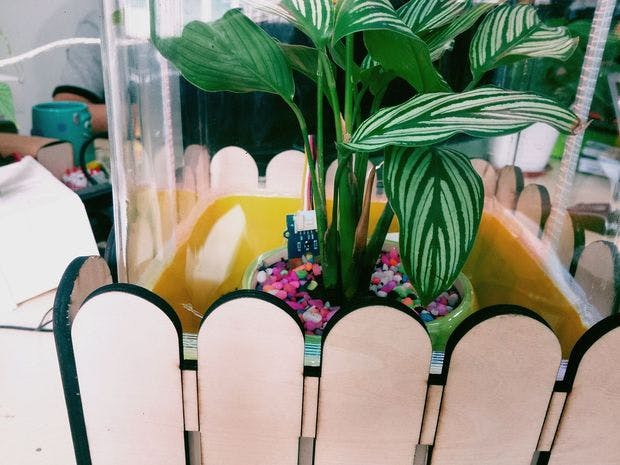
I am a plant hobbyist. Few days ago one of my friends give me a plate of plant, I don't know the name of this plant, but I like it anyway.
And I want to built a hour for my plant to detect some data, such temperature, humidity, and the CO2, cu'z I want to know it my plant is health or not.
What I am concern about is how to watering it. It's not that funny is you just put some water in it. Yesterday, Shenzhen rained very heavy and with lighting, you know it always rain cats and dogs in the summer of Shenzhen. I was inspired from the rain. Of course it don't mean I will put the plant to outside and rain it.
I was thinking why not built a box can rain and with lighting.
Sounds like a good idea, just MAKE!
Prepare materials and tools
Control Board
Sensor & Actuator
- Grove - Moisture Sensor
- Grove - Button
- Grove - Relay
- Grove - Gas sensor(O2)
- Grove - LCD RGB Backlight
- Grove - Temperature Sensor
The others electronic module
Tools
Laser cutting machine
5mm wood
3mm transparent acrylic
I guess you don't have a laser cutting at home, you can find some in the hacker space near from you easily. If there's no hacker space nearby, you can try the Laser Cutting Service supply by Seeed.
Laser cutting the wood to make a fence
Make the Body of the Case
Make the roof
Water pump installation
You need to get soft water pipe, you can buy it in the Hardware Store, or eBay maybe.
Just put it to the back of the Fence, and tight with 2 screw.
Hardware install 1 - Built the control center
It's no a very easy step to go. You need to do some soldering here, if you had never solder something, why not just start here.
First of all, let's cut 2 acrylic, download the file here, or you can check it in the attachment.
In the end of this step, we will get a control center, which looks like a small pc host. You can refer to image 11 and 12.
First we need to laser cut some, the acrylic top and bottom. Click here to download 2d file.
Then the hardest part is coming. We need to paste some interface on the bottom acrylic, they are
Put them on the right place just as shown in image 3 and 4. Pitch them om the bottom acrylic with some AB glue.
Then you should solder some cable on each connect, don't know the connection? Never mind, will tell you soon. As shown in image 5.
Connection of GrovePi please refer to image 13.
Connection of Hercules please refer to image 14.
Hardware installtion 2 - Sensor on the plant case
After the above steps, we had made a fence and acrylic case. Now we are going to install some sensor and cable on it.
They are:
- Grove - Moisture Sensor
- Humidifier
- Water pump
- Grove - Temperature Sensor
- Grove - CO2 Sensor
As it's very hard to describe the details, so please refer to the image, as a MAKER, I think you can make it out :XD
Software working on Raspberry pi
The operating system on Raspberry Pi 2 is Windows 10 for IoT Core. If this is your first time to run Windows 10 for IoT Core on your device, please click here to get more information.
Download the Code
This project is made as an Open Source Project. You can download the demo code from GitHub .
Click “Download ZIP” just as the picture below shows. And decompress it to any folders.
Run it
Double click on the “Rpi.sln”. Then you’ll find there’re 3 projects in the Solution Explorer. Choose the “RPI(Windows Universal)” project, Click “Debug ” -> “Rpi Properties” as shown in Image 2.
Then according to the below content of the red box marked to configure your project. Please note that the “Remote machine” IP address should be your own. (Image 4)
After all of the configuration is set up, Click “Build Solution”, when it’s finished built click “Deploy Solution”(Image 5)
At last, you’ll find the code is running on your Raspberry.
Self-starting Function
If you want to let your device startup automatically, you should remotely configure and manage the device using Windows PowerShell. PowerShell is a task - based command - line shell and scripting language , if you want more information click here .
Please follow this link to see how to set the code as the Startup App.
Software working on Hercules motor control board
Hercules Motor Controller is a high current motor drive control board. including micro controller processor, motor drive circuit, charging circuit and protection circuit. It features a complete solution to power supply, control and drive.
Hercules is compatible with Arduino, you can code it with Arduino IDE.
First of all, download the code here.
About the use of Hercules, please refer to wiki of Hercules.
Never heard about Arduino? Oh, there's long way to go, but never mind, it's not that hard to study.
Make it work
Finally, put a plate of plant into the box, better the water-like plant, or it may kill the plant with so many water.
Put some water into the box, press the button, then something magic will happen.
At the last, HAPPY HACKING.


Comments
Please log in or sign up to comment.