


Hardware components | ||||||
 |
| × | 1 | |||
 |
| × | 1 | |||
 |
| × | 1 | |||
 |
| × | 1 | |||
 |
| × | 1 | |||
 |
| × | 1 | |||
 |
| × | 1 | |||
 |
| × | 1 | |||
Software apps and online services | ||||||
 |
| |||||
 |
| |||||
| ||||||
It is very important in pharmaceutical industry to maintain the temperature of the medicines in the threshold range.
My friend Ms.Manisha is the head of a pharmaceutical industry and had a problem a year ago in monitoring the temperature. The tablets were destroyed and had to be discarded, the company faced a lot of loss.
This year the company has decided to put a temperature monitoring system in the industry that will send a message as well as e-mail when the temperature crosses threshold values.
Also as a precautionary measure, a predictive machine learning algorithm will predict the future data based on the data in history that is model is trained based on it's previous dateset so that prior steps can be taken.
1) DEMONSTRATIONCreate a free account on Twilio and follow below steps to receive SMS:-
- To signup click "Get a Free API Key".
- Fill SIGNUP form with necessary details that includes name, email id, select sms for product plan to use first, choosing account notification for what you are building and programming language as python as our code is in python.
- Choose the country code and enter your number
- Select on products on the next screen
- Enable Programmable Sms and Phone Numbers as shown in the screen below
- Scroll down and click on continue and give the project a name
- Click on "skip this step" when it asks to Invite a teammate
- Click on project info to view credentials ; from top-down menu select programmable sms and click get started on next screen click on get a number to receive sms
Create a free account on Mailgun nad follow the steos to receive mail:-
- Click on signup button
- Fill all necessary information and make sure to uncheck the payment option in the checkbox
- After verification of the mail, verify the phone number.
- After verification scroll down to Sandbox domain and click on add recipient.
- Click on invite new recipient and enter the email id of the recipient.
- After adding Email ID a new sandbox will be generated. Click on the ID of the newly generated sandbox.
- The screen will contain all the credentials required for sending the mail.
Video Link:-
Copy and paste this link forthe video link:-
https://drive.google.com/file/d/1a4cxYvB7CsrKStZA9NxMBvmpjF2iwPeY/view?usp=sharing
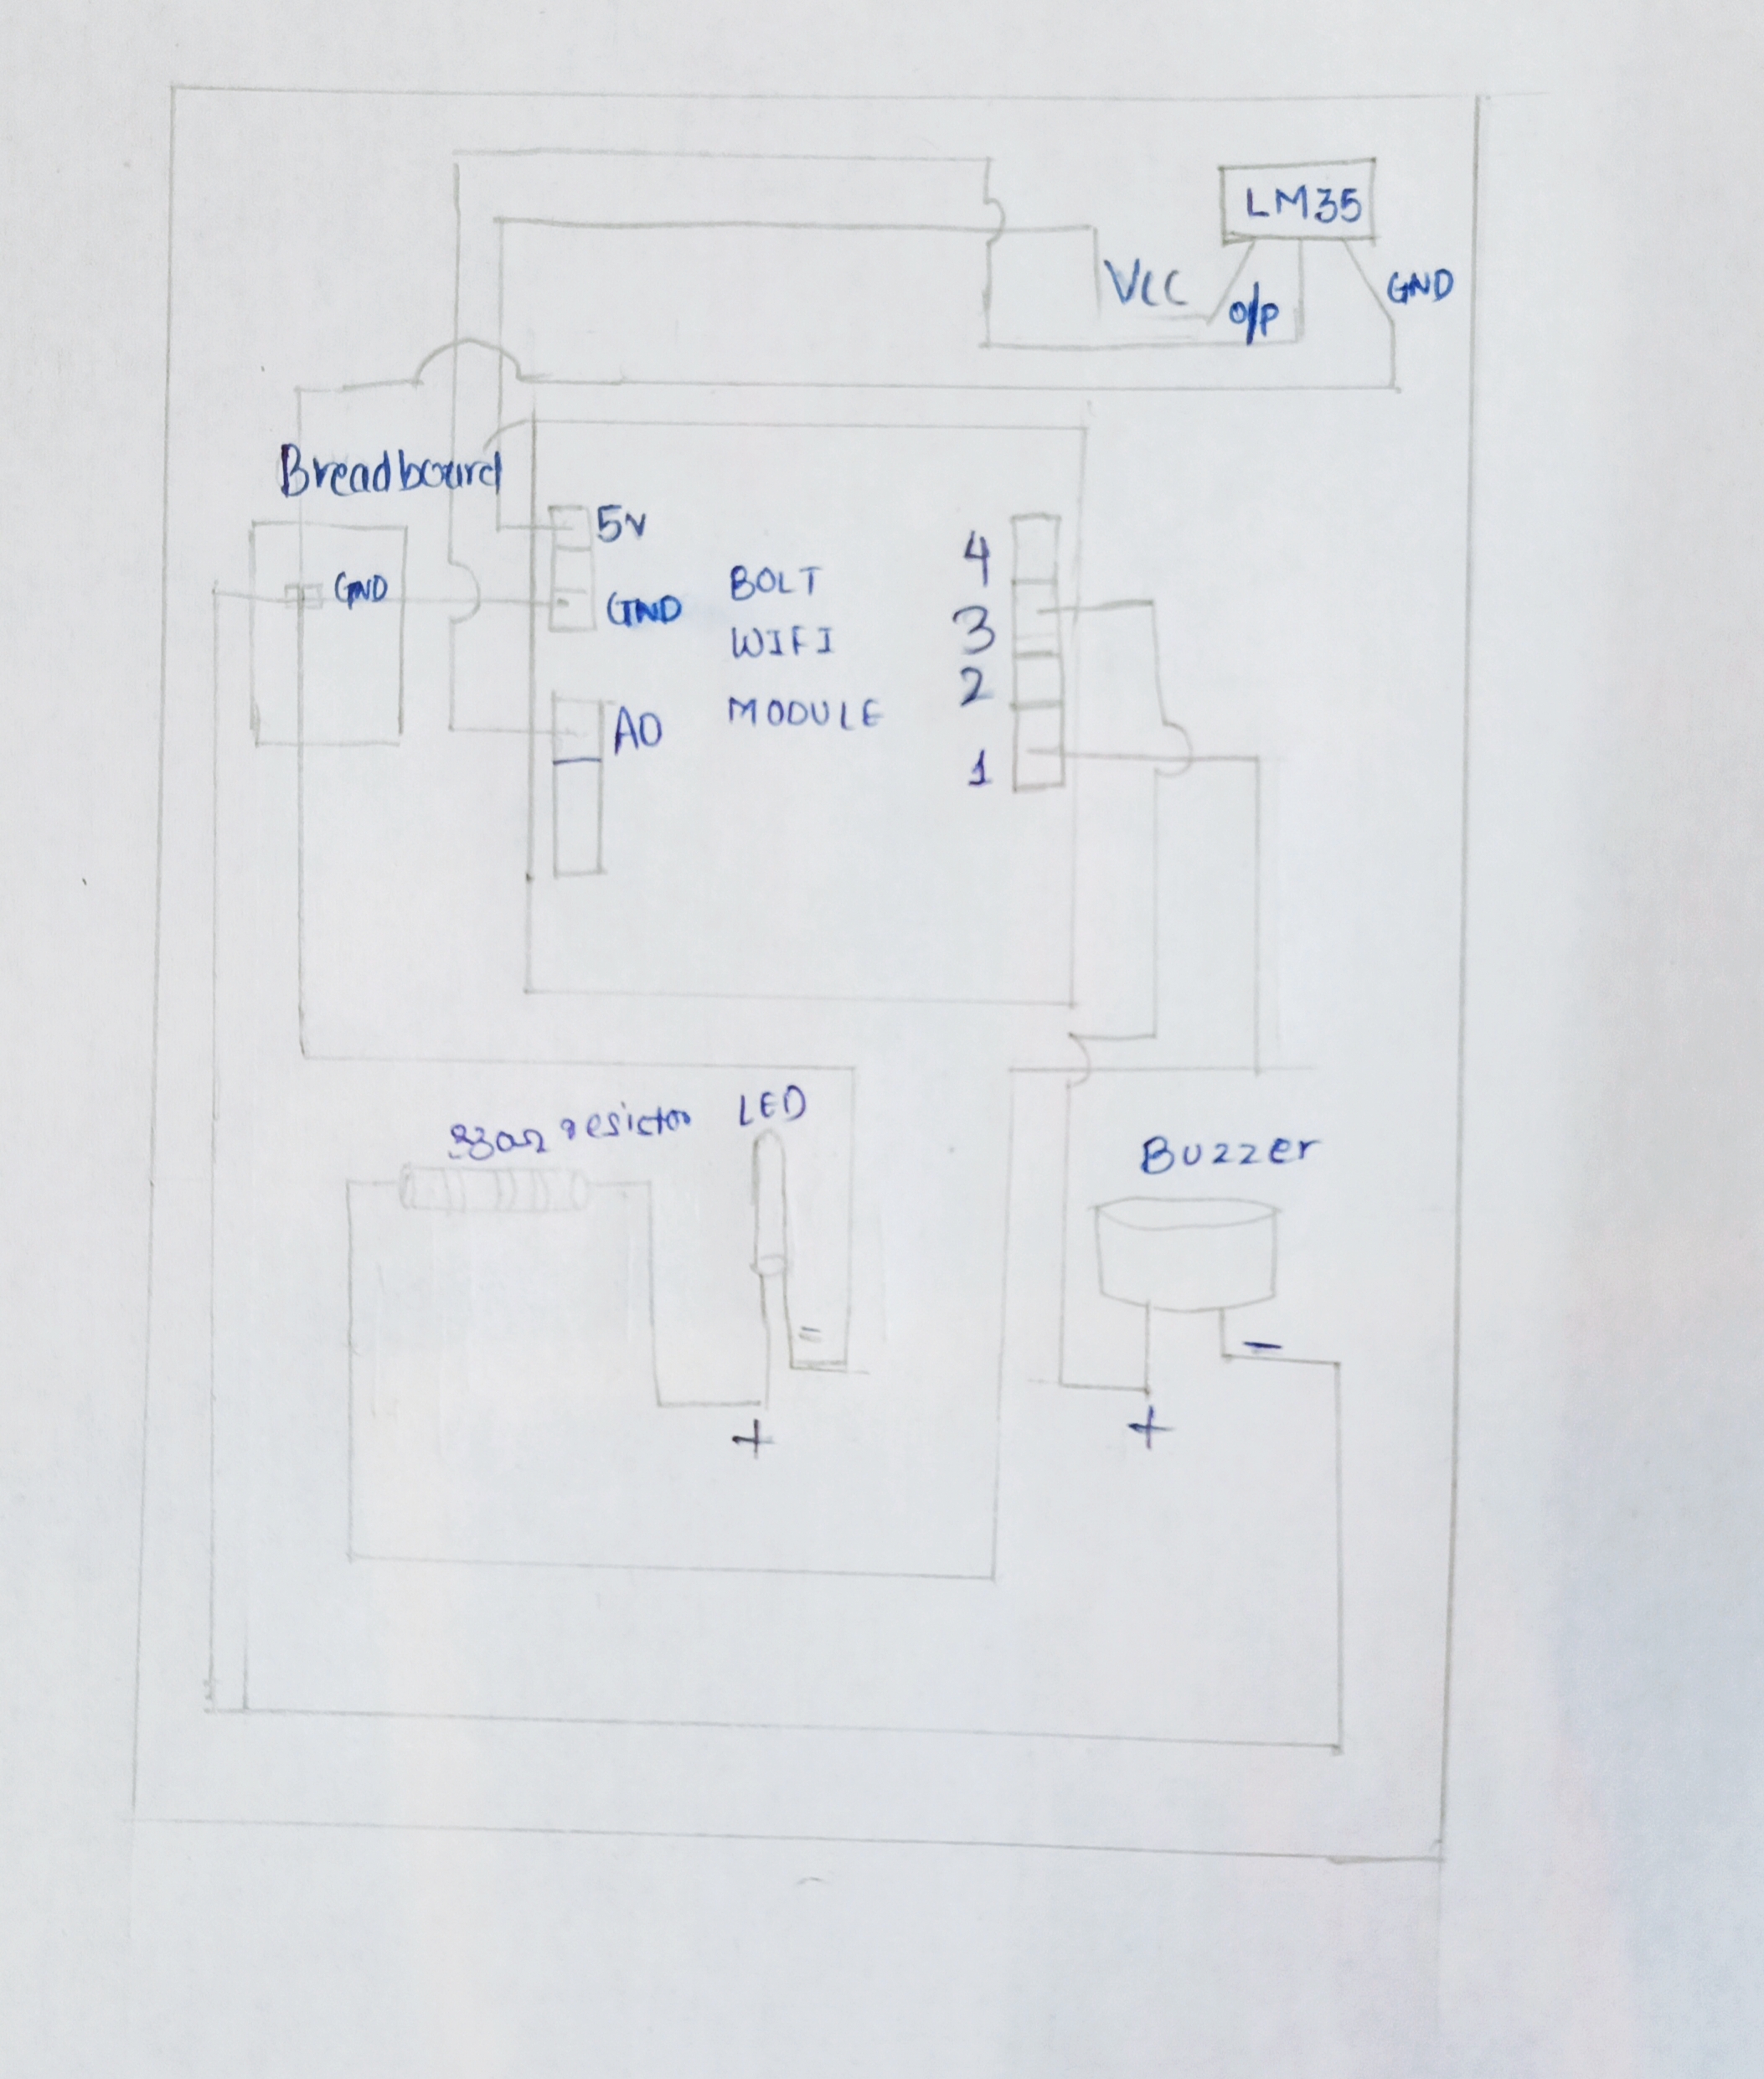
2) HARDWARE CONNECTIONS- Let's start with simple connections first. Let's start with LED and Buzzer connections.
- For the LED connections we need a 330 ohm resistor. Resistor's one leg is wrapped around longer / positive leg LED. Insert negative leg of the LED into the ground pin of the BOLT Wifi Module and insert the other leg of the resistor in digital pin 0 of the BOLT Wifi Module.
- The connections for the Buzzer are the same, only do not use a resistor with the buzzer. Buzzer leg goes digital pin 1 of the BOLT Wifi Module.
- Now for the LM35 connections, the LM35 has 3 pins namely the VCC, Output and Gnd. The VCC pin of the LM35 connects to 5v of the Bolt Wifi module. Output pin of the LM35 connects to A0 of the Bolt Wifi module and Gnd pin of the LM35 connects to the GND.
- After the connections are done power the Bolt Wifi Module to laptop via the USB cable.
- Wooh ! the hardware connections are done
- Refer to Schematics for the connections in detail.
SENDING SMS AND MAIL
- On your Ubuntu machine ; on the command line create a directory named project
mkdir project
cd project- Next create a.py file named conf that will store all the auth, ssid and bolt wifi module credentials.
sudo nano conf.py- Creat temp_sms file of.py extension and type in the code for sending the sms and mail
sudo nano temp_sms.py- Run the temp_sms.py file and the notice the output on the command line interface
sudo python3 temp_sms.py- Now to enable your API KEY on the left side click on API. A screen will appear where two options are displayed enable and disable. Select the enable option.
- Once you start receiving the mail and sms the alerting part of the project is done. Now to be cautious in future we build a Machine Learning algorithm.
- Log in to your BOLT cloud account and click on products and then click on add product. If no existing products exist click on build project.
- Give the project a name and select the configuration as follows
- Select the product and then click on configure this product.In the hardware section select data collection rate to be 5 minutes. Name the variable and select A0 analog pin.
- In the Code section enter the below code
/ *start typing your code here */
setChartLibrary('google-chart'); # set the chart library as google-charts
setChartTitle('Polynomial Regression'); # Title of the chart
setChartType('predictionGraph'); #Type of the graph is prediction graph
setAxisName('time_stamp','temp'); # setting axis name
mul(0.0977);
plotChart('time_stamp','temp');#plotting the chart- In the code section select 'js' as the extension for the code as the code is in JavaScript. Save the changes to your product
- Link your product to the device by clicking on the link option
- Click on deploy configuration and then view this device. After sufficient collection of data points click on predict button.
- Working of the whole project can be found in the video above.
- The conf file contains all the credentials of the account on Twilio, Mailgun and Bolt cloud API Key and Bolt device id. It contains the twilio number, mailgun sandbox email, recipient number,recipient mail id.
- From the boltiot pythom module import the Bolt class, sms and email class as well. Import json and time which is needed to load response from the bolt module.
- The algorithm for code is as follows:-
- Setting the minimum and maximum limit for the temperature analog values.
- Creating objects 1) mybolt:- for the bolt device 2) sms:- for the sms from Twilio 3)mailer:- for the mail from Mailgun
- Start with the while loop and run till it is true (Press Ctrl+C to exit). Inside the while loop start with fetching the latest sensor value from the Bolt device.
- Load the response from from Bolt Wifi module by using json.loads() function.
- Extracting the sensor value from the response received from the Bolt Wifi Module and checking if the value is in the range specified in our min and max values.
- If it is not in the range send sms and mail.
- If sms and mail not sent show the response from the from Twilio and Mailgun.
- Wait for 10 seconds
- Repeat from the while loop.
Go ahead ! Build this interesting project! All the best!
My thanks to course instructor of BOLT IOT Training: Pranav Pai Vernekar.


Comments