


Hardware components | ||||||
 |
| × | 1 | |||
 |
| × | 1 | |||
 |
| × | 1 | |||
 |
| × | 2 | |||
Software apps and online services | ||||||
 |
| |||||
| ||||||
The most difficult aspect is getting up early. It is even more difficult to get up early without an alarm clock. Nowadays, we all have cell phones, which are really valuable to us. We set the alarm on our phones every day, but for some reason, we fail to set it one day, and that day we miss our best opportunity.
Here is a solution for breaking these bad habits. Many projects involving smart alarm clocks can be developed using the Internet of Things.
We can design our own alarm clock using the Bolt Wifi Module and Buzzer to catch all opportunities, essential meetings, and so on.
SHORT STORY
John was a heavy sleeper and struggled to wake up in the morning, often hitting snooze on his regular alarm clock multiple times. He knew he needed a better solution, so he decided to build his own smart alarm clock using a Bolt WiFi module and a buzzer.
With the help of online tutorials, John programmed the Bolt WiFi module to connect to his home WiFi network and send an alarm signal to the buzzer at his desired wake-up time. He also programmed the module to gradually increase the volume of the alarm over a period of two minutes, to prevent the jarring wake-up experience he was used to.
The next morning, John eagerly went to bed excited to try out his new smart alarm clock. As soon as the alarm went off, he was pleasantly surprised by the gradual increase in volume, and the gentle buzz of the buzzer that didn't startle him awake. He got up on time and felt refreshed and ready for the day ahead.
John continued to use his smart alarm clock every morning and found that it was a vast improvement over his old alarm clock. He even started experimenting with adding more features, like using the Bolt WiFi module to turn on his coffee maker automatically as soon as the alarm went off.
Thanks to the Bolt WiFi module and buzzer, John was able to finally overcome his heavy sleeping habits and start his day off on the right foot.
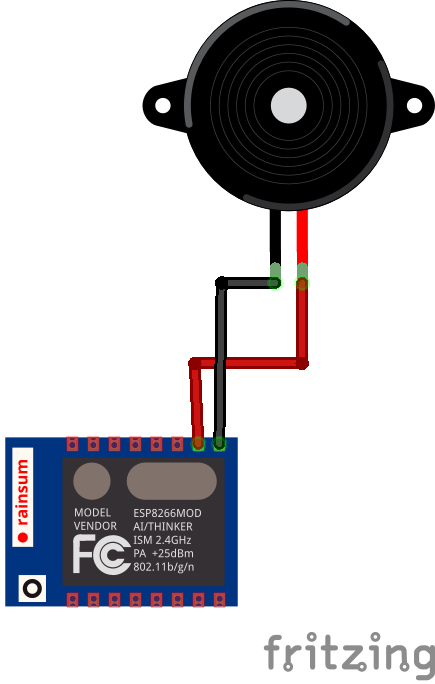
CONNECTIONS- Connect the Buzzer's longer (+ve end) to the Bolt's pin 0 (or any other GPIO pin, such as 1 2 3 or 4).
- Connect the Buzzer's shorter end (-ve end) to the Bolt's GND pin.
- The Bolt device is powered on through a micro-USB connection.
Give the connection to your bolt wifi module
- Make an account at www.integromat.com
- Verify the account using your email address.
- Login to your account
- Create a new scenario.
- Click Add Module
- To connect the Wifi module, search for and choose Bolt IoT, then enter your Command as write digital output, then enter your API key
- To obtain your API KEY, go to the cloud.boltiot.com home page and enter your API secret key.
- Enter your Device ID and choose Pin 1 because the buzzer is connected to it.
- To activate the buzzer, set the status to HIGH.
- Next, we'll sound the buzzer for a few seconds. To do so, go to the tools icon (purple) and select the sleep option.
- Enter the number of seconds you want the buzzer to stay on.
- · Select Bolt IoT once more by clicking on add new module.
- · In the command area, select Write Digital Write Option.
- · Enter the Device ID and API key, then click the 'LOW' button.
- · Now, configure certain criteria for our IoT alarm clock to sound.
- · On the initial Bolt module, click the small clock symbol.
- · Time can be changed to suit your needs.
- · That's all. You have completed the entire procedure successfully.
- · Now, click the save button to save your scenario.
Easy way to built your own alarm clock using Bolt IOT


Comments
Please log in or sign up to comment.