Hardware components | ||||||
_ztBMuBhMHo.jpg?auto=compress%2Cformat&w=48&h=48&fit=fill&bg=ffffff) |
| × | 1 | |||
| × | 2 | ||||
 |
| × | 1 | |||
| × | 1 | ||||
 |
| × | 3 | |||
 |
| × | 1 | |||
 |
| × | 1 | |||
 |
| × | 1 | |||
 |
| × | 1 | |||
Software apps and online services | ||||||
 |
| |||||
 |
| |||||
 |
| |||||
Hand tools and fabrication machines | ||||||
 |
| |||||
 |
| |||||
 |
| |||||
 |
| |||||
 |
| |||||
 |
| |||||
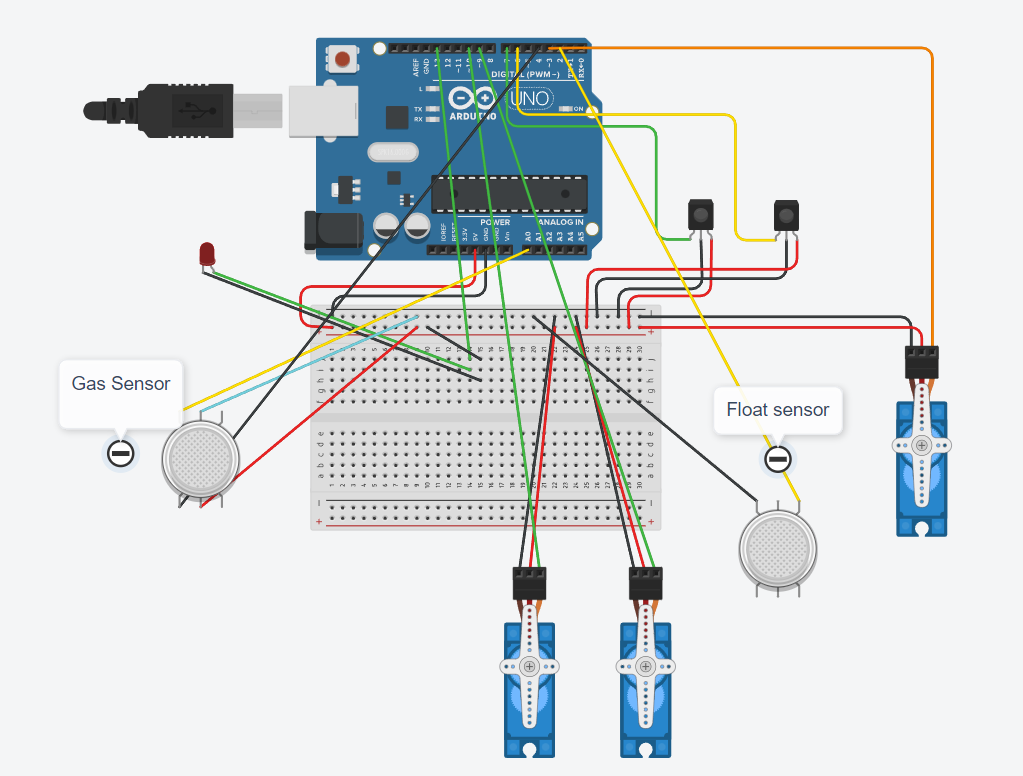
Flashfloods are known in Malaysia that is caused by irresponsible people throwing trash into drains and sewers. This system that we create is mainly to use mechanical methods to remove trash and waste and be discarded to their rightful place. This method has a lot more to innovations in mind as we can't eliminate them for now. The project is just to make us realize that even thought we can only do so much now, it is still worth doing as not only it is the right thing to do but also to inspire others to create better solution for the future.
Trash Removal System (Rendall Edward TP019798)
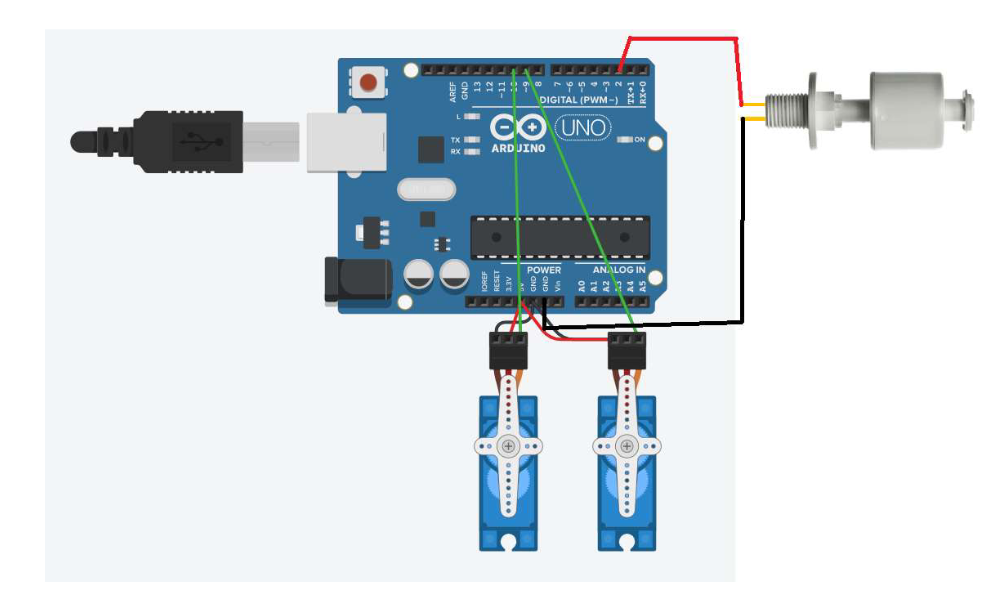
This trash removal system uses float sensor to operate. The liquid level affects the movement of a float sensor. The mechanical switch opens or closes as it rises or lowers to particular levels, depending on the counterweight and previously specified trigger. The linked device receives an electrical current when the switch is closed. When the water level rises or higher than expected level, the float sensor will send signal to the Arduino. The servos will activate once the signal is received and will remove the obstructions from the sewage system, clearing the pathway for smooth water flow.

Gas Detection System (Tan Chin Wan TP053424)
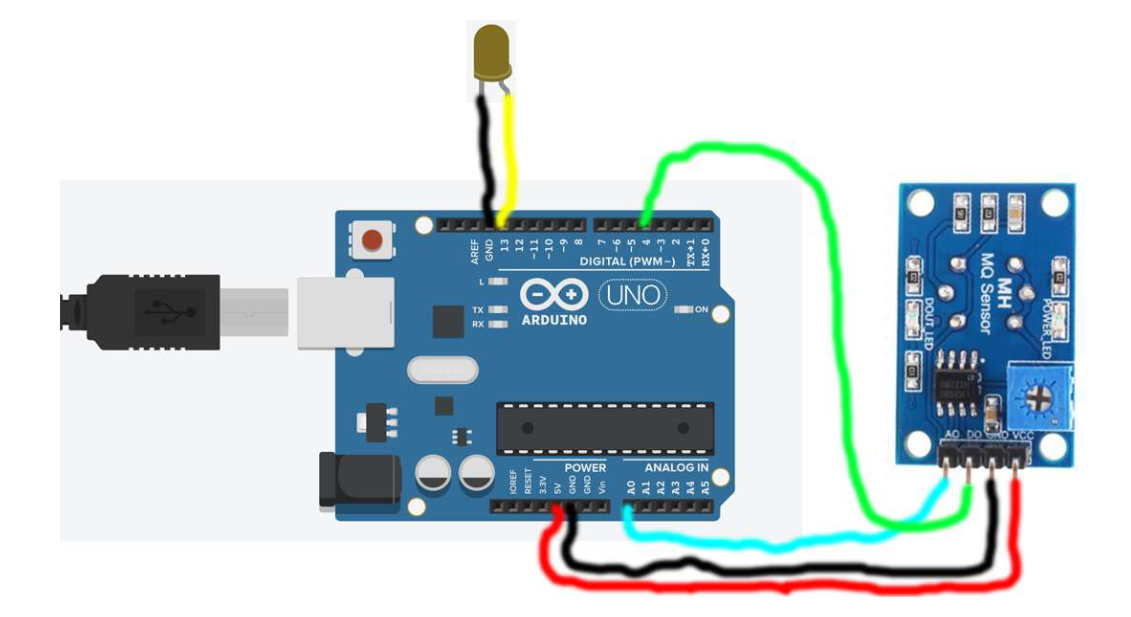
The gas detection system contains a gas sensor and an LED working together with the Arduino. The Arduino will read the analogue values through the gas sensor, when it detects anything other than normal air, it will light up the LED through the Arduino output. The LED will switch off when the environment returns to normal air.

Sediment Filter System (Muhammad Hafizhan TP061825)
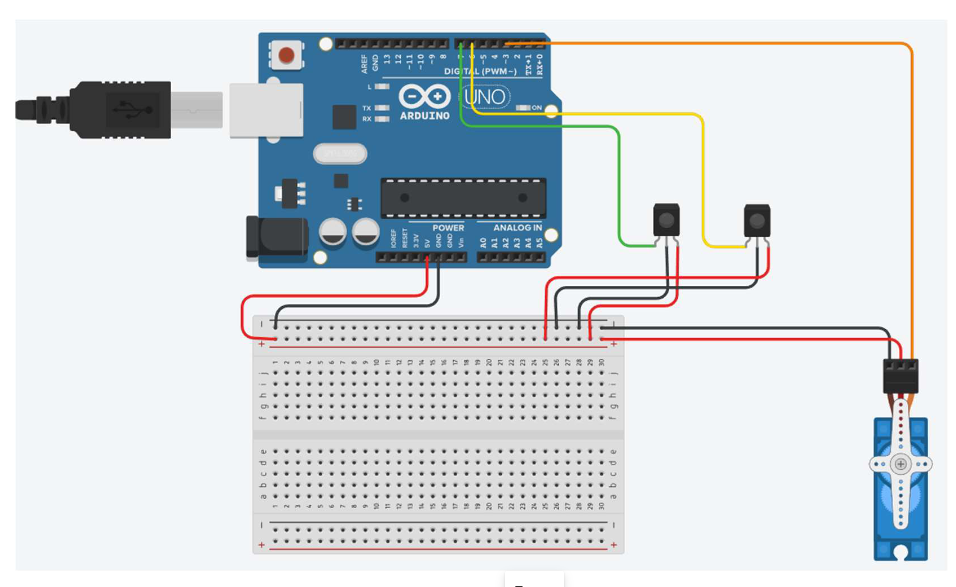
The sediment filter system filters the water further by controlling the water flow direction using the servo motor and a plastic contraption. The Sediment filter consist of two infrared sensors and a servo motor. Each of the controlled input and output component is attached to its specific pin according to the pin indicated in the code in Arduino IDE. The IR sensor will detect the infrared radiation from the foreign substance and will send a input signal to the Arduino and GUI. The motor acts as the directional flow controller where it will redirect the water flow towards the pipeline without any foreign substances to ensure less contamination occurs in the water flow.

Trash Removal System
C/C++It's a trash removal system code that removes trash according float sensor.
#include <Servo.h>
// Define the pin number for the float sensor
const int floatSensorPin = 2;
const int servo1Pin = 9;
const int servo2Pin = 10;
const int servo1InitialPosition = 0;
const int servo1FinalPosition = 90;
const int servo2InitialPosition = 90;
const int servo2FinalPosition = 0;

Servo servo1;
Servo servo2;

bool servoDirection = true;

void setup() {
  servo1.attach(servo1Pin);
  servo2.attach(servo2Pin);
  servo1.write(servo1InitialPosition);
  servo2.write(servo2InitialPosition);

  // Initialize serial communication
  Serial.begin(9600);

  // Set the float sensor pin as input
  pinMode(floatSensorPin, INPUT_PULLUP);
}

void loop() {
  // Read the digital value from the float sensor
  int sensorValue = digitalRead(floatSensorPin);
  // Check if the sensor is in high or low state
  if (sensorValue == HIGH) {
    Serial.println("Float sensor is HIGH (heavy obstruction detected)");
    servoDirection = !servoDirection;

    if (servoDirection) {
      for (int pos = servo1InitialPosition; pos <= servo1FinalPosition; pos++) {
        servo1.write(pos);
        servo2.write(servo2FinalPosition + (pos - servo1InitialPosition));
        delay(10);
      }
    } else {
      for (int pos = servo1FinalPosition; pos >= servo1InitialPosition; pos--) {
        servo1.write(pos);
        servo2.write(servo2FinalPosition + (pos - servo1FinalPosition));
        delay(10);
      }
    }
  }
  delay(1000);
}
WATER DRAINAGE CLEARANCE SYSTEM ARDUINO UNO R3 CODE
C/C++This is the combined code of the whole system. Only 1 Arduino Uno R3 Controller is used to control the whole project.
#include <Servo.h>
// Define the pin number for the float sensor
const int floatSensorPin = 2;
const int servo1Pin = 9;
const int servo2Pin = 10;
// Define Servo Position
const int servo1InitialPosition = 0;
const int servo1FinalPosition = 90;
const int servo2InitialPosition = 90;
const int servo2FinalPosition = 0;
// Define the pin number for the gas sensor
const int gasin = 4;
const int gasout = 13;
// Define Gas Sensor Value
int sensorValue;
int digitalValue;
// Define the pin number for the IR sensor
int IRSensor = 6;
int IRSensor2 = 7;
int servo3Pin = 3;

Servo servo1;
Servo servo2;
Servo servo3;

bool servoDirection = true;

void setup() {
  servo1.attach(servo1Pin);
  servo2.attach(servo2Pin);
  servo3.attach(servo3Pin);
  servo1.write(servo1InitialPosition);
  servo2.write(servo2InitialPosition);

  // Initialize serial communication
  Serial.begin(9600);
  // Set the float sensor pin as input
  pinMode(floatSensorPin, INPUT_PULLUP);
  // Set the gas sensor pin input and output
  pinMode(gasout, OUTPUT);
  pinMode(gasin, INPUT);
  // Set the ir sensor pin inputs
  pinMode(IRSensor, INPUT);
  pinMode(IRSensor2, INPUT);
}

void loop() {
  // Read the digital value from the float sensor
  int sensorValue = digitalRead(floatSensorPin);
  // Check if the sensor is in high or low state
  if (sensorValue == HIGH) {
    Serial.println("Float sensor is HIGH (heavy obstruction detected)");
    servoDirection = !servoDirection;

    if (servoDirection) {
      for (int pos = servo1InitialPosition; pos <= servo1FinalPosition; pos++) {
        servo1.write(pos);
        servo2.write(servo2FinalPosition + (pos - servo1InitialPosition));
        delay(10);
      }
    } else {
      for (int pos = servo1FinalPosition; pos >= servo1InitialPosition; pos--) {
        servo1.write(pos);
        servo2.write(servo2FinalPosition + (pos - servo1FinalPosition));
        delay(10);
      }
    }
  }
  delay(1000);
// gas sensor
  sensorValue = analogRead(0);
  digitalValue = digitalRead(4);
  if (sensorValue > 400){
    digitalWrite(13, HIGH);
    Serial.println("LED turned ON");
  }
  else
    digitalWrite(13, LOW);

  Serial.println(sensorValue, DEC);
  Serial.println(digitalValue, DEC);
  delay(1000);
// ir sensor
  int sensorStatus = digitalRead(IRSensor);
  int sensorStatus2 = digitalRead(IRSensor2);
  if (sensorStatus == 1 and sensorStatus2 == 0){
    Serial.println("A is full");
    servo3.write(90);
  }
  if (sensorStatus == 0 and sensorStatus2 == 1){
    Serial.println("B is full");
    servo3.write(0);
  }
  else
  {}
}
WATER DRAINAGE CLEARANCE SYSTEM PYTHON GUI
PythonUsing customtkinter, pyserial and sys python library to create a system to receive data from Arduino on the status of the project.
import customtkinter
import serial
import sys

arduino_port = 'COM3'
baud_rate = 9600

ser = serial.Serial(arduino_port, baud_rate)

customtkinter.set_appearance_mode("dark")
customtkinter.set_default_color_theme("dark-blue")

root = customtkinter.CTk()
root.title("GUI for Arduino")
root.geometry("500x300")

frame = customtkinter.CTkFrame(root)
frame.pack(pady=20, padx=40, fill="both", expand=True)

def reset_arduino():
    ser.write(b'ResetCommand')

label = customtkinter.CTkLabel(frame, text="Waiting for data...")
label.pack(pady=10, padx=12)

label2 = customtkinter.CTkLabel(frame, text="Waiting for data...")
label2.pack(pady=10, padx=12)

label3 = customtkinter.CTkLabel(frame, text="Waiting for data...")
label3.pack(pady=10, padx=12)

reset_button = customtkinter.CTkButton(root, text="Reset Arduino", command=reset_arduino)
reset_button.pack(pady=10, padx=12)

def quit_program():
    # Close the serial connection
    ser.close()
    # Exit the program
    sys.exit()

quit_button = customtkinter.CTkButton(root, text="Quit", command=quit_program)
quit_button.pack(pady=10, padx=12)

def update_label(line):
    label.configure(text=line)

    root.after(1000, reset_label)

def update_label2(line):
    label2.configure(text=line)

    root.after(1000, reset_label)


def update_label3(line):
    label3.configure(text=line)

    root.after(1000, reset_label)

def reset_label():
    label.configure(text="Waiting for data...")
    label2.configure(text="Waiting for data...")
    label3.configure(text="Waiting for data...")

def read_serial():
    line = ser.readline().decode().strip()
    if line.startswith('Float'):
        update_label(line)
    if line.startswith('A') or line.startswith('B'):
        update_label2(line)
    if line.startswith('LED'):
        update_label3(line)

    root.after(10, read_serial)

read_serial()

root.mainloop()

ser.close()
#include <Servo.h>
int IRSensor = 6; // connect IR sensor module to Arduino pin D6
int IRSensor2 = 7; // connect IR sensor module to Arduino pin D7
int servoPin = 3; // connect Servo to Arduino pin D3
Servo Servo1;

void setup()
{
  Serial.begin(9600); // 9600 Baud Rate.
  Serial.println("Serial Working");
  pinMode(IRSensor, INPUT); // IR Sensor pin INPUT
  pinMode(IRSensor2, INPUT); // IR Sensor2 pin INPUT
  Servo1.attach(servoPin); // Atatching the Servo
}

void loop(){
  int sensorStatus = digitalRead(IRSensor);
  int sensorStatus2 = digitalRead(IRSensor2); // Set the GPIO as Input
  if (sensorStatus == 1 and sensorStatus2 == 0)  // Check the IR sensor value
  {
    Serial.println("A is full"); // print A is full on the serial monitor window
    Servo1.write(90); // Servo turn to 90 degree angle
  }
  if (sensorStatus == 0 and sensorStatus2 == 1) // Check the IR sensor value
  {
    Serial.println("B is full"); // print B is full on the serial monitor window
    Servo1.write(0);  // Servo turn to 0 degree angle
  }
  else
  {}

}
Gas Detection System
C/C++It is a gas detection code, that detects gas concentration other than normal air. The Arduino takes analogue and digital input from the gas sensor, if the value of the analogue value exceeds 400, the output LED will light up. Once it goes below 400, the LED will switch off.
int sensorValue;
int digitalValue;
int gasin= 4;
int gasout =13;


void setup()
{
  Serial.begin(9600); // sets the serial port to 9600
  pinMode(gasout, OUTPUT);
  pinMode(gasin, INPUT);

}

void loop()
{
  sensorValue = analogRead(0); // read analog input pin 0
  digitalValue = digitalRead(4);
  if (sensorValue > 400)
  {
    digitalWrite(13, HIGH);


  }
  else
    digitalWrite(13, LOW);

  Serial.println(sensorValue, DEC); // prints the value read
  Serial.println(digitalValue, DEC);
  delay(1000); // wait 100ms for next reading
}


_t9PF3orMPd.png?auto=compress%2Cformat&w=40&h=40&fit=fillmax&bg=fff&dpr=2)


Comments
Please log in or sign up to comment.