


Hardware components | ||||||
 |
| × | 1 | |||
| × | 1 | ||||
Software apps and online services | ||||||
| ||||||
The moment the Dragon Slayer is drawn into the world of challenges, driven by curiosity and purpose.
The Kria KR260 is an exceptional platform for developing a wide range of applications. With the ability to run Ubuntu, it provides access to an extensive suite of tools, enabling seamless embedded software and hardware co-design. However, when developing such systems, there inevitably comes a point where you need to transfer large amounts of data between the Processing System (PS) and the Programmable Logic (PL). In such case AXI Bram might not do the job. This is where Direct Memory Access (DMA) comes into the picture.
DMA has always been - the dragon I’ve needed to slay - something I’ve wanted to master but have found daunting due to its complexity. If you’re also eager to demystify DMA and learn how to implement it, keep on reading!
In this story I describe the learning path I went through, it is by no means my intention to write an extensive driver that does it all. Just getting to know how such a driver works. By doing so, you'll get better at using existing drivers. If you're only looking for a quick answer skip to the coffee break.
Why DMA?You're absolutely right—DMA (Direct Memory Access) isn't always necessary for transferring data from the PS (Processing System) to the PL (Programmable Logic). However, when dealing with large volumes of data, DMA becomes incredibly valuable. By using a dedicated controller to handle the data transfer, DMA allows the CPU to focus on other tasks while the transfer occurs seamlessly in the background. Consider it an essential tool in your development toolkit—it may prove indispensable one day.
Responsibility and Disclaimer: Proceed at Your Own RiskThis project is shared in the spirit of learning and exploration, but please note: you are fully responsible for your own actions and the outcomes of using this work. While I’ve done my best to document and test the process, I am by no means an expert—just a curious Dragon Slayer tackling challenges one step at a time. Mistakes can happen, and experimenting with low-level systems like FPGAs, Linux Kernel Modules, and DMA can have unintended consequences, including system crashes or data loss. Proceed with caution, double-check your work, and embrace the learning journey!
>> Forging the BladePreparing for the journey; acquiring tools, knowledge, and determination.Kria KR260 Starter Kit
The Kria KR260 is a fascinating starter kit! It features a versatile carrier card equipped with a wide range of I/O interfaces, and it integrates with the K26 SOM (System on Module)—the actual FPGA module that plugs into the carrier card. The K26 can run a standard Ubuntu OS, offering a user-friendly development environment. Before starting with the KR260, make sure you upgrade your firmware. While it's possible to upgrade to the latest Ubuntu version using a simple do-release-upgrade, I recommend sticking to 22.04 LTS for now. I encountered some issues with 24.04 that require further investigation.
Update: I have tested on 24.04, that works as well.
For this project, I used Vivado 2024.1, which includes the Vitis Unified IDE (though I didn’t utilize Vitis for this particular build). While you can create a fully custom system with Petalinux, this isn't a strict requirement. Instead, you can download the Ubuntu image, write it to an SD card, or even transfer it to an SSD (more on this later).
Next, you'll need to:
- Build the hardware design in Vivado.
- Export the design.
- Generate a device tree overlay using
xsctanddtc. - Copy three key files to the running board.
- Load the new hardware design.
These steps are explained in greater detail later in this guide.
Linux Kernel ModulesFor this project, I aimed to expand my knowledge by writing a Linux Kernel Module (LKM). This module creates a character device that facilitates DMA transfers. However, as a starting point, I used devmem2 to directly manipulate the hardware registers—a quick but insecure method that requires root privileges (sudo).
Some developers advocate for writing custom LKMs, as they provide robust and tailored functionality. However, this approach requires caution—bugs in your LKM can crash the entire system. Others recommend using UIO (Userspace I/O) as a simpler alternative for driver development. Both methods have their merits, so choose based on your project's complexity and your experience level. Most important is to learn from what you are doing. After doing this, make sure you read more about the Linux Soft DMA Driver, you might want to use one of those once you understand the drivers better.
>> First FlamesFacing initial obstacles and learning the power of perseverance.
Let's embark on the journey. First we need to learn more about DMA. Whitney Knitter has a very nice introduction to using axi dma in embedded linux that explains the basics of the status and control registers. Make sure you read this first as I will not repeat this well written explanation.
After reading about the basics of DMA, I started creating a design. Again, Whitney has written a very good step-by-step guide on how to create this design. The first one explains how to create a basic design for the KR260. The second one explains how to configure the peripherals for the KR260 in the Zynq Ultrascale+. I did all of this using Vivado 2024.1 without any issues.
I also started building petalinux images, because at that time I did not realize with Kria this is not required anymore. You can use the existing Ubuntu image. But I must say, forging your own Petalinux gives many insights in how your embedded system is working, but that's another Dragon's Lair...
After having setup the base design, I changed and added some IPs because I wanted to test the DMA using audio. The goal I set was to play a wav-file using DMA on the KR260 connected to a Digilent Pmod I2S2. Playing wav-files has been done before. Daniel Kampert has written a story that explains how to Play wav-files from an SD card on a ZYBO. I2S is also explained overthere. Nice! When measuring the output clocks I noticed my design had difficulties to reach exactly 48Khz, so I increased the mclk clock setting a bit (from 12.288 Mhz to 12.5Mhz) to approximate the 48Khz as close as possible (48.23Khz).
>> The Hidden PathDiscovering unexpected truths and uncovering secrets on the way forward.AXI Streams
When I used Daniel Kampert's VHDL files to output I2S to the Digilent Pmod I2S2, Vivado refused to connect the AXI Stream interfaces. Vivado uses naming conventions for AXI Streams, so changing the input and output names of the VHDL files resolves that issue.
entity AXIS_I2S is
Generic (   RATIO   : INTEGER := 8;
  WIDTH   : INTEGER := 16
);
Port (
  mclk        : in STD_LOGIC;
  aud_rst     : in STD_LOGIC; -- resets the I2S transmitter
  lrclk       : out STD_LOGIC;
  sclk        : out STD_LOGIC;
  sd          : out STD_LOGIC;
  s_axis_aud_aclk    : in STD_LOGIC; -- s_axis_aud_aclk
  s_axis_aud_aresetn : in STD_LOGIC; -- s_axis_aud_aresetn
  s_axis_aud_tdata   : in STD_LOGIC_VECTOR(31 downto 0); -- s_axis_aud_tdata
  s_axis_aud_tready  : out STD_LOGIC; -- s_axis_aud_tready
  s_axis_aud_tvalid  : in STD_LOGIC -- s_axis_aud_tvalid
);
end AXIS_I2S;
Oh, if you're struggling with AXI Streams, have a look at Stacey's video AXI Stream basics for beginners.
Constraints filesFiguring out how to get the constraints file was a bit hard in the beginning. With a board like the Pynq-Z2 you can easily find a constraints file that contains all of the correct pin-outs, very well documented. In the case of the Kria you need two files:
- The schematics at the bottom of the Kria KR260 starterkit page
- And this resource (might change in the future, you are looking for a file called part0_pins.xml)
With those files you can find all of the pin mappings. Both of them can be downloaded from AMD Xilinx's website. Read the message from Kevin Keryk about the mapping and xtp685. The constraints file I used is attached at the bottom of this page.
Here is an example that shows PMOD1_pin1 is mapped to H12 (via HDA11 to SOM240_1_ A17). Check this for your version of the board, there have been updates between board revisions. Also notice the order of the pin numbering is different than the pmod interface specification (but the IOx-numbering is correct).
So for PMOD1_pin1 we need the following constraint:
set_property PACKAGE_PIN H12 [get_ports mclk]
set_property IOSTANDARD LVCMOS33 [get_ports mclk]At a certain point I ran out of disk space on my SD card. I had an SSD disk laying around and decided to try and boot from that disk. It turns out this is really simple. Just write the Ubuntu image to the disk, plug it in via USB and voila! The system is way faster as well! The reason why this is working is because the Kria boots from QSPI, which you can program with your own hardware design if you want to do so, but it will work with the boot image you uploaded while doing the firmware upgrade. After booting the first and second stage from QSPI the system will look for /dev/sda to boot the rootfs so you have to remove the SD card, otherwise the SSD will be /dev/sdb. Running on an SSD disk, the system is faster, no scientific testing but it feels like twice as fast...
>> Clash at the Cavern GateA pivotal confrontation with doubts, setbacks, or a critical learning curve."It is not working"
I came at a point where nothing was working out. The DMA controller just did not want to kick off the memory copy. It was unclear if DMA was recognized by the system. Using devmem2 to peek and poke in memory caused crashes. After trying lots of things, I decided to do two things... (always bad to change two things at the same time...) I went back to Ubuntu 22.04 (I had been running 24.04 until now) and started writing a proper Linux Kernel Module. This proved to be the path of success.
devmem2 is very useful, just make sure you read the correct registers and do not write to registers unless you are sure you can. Read the AXI DMA 7.1 documentation for the Control Registers and Status Registers. I am using Direct Register Mode, so no Scatter Gather (which uses a linked list of memory areas that need to be sent via DMA to the PL, called buffer descriptors).
$ sudo apt update
$ sudo apt upgrade
$ sudo apt install devmem2
$ devmem2 --help
$ sudo devmem2 0x80000000
$ sudo devmem2 0x80000004 h
Read the help of devmem2 to understand how to use it. As you can see this requires sudo rights. That is one of the reasons why using UIO or a LKM is better.
Linux Kernel Module journeyI started learning about LKM's using Johannes' video's, he recently restarted his series on building Linux drivers with updated code. His Let's Code A Linux Driver - Legacy is famous, short and clear tutorials on how to build Linux Drivers.
If you want to take a deep dive into kernel development, another very good resource for learning about Kernel Development seems to be Linux Kernel Labs (it has a "Copyright The kernel development community" and "This content is based on the Operatings Systems 2 course from the Computer Science and Engineering Department, the Faculty of Automatic Control and Computers, University POLITEHNICA of Bucharest").
If I am correct, it provides information about kernel v5.10, Kria uses kernel v5.15 for the time being, so we should be pretty fine. Though, I did not extensively use this resource.
>> Do Dragon Slayers drink coffee?Care to share some coffee with Stacey or Johannes? I couldn't find out if Whitney and Daniel like to drink coffee, but you can support them by following them on YouTube or here on Hackster.io. Shout out to all of you: thanks for all the great work and sharing the information, this is a great community!
>> Allies and ArtifactsFinding support, resources, or mentors that bolster strength and resolve.Specific hardware design
I am organizing my folder structure as follows: the main folder that I use for this project contains subfolders named:
- src : all hdl source files
- bd : board design file
- xdc : constraints file
- kr260_custom_platform : for devicetree generation using
xsct - KR260_base : the Vivado project is located in this subfolder and references to the above files outside of the project folder, this makes it easier to commit your vivado project in a git repository in the form of a Tcl script
- dma_file_transfer : will contain the files we need to copy to the Kria
[There is a caveat, I noticed I was getting some weird build errors when using external references to source files. This can be solved by right-clicking on the block design in the source tree and select Copy All Files Into Project, shortcut ALT-i]
I learned about this method from Stacey when she was talking about her development environment.
Before we begin do not forget to change your settings in Vivado. Generating the bitstream has to create the 'bin' file. In synthesis settings disable incremental synthesis.
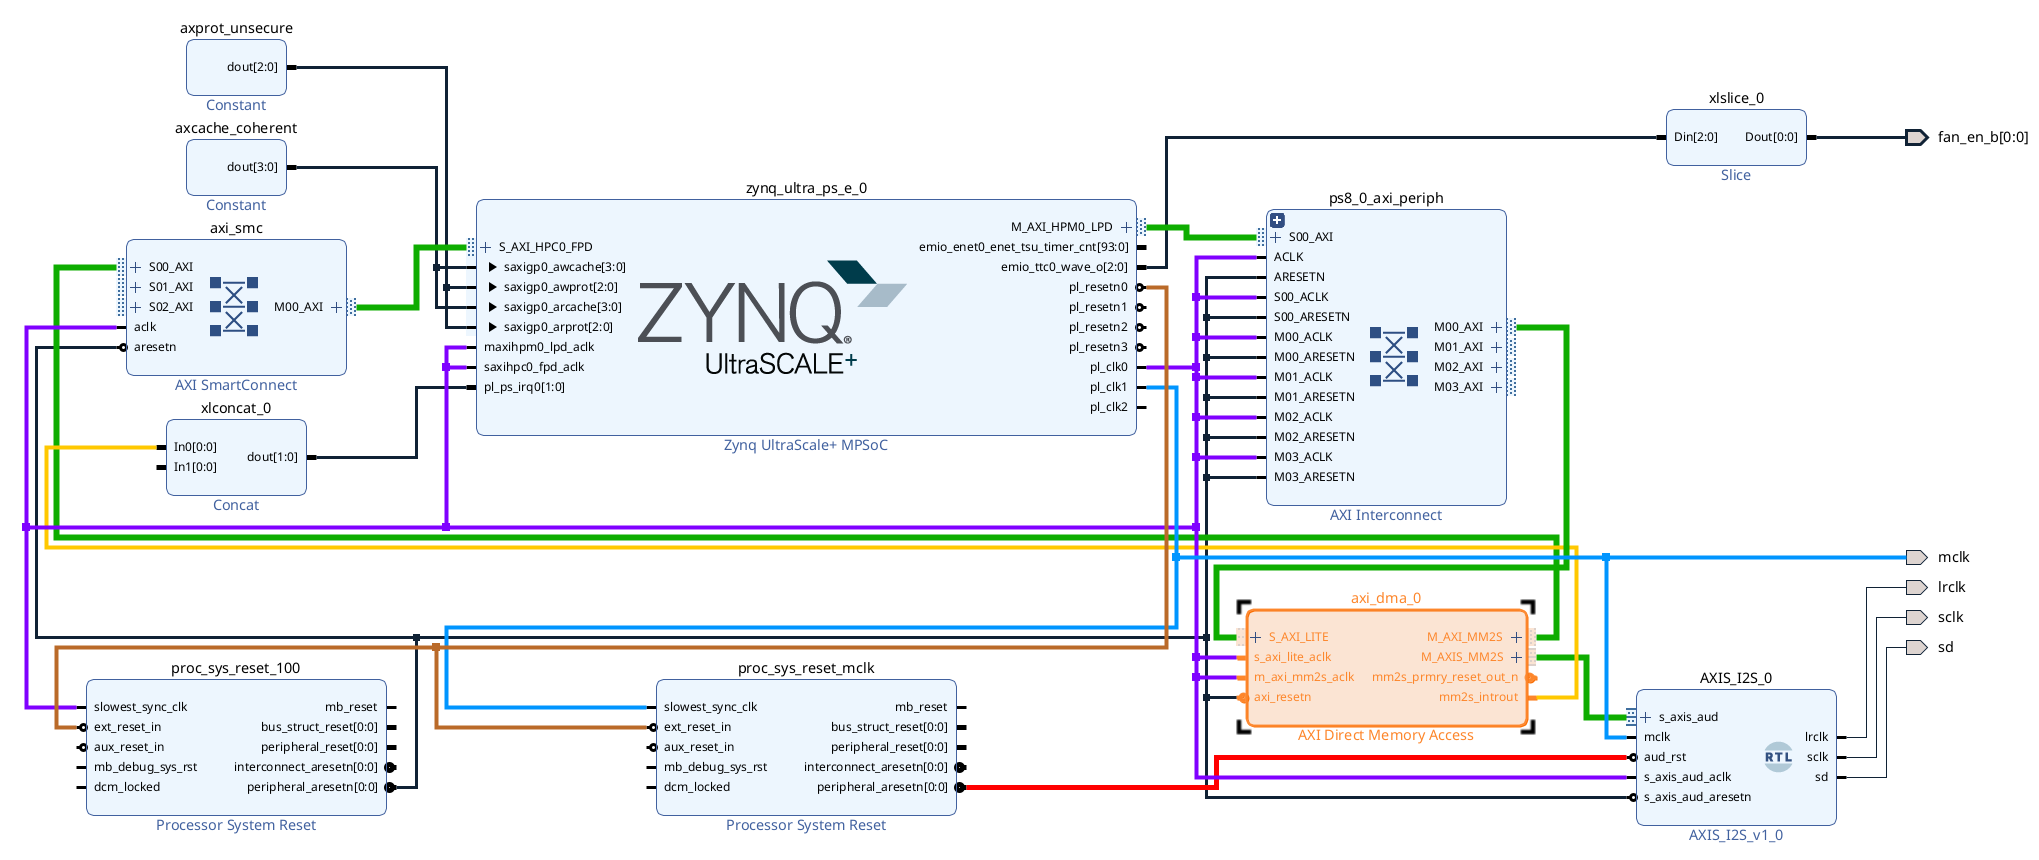
Ok, here is the block design I created for this project:
Green: DMA, Yellow: interruptPurple: 100MHz clock, Blue: 12.5MHz clockBrown: ext_reset, Black: reset@100Mhz, Red: reset@12.5Mhz
Enable the correct AXI interfaces:
To be able to use coherent allocations in the LKM for DMA the system needs to boot with an option CMA=1000M (which is set by default in the Ubuntu image for the Kria KR260, if you build your own petalinux, set this in the kernel configuration) and we need to configure 2 constants and connect them to the Zynq Ultrascale+ IP:
These are the clock settings for the Zynq Ultrascale+:
Some more detail on the AXI DMA IP, I disabled scatter gather and only needed the Read Channel, so disabled the Write Channel. I set the Address Width to 64 bits:
And do not forget to setup your platform and addresses:
When you have the design ready, build the bitstream and export the platform (including the bitstream).
Time to prepare the files for the KriaI am working in a folder /kria/KR260_base
yuri@ubuntu:~$ cd /kria/KR260_base
yuri@ubuntu:/kria/KR260_base$ cp KR260_base/KR260_base.runs/impl_1/kria_bd_wrapper.bin dma_file_transfer/kr260_dma.bit.bin
I will shorten the prompt from now on to gain some space. Next create the device tree for the overlay:
$ source /tools/Xilinx/Vitis/2024.1/settings64.sh
$ cd kr260_custom_platform
$ xsct
xsct% hsi::open_hw_design ../kr260_dma.xsa
xsct% createdts -hw ../kr260_dma.xsa -zocl -platform-name kr260_dma -git-branch xlnx_rel_v2024.1 -overlay -compile -out ./dtg_output_dma/
xsct% exit
And then you can compile the pl.dtsi to a pl.dtbo which is your second file you need to copy to the Kria.
$ cd dtg_output_dma/dtg_output_dma/kr260_dma/psu_cortexa53_0/device_tree_domain/bsp/
$ dtc -I dts -O dtb -o pl.dtbo pl.dtsi
$ cp pl.dtbo ../../../../../../../dma_file_transfer/kr260_dma.dtbo
The last file we need is shell.json, create this file in the dma_file_transfer folder, this is the content of that file:
{
"shell_type" : "XRT_FLAT",
"num_slots" : "1"
}Start up the Kria KR260 (using SD card or SSD disk), connect a network cable to your system, connect the Pmod and usb for checking the boot process via serial terminal.
Start a serial terminal (I use GTKTerm) to /dev/ttyUSB1 @ 115200 baud. When you boot from SSD you might have to press reset sometimes because it skipped the SSD boot and is waiting for a TFTP server. When it is booting the fan noise should diminish.
Configure ssh if you want, it simplifies logging in and copying files. Edit the authorized_keys file and add your public key. After that start the ssh server.
ubuntu@kria:~$ nano ~/.ssh/authorized_keys
ubuntu@kria:~$ sudo systemctl start ssh
Check your ip address, if you don't have any, check your internet sharing settings.Then copy the three files from your dma_file_transfer folder to the Kria and create a new application for your hardware design.
Note: you can also copy the files to the SD/SSD before inserting it in the Kria and booting. Copy them to the Writeable partition in /home/ubuntu
ubuntu@kria:~$ scp yuri@10.42.0.1:/kria/KDBase260/dma_file_transfer/* .
ubuntu@kria:~$ sudo mkdir /lib/firmware/xilinx/kr260_dma
ubuntu@kria:~$ sudo cp shell.json kr260_dma.bit.bin kr260_dma.dtbo /lib/firmware/xilinx/kr260_dma/
Start your new design:
ubuntu@kria:~$ sudo xmutil listapps
ubuntu@kria:~$ sudo xmutil unloadapp
ubuntu@kria:~$ sudo xmutil loadapp kr260_dma
Check dmesg to see if everything went ok, I have this running in a separate ssh session all the time (it will be useful when loading kernel modules):
ubuntu@kria:~$ sudo dmesg -wNow we can check if dma has been configured by looking at the reserved memory:
ubuntu@kria:~$ sudo cat /proc/iomemYou should see your dma address in the list.
Here we see the base address 0x8000_0000 is being mapped for dma, as defined in Vivado. We have been assigned dma17chan0. That dma17chan0 is the correct channel can be verified with:
ubuntu@kria:~$ ls /sys/class/dma/dma17chan0/device/of_node
'#dma-cells' clock-names clocks compatible dma-channel@80000000 interrupt-names interrupt-parent interrupts name reg xlnx,addrwidth xlnx,sg-length-widthNavigating the complexities of the task; moments of confusion and insight.
And now it's time for some Kernel Module coding. You can find the source code at the end of this story. The code has comments, I hope enough for you to understand. I might have not taken the best route, but the driver does it's basic job.
What the driver basically does is create a character device /dev/dma_audio_driver on initialization, to which a user, when given the permission, can write a path to a wav-file. Writing to the character driver summons a callback function. The driver will spawn a thread from within this function upon receiving a wav-file. This thread will allocate coherent memory to store chunks of the wav-file and start the dma controller to stream the audio data to the fpga which will start playing it. You write the data you want to transfer into the memory at address src_buf (this is what get_wav_chunk does), which gets mapped to the physical address at src_addr. You tell the DMA controller to transfer the data at address src_addr to the PL (using dmaengine_prep_slave_single).
Download the Makefile and dma_audio_driver.c to the Kria and run make:
ubuntu@kria:~/dma_audio_driver/$ makeThis should build your kernel driver without errors.
When you have a look at the code you will see that the DMA address we set in Vivado is in dst_addr:
slave_config.dst_addr = DMA_BASE_ADDRESS;update this address at the top of the file so that it corresponds to your design.
>> The Heart of the DragonFacing the ultimate challenge; a test of skill, resolve, and creativity.
Time to test our kernel module. I did not include any wav-file to not infringe copyrights. Use any 16-bit stereo 48kHz wav-file.Note: Use a wav-file with audio from Sean Connery in Dragonheart, the feeling of victory will be way more intense.
Build and use the Linux Kernel ModuleClean and build :
ubuntu@kria:~$ mkdir lkm
ubuntu@kria:~$ cd lkm
ubuntu@kria:~$ sudo apt install micro
ubuntu@kria:~$ micro dma_audio_driver.c
[copy the dma_audio_driver.c code at the bottom of this site into the file and save, Ctrl-Shift-V, Ctrl-S, Ctrl-Q]
ubuntu@kria:~$ micro Makefile[copy the lines of the Makefile at the bottom of this site into the file and save]
Build the Linux Kernel Module
ubuntu@kria:~/lkm$ makeWhen you have no errors, load the module into the kernel :
ubuntu@kria:~/lkm$ sudo insmod dma_audio_driver.koWatch the dmesg window, you will see some messages appear.
Using lsmod you could check of the module was loaded.
ubuntu@kria:~/lkm$ lsmod | grep dma_audio_driverCheck if the new character device has been created. You should see dma_audio_driver in the list.
ubuntu@kria:~/lkm$ ls /dev/dma*Update the user permissions of the character device, there are two ways to do this:
- Quick and dirty (you will have to do this each time you run insmod):
ubuntu@kria:~/lkm$ sudo chmod 666 /dev/dma_audio_driver- The "right way":
Check the device properties with udevadm and add a new rule.
ubuntu@kria:~/lkm$ sudo udevadm info -a -n /dev/dma_audio_driver
ubuntu@kria:~/lkm$ sudo micro /etc/udev/rules.d/99-dma-audio.rules
Add this line:
SUBSYSTEM=="dma_audio_class", KERNEL=="dma_audio_driver", MODE="0660", GROUP="audio"This gives users in the group "audio" read/write permissions to our driver. Check your groups using the groups command, audio should be in the list.
Next, reload the udev rules and trigger, the rights should have been updated and users in the group "audio" should have read/write access.
ubuntu@kria:~/lkm$ sudo udevadm control --reload-rules
ubuntu@kria:~/lkm$ sudo udevadm trigger
ubuntu@kria:~/lkm$ ls /dev/dma_audio_driver -al
If the group audio does not have permission to write to the device, check journalctl.
ubuntu@kria:~/lkm$ journalctl -u systemd-udevdFinally you can start playing sound by writing the path to the character device:
ubuntu@kria:~/lkm$ echo "/home/ubuntu/audio.wav" > /dev/dma_audio_driverSound should be playing now. Make sure the Pmod jumper is set to slave mode and connect headphones or speakers to the mini-jack output (green).
Removing the driver can be done as such:
ubuntu@kria:~/lkm$ sudo rmmod dma_audio_driverTriumphing over the dragon; reflecting on the scars and lessons learned.
So, this is the end of our journey. I hope you had some fun while learning... You have taken the first step into writing your own drivers, but there is a lot more to learn. There are several things to do now:
- Read chapters 11.6 Data Movement Fundamentals and 12.3 Linux Software Stack in the book Exploring Zynq MPSoc, this book has a lot of interesting information...
- Learn about IOCTL, a way to control/use your kernel from a user space program
- I intentionally did not opt for a UIO Driver, have a look at UIO it is nice!
- Add more error-checks in the Linux Kernel Module
- Automate the loading of the driver by adding it in /etc/modules
- Removing the module should first check if there is no thread playing sound
- Improve the LKM to be able to create multiple devices so multiple streams can be sent to the PL, you might want to get to know MCDMA and have a look at the dma-proxy-test.c, MCDMA uses scatter gather with buffer descriptors.
- Add some feedback via the character device to know if it is transferring data (playing) or not
Sharing the knowledge gained, empowering others, and preparing for the next journey.
You can add filters in the hardware design that will shape the sound. Or maybe add another DMA channel to start mixing sound? How about adding reverb or other effects?
Now you understand the drivers better, go and read about continue with MCDMA in my next article.


Comments