Hardware components | ||||||
| × | 1 | ||||
| × | 1 | ||||
| × | 1 | ||||
Software apps and online services | ||||||
![]() |
| |||||
![]() |
| |||||
![]() |
| |||||
![]() |
| |||||
![]() |
| |||||
![]() |
| |||||
| ||||||
![]() |
| |||||
![]() |
| |||||
Hand tools and fabrication machines | ||||||
![]() |
| |||||
![]() |
|
• Meeting rooms within companies and offices premises are often under utilization at an expensive building cost;
• Majority of companies utilizes MS Azure AD as company Active Directory for corporate user identities handling, MS Outlook as email and calendar platforms, and where meeting rooms are seen as resources type of users, owning mailboxes and been handled/booked via MS Outlook (administrated via o365 admin console);
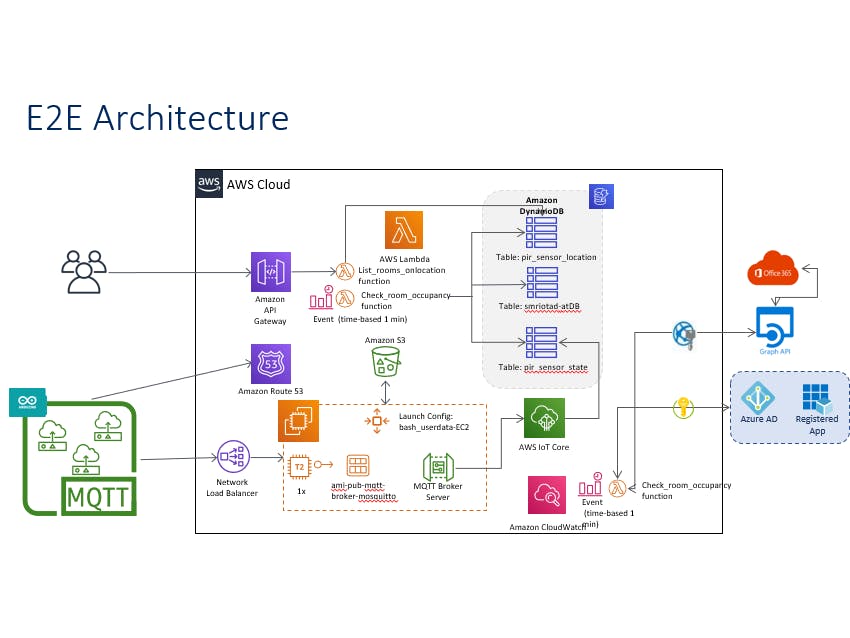
• To improve meeting rooms utilization and provide enhanced location based meeting rooms availability, this project integrates motion sensors into meeting rooms, where motion detection (PIR) and location (Google Wi-Fi Geolocation API) telemetric info is provided to backend non-SQL database (AWS DynamoDB) and applications (AWS Lambda), where this info is transformed into meaningful data for automatic meeting rooms reservation released due no activity/usage and provide to end-users closest available meeting rooms for utilization, based or their location.
• Sensors telemetry data is sent using MQTT (Message Queuing Telemetry Transport)protocol towards a MQTT broker (Mosquitto Server deployed in a AWS EC2 and S3), which in turns is integrated with AWS IoT (using TLS authentication) and backend non-SQL DB as mentioned above. •For prototyping purposes, client app is developed using Python, making using of Google Wi-Fi based Geolocation and AWS API Gateway, also integrated with backend AWS Lambada applications for meeting room lookup purposes.
This is a work in progress with final goal to have a full programmatic“one-click” server-side architecture using AWS Cloud Formation for MQTT Broker/ IoT Core / Cloud Watch and back-end Lambda functions. I will update thisproject continuously. Project Roadmap update will be shared soon.
How to read and use it?Please consider the enclosed PDF slide-pack presentation for overall details of the project. All documented codes and configuration files attached directly to this project. AWS services configuration / screenshots are available at the slide-pack too.
Summary of the Steps (details at slide-pack)
- Step 1 - Build and Configure IoT Sensor (Slides 4-5)
- Step 2 - Instantiate and Configure EC2 Mosquitto MQTT Broker (Slides 6-7)
- Step 3 - AWS IoT Core Configuration and DynamoDB tables (Slide 8 and 17)
- Step 4 - AWS Lambda Function and CloudWatch event rule (Slides 9-12)
- Step 5 - AWS API Gateway endpoint (Slide 13)
- Step 6 - Desktop App (Slide 14)
- Step 7 - Microsoft Azure AD and o365 Exchange Online (Slides 15-16)
Mosquitto MQTT Broker Server Setup
MQTT Broker AMI based on Mosquitto 1.4.5 is available at UE-EAST-1 region (N. Virginia), as found below. Just select Community AMIs at left frame and search by “mqtt” string.
Launch Configuration for ASG can be created using indicated AMI and attached “user-data” in order to automate a couple tasks, such as “MQTT broker thing” creation at IoT Core, configuration of Mosquitto broker, etc. Zip file contains Broker configuration files, http index file (for http server used for Network Load Balancing monitoring) and customized init.d/mosquitto service file (stored in a S3 bucket and downloaded via VPC endpoint to avoid public access). In order to run under AWS free tier, ASG is made of 1 desired/max EC2 VM.
PublishPIRSensor-MQTTadafruit - pub.ino
Arduinoconst char* googleApiKey = "xxxxxxxxxxxxxxxxxxxx";
char ssid[] = "xxxxxx";
char pass[] = "xxxxxx";
googleApiKey has to be acquired from https://developers.google.com/maps/documentation/geolocation/intro, where billing details has to be provided. In case do you exceed the free tier credit, this will not incur in any charge. Note that the code request Geolocation of the microcontroller once at power-on, so it is unlikely that you exceed the free tier credit, even you decide to use for dozens of rooms.
SSID from closest access point is required, along with password. pass is optional and is required when WPA/WPA2 auth method is used instead of open access.
MQTT Broker details:
#define host “<MQTT Broker IP address or FQDN if DNS is used: i.e.: AWS Route53>“
#define clientid "<prefix>-meetingroom1“
//Common prefix is used to implement some level of access control at MQTT Broker Server
//clientid also must match user-part of room mailbox address, configured via o365 admin
#define username "sensor1“
#define password "sensor123“
//username and password is used for ACL purposes too at MQTT Broker side. More details will be provided MQTT Server side.
/*
* Publish/Subscribe MQTT PIR Sensors for Smart Meeting Rooms IoT Use Cases
*
* Copyright (C) 2019 Fabio R. Caetano fabior_bra@yahoo.com.br
*
*
* This file is distributed in the hope that it will be useful, but without any warranty; without even
* the implied warranty of merchantability or fitness for a particular purpose.
*/
#include <WiFi101.h>
#include <WifiLocation.h>
#include <SPI.h>
#include "Adafruit_MQTT.h"
#include "Adafruit_MQTT_Client.h"
const char* googleApiKey = "xxxxxxxxxxxxxxxxxxxxxxxxxxxxxxxxxxx";
char ssid[] = "xxxxxx";
char pass[] = "xxxxxx";
#define host "<MQTT Broker IP address or FQDN>"
//if DNS is used: i.e.: AWS Route53>"
#define clientid "<prefix>-meetingroom1"
//clientid must match user-part of room mailbox address, configured via o365 admin
#define username "sensor1"
#define password "sensor123"
String mqttpayload1;
String mqttpayload2;
String mqttpayload3;
WiFiClient wificlient;
Adafruit_MQTT_Client mqttclient(&wificlient, host, 1883, clientid, username, password);
WifiLocation location(googleApiKey);
int ledPin = 13; // choose the pin for the LED
int inputPin = 5; // choose the input pin (for PIR sensor)
int pirState = LOW; // we start, assuming no motion detected
int val = 0; // variable for reading the pin status
int status = WL_IDLE_STATUS;
// You don't need to change anything below this line!
#define halt(s) { Serial.println(F( s )); while(1); }
/****************************** Feeds ***************************************/
// Setup a feed called 'sensor/#' for publishing.
// Notice MQTT paths for AIO follow the form: <username>/feeds/<feedname>
Adafruit_MQTT_Publish topiclocation = Adafruit_MQTT_Publish(&mqttclient, "pir_sensor/location/" clientid);
Adafruit_MQTT_Publish topicstate = Adafruit_MQTT_Publish(&mqttclient, "pir_sensor/state/" clientid);
// Setup a feed called 'onoff' for subscribing to changes.Future use only. intended to trigger monitoring only when room is booked.
Adafruit_MQTT_Subscribe onoffmonitor = Adafruit_MQTT_Subscribe(&mqttclient, "pir_sensor/onoffmonitor");
/*************************** Sketch Code ************************************/
void setup() {
WiFi.setPins(8,7,4,2);
// while (!Serial);
Serial.begin(115200);
Serial.println(F("Adafruit MQTT demo for WINC1500"));
// Initialise the Client
Serial.print(F("\nInit the WiFi module..."));
// check for the presence of the breakout
if (WiFi.status() == WL_NO_SHIELD) {
Serial.println("WINC1500 not present");
// don't continue:
while (true);
}
Serial.println("ATWINC OK!");
pinMode(ledPin, OUTPUT); // declare LED as output
pinMode(inputPin, INPUT); // declare sensor as input
mqttclient.subscribe(&onoffmonitor);
MQTT_connect(); // Call once on setup to send Room Sensor Location
location_t loc = location.getGeoFromWiFi();
Serial.println("Location request data");
Serial.println(location.getSurroundingWiFiJson());
Serial.println("Latitude: " + String(loc.lat, 7));
Serial.println("Longitude: " + String(loc.lon, 7));
Serial.println("Accuracy: " + String(loc.accuracy));
mqttpayload1 = "{\"Location\": \"";
mqttpayload2 = "\"}";
mqttpayload3 = mqttpayload1 + String(loc.lat, 7) + String(",") + String(loc.lon, 7) + String(",") + String(loc.accuracy) + mqttpayload2;
const char *publishloc = mqttpayload3.c_str();
Serial.println(publishloc);
topiclocation.publish(publishloc);
}
void loop() {
// Ensure the connection to the MQTT server is alive (this will make the first
// connection and automatically reconnect when disconnected). See the MQTT_connect
// function definition further below.
MQTT_connect();
// this is our 'wait for incoming subscription packets' busy subloop
Adafruit_MQTT_Subscribe *subscription;
while ((subscription = mqttclient.readSubscription(5000))) {
if (subscription == &onoffmonitor) {
Serial.print(F("Got: "));
Serial.println((char *)onoffmonitor.lastread);
if (0 == strcmp((char *)onoffmonitor.lastread, "OFF")) {
digitalWrite(ledPin, LOW);
}
if (0 == strcmp((char *)onoffmonitor.lastread, "ON")) {
digitalWrite(ledPin, HIGH);
}
}
}
val = digitalRead(inputPin); // read input value
if (val == HIGH) { // check if the input is HIGH
digitalWrite(ledPin, HIGH); // turn LED ON
if (pirState == LOW) {
// we have just turned on
mqttpayload1 = "{\"State\": \"Detected\"}";
const char *publishstate = mqttpayload1.c_str();
Serial.println(publishstate);
topicstate.publish(publishstate);
// We only want to print on the output change, not state
pirState = HIGH;
}
} else {
digitalWrite(ledPin, LOW); // turn LED OFF
if (pirState == HIGH){
// we have just turned of
mqttpayload1 = "{\"State\": \"End\"}";
const char *publishstate = mqttpayload1.c_str();
Serial.println(publishstate);
// topicstate.publish(publishstate);
// We only want to print on the output change, not state
pirState = LOW;
}
}
}
// Function to connect and reconnect as necessary to the MQTT server.
// Should be called in the loop function and it will take care if connecting.
void MQTT_connect() {
int8_t ret;
// attempt to connect to Wifi network:
while (WiFi.status() != WL_CONNECTED) {
Serial.print("Attempting to connect to SSID: ");
Serial.println(ssid);
// Connect to WPA/WPA2 network. Change this line if using open or WEP network:
status = WiFi.begin(ssid, pass);
// wait 10 seconds for connection:
uint8_t timeout = 10;
while (timeout && (WiFi.status() != WL_CONNECTED)) {
timeout--;
delay(1000);
}
}
// Stop if already connected.
if (mqttclient.connected()) {
return;
}
Serial.print("Connecting to MQTT... ");
while ((ret = mqttclient.connect()) != 0) { // connect will return 0 for connected
Serial.println(mqttclient.connectErrorString(ret));
Serial.println("Retrying MQTT connection in 5 seconds...");
mqttclient.disconnect();
delay(5000); // wait 5 seconds
}
Serial.println("MQTT Connected!");
}
Check_room_occupancy Lambda Function
PythonDeployment package (Python 3.7) found attached. Please note that it is greater than 3MB and and it is not possible to edit the code at lambda GUI directly. Environment variables are found at enclosed slide-pack and Azure AD related variables values ( where to locate?), are found at slide 15.
How to upload the deployment package: i.e.: aws lambda update-function-code --function-name Check_room_occupancy --zip-file fileb://Check_room_occupancy.zip
No preview (download only).
List_rooms_onlocation Lambda Function
PythonDeployment package written in Python 3.7 and environment variables used are found at the enclosed slide-pack.
API Gateway configuration found in the slide-pack enclosed.
No preview (download only).
Mosquitto MQTT Broker Server EC2 - User Data scripts
BatchFile#!/bin/bash
yum -y update
#Configure the CLI with your region, leave access/private keys blank
aws configure set default.region us-east-1
#Create a Broker Thing
aws iot create-thing --thing-name "mosquittobroker"
#Create an IAM policy for the bridge
aws iot create-policy --policy-name bridge --policy-document '{"Version": "2012-10-17","Statement": [{"Effect": "Allow","Action": "iot:*","Resource": "*"}]}'
#Place yourself in Mosquitto directory
#And create certificates and keys, note the certificate ARN
mkdir -p /etc/mosquitto/certs/
cd /etc/mosquitto/certs/
aws iot create-keys-and-certificate --set-as-active --certificate-pem-outfile cert.crt --private-key-outfile private.key --public-key-outfile public.key --region us-east-1
#List the certificate and copy the ARN in the form of
# arn:aws:iot:us-east-1:[AWS Account ID]:cert/xyzxyz
aws iot list-certificates --max-items 1 > iot-last-certificate.txt
#Attach the policy to your certificate
aws iot attach-principal-policy --policy-name bridge --principal arn:aws:iot:us-east-1:[AWS Account ID]:cert/`cat iot-last-certificate.txt |grep certificateArn|tr -d '",'|awk -F 'certificateArn:' '{print substr($2,42)}'`
#Attach the policy to your thing
aws iot attach-thing-principal --thing-name "mosquittobroker" --principal arn:aws:iot:us-east-1:[AWS Account ID]:cert/`cat iot-last-certificate.txt |grep certificateArn|tr -d '",'|awk -F 'certificateArn:' '{print substr($2,42)}'`
#Add read permissions to private key and client cert
chmod 644 private.key
chmod 644 cert.crt
#Download root CA certificate
wget https://www.symantec.com/content/en/us/enterprise/verisign/roots/VeriSign-Class%203-Public-Primary-Certification-Authority-G5.pem -O rootCA.pem
#download the configuration file from S3
cd /etc/mosquitto
aws s3 cp --recursive s3://[mqtt-broker-S3bucket]/conf/ .
chmod 666 logfile.log
chmod -R 777 persistent/
#download http index file from S3
cd /var/www/html
aws s3 cp --recursive s3://[mqtt-broker-S3bucket]/www/ .
chmod 666 index.html
#Starts Mosquitto in the background
mosquitto -d -c /etc/mosquitto/bridge.conf
#Enable Mosquitto to run at startup automatically
cd /etc/init.d
aws s3 cp s3://[mqtt-broker-S3bucket]/init.d/mosquitto .
chmod 755 mosquitto
chkconfig --level 345 mosquitto on
chkconfig --level 345 httpd on
Client Desktop App
PythonRun it using c:\python .\getFreeRoomsLocation.py
Or use pyinstaller for executable creation and easy distribution. Suggest to pack it one directly instead of one file due performance purposes:
What to configure/customize?
# Google Geoloction api-endpoint + Key
URL = "https://www.googleapis.com/geolocation/v1/geolocate?key=xxxxxxxxxxxxxxxxxxxxxxxxxx"
# api-gateway endpoint, found at AWS API Gateway GUI, left frame menu "Dashboard" of concerned API
URL_APIG = "https://xxxxxxxxxxxxxxxxxxxxxxxxxx"
import subprocess
import operator
import requests
import json
import os
import sys
class DecimalEncoder(json.JSONEncoder):
def default(self, o):
if isinstance(o, decimal.Decimal):
if o % 1 > 0:
return float(o)
else:
return int(o)
return super(DecimalEncoder, self).default(o)
def bssidlist (ssids):
# This function order the list of MAC addresses by RSSI (signal strenght) and return the top 3
sorted_keys = sorted(ssids, key=lambda x: (ssids[x]['Signal']), reverse=True)
# print(sorted_keys)
aplist = list()
for x in sorted_keys:
# print(ssids[x]['BSSID'])
aplist.append(ssids[x]['BSSID'])
return aplist[:3]
def fetchUlocation (macaddr):
# This function calls Google Geolocation API based on Wi-Fi Access Points MAC addresses and respective RSSI
# api-endpoint
URL = "https://www.googleapis.com/geolocation/v1/geolocate?key=xxxxxxxxxxxxxxxxxxxxxxxxxx"
# data to be sent to api
macdata0 = "{'considerIp': 'false', 'wifiAccessPoints': ["
macdata1 = "{'macAddress': '"
macdata2 = "'}, {'macAddress': '".join(macaddr)
macdata3 = "'}]}"
macdata = json.dumps(macdata0+macdata1+macdata2+macdata3)
macdata = macdata.strip('"')
# print(macdata)
#headers
headers = {"content-type": "application/json charset=utf-8"}
# sending post request and saving response as response object
r = requests.post(URL, data = macdata, headers = headers)
# extracting response text
pastebin_url = r.json()
# print("The pastebin URL is:%s"%pastebin_url)
return pastebin_url
def fetchrooms (user_geoloc):
#This function calls AWS API Gateway endpoint which in turns calls lambda function List_rooms_onlocation, it provides rooms location and #get in return the closest available rooms
# api-gateway endpoint
URL_APIG = "https://xxxxxxxxxxxxxxxxxxxxxxxxxx"
# data to be sent to api
#user_geoloc = user_geoloc.strip('"')
# print(user_geoloc['location'])
#params
params = {'Latitude': user_geoloc['location']['lat'], 'Longitude': user_geoloc['location']['lng']}
#headers
headers_get = {"content-type": "application/json"}
# sending get request and saving response as response object
req = requests.get(URL_APIG, params=params, headers = headers_get)
# extracting response text
resp = req.json()
return resp
def main():
results = subprocess.check_output(["wifi", "scan"])
results = results.decode('utf-8') # needed in python 3
results = results.replace("\r","")
ls = results.split("\n")
ls = ls[4:]
ssids = {}
ssids_hlist = {}
x = 0
y = 0
r = 0
while x < len(ls):
if "BSSID" in ls[x]:
ssids_add = {
'BSSID' : ls[x].replace(" ","")[7:],
'Signal': ls[x+1].replace(" ","")[7:]
}
ssids[y] = ssids_add
y += 1
x += 1
geoloc = fetchUlocation(bssidlist(ssids))
list_rooms = fetchrooms(geoloc)
os.system('cls') # on windows
print("\n\n\n")
for r in list_rooms:
print(r['Room'],"is available at",int(r['Distance']),"meters")
print("\n\n\n")
input('Press any key to exit')
main()
Comments
Please log in or sign up to comment.